How to add extra workspaces
If you find that having nine workspaces is not enough then this guide shows how to add extra workspaces that are hidden by default.
First we should look at the workspace rules which defines the existing workspaces:
static const WorkspaceRule wsrules[] = {
	/*                                                                     schemes ------ icons ------
	   name,  monitor,  pinned,  layout,  mfact,  nmaster,  nstack,  gaps, ...     def,   vac,  occ,  */
	{  "1",   -1,       0,       0,       -1,    -1,       -1,      -1,    ...     "1",   "",   "[1]", },
	{  "2",   -1,       0,       9,       .80,   -1,       -1,      -1,    ...     "2",   "",   "[2]", },
	{  "3",   -1,       0,       0,       -1,    -1,       -1,      -1,    ...     "3",   "",   "[3]", },
	{  "4",   -1,       0,       0,       -1,    -1,       -1,      -1,    ...     "4",   "",   "[4]", },
	{  "5",   -1,       0,       0,       -1,    -1,       -1,      -1,    ...     "5",   "",   "[5]", },
	{  "6",   -1,       0,       0,       -1,    -1,       -1,      -1,    ...     "6",   "",   "[6]", },
	{  "7",   -1,       0,       10,      .75,   -1,       -1,      -1,    ...     "7",   "",   "[7]", },
	{  "8",   -1,       0,       1,       -1,    -1,       -1,      -1,    ...     "8",   "",   "[8]", },
	{  "9",   -1,       0,       0,       -1,    -1,       -1,      -1,    ...     "9",   "",   "[9]", },
};
Now we will want to add a few more workspaces to this list.
	{  "10",  -1,       0,       15,      -1,    -1,       -1,      -1,    ...     "",    "E1", "[E1]", },
	{  "11",  -1,       0,       9,       .80,   -1,       -1,      -1,    ...     "",    "E2", "[E2]", },
	{  "12",  -1,       0,       14,      -1,    -1,       -1,      -1,    ...     "",    "E3", "[E3]", },
This example adds three more workspaces, but you can add as many as you want.
Note the workspace names of "10", "11" and "12" as we will refer to them later. If we compare the above to the original rules you may notice that the icons define an empty string for the default workspace icon and "E1", "E2", etc. for the vacant icon.
The effect of this is that the workspaces will not be shown in the bar by default, but will show "E1", "E2", etc. when selected. The last column contains the icon that is displayed when the workspace is occupied by clients. For more details on this refer to the workspace module page.
OK, so now we have defined three more workspaces, but how do we get to them?
I would recommend adding keyboard shortcuts for the new workspaces, but you do not strictly have to. Feel free to skip the next section.
The existing keybindings look like this in config.h:
	WSKEYS(MODKEY,                              XK_1,            "1")
	WSKEYS(MODKEY,                              XK_2,            "2")
	WSKEYS(MODKEY,                              XK_3,            "3")
	WSKEYS(MODKEY,                              XK_4,            "4")
	WSKEYS(MODKEY,                              XK_5,            "5")
	WSKEYS(MODKEY,                              XK_6,            "6")
	WSKEYS(MODKEY,                              XK_7,            "7")
	WSKEYS(MODKEY,                              XK_8,            "8")
	WSKEYS(MODKEY,                              XK_9,            "9")
This is using the WSKEYS macro to streamline the keybindings for consistency.
Let's add keybindings for the workspaces we added. My dilemma here is that I do not have enough spare keys on my keyboard for this, especially if adding up to nine extra workspaces.
You could potentially use the F1, F2 keys etc. but personally I find those better used to start commonly used applications.
In this example I am using a separate modifier key bound to Mod3Mask (AltGr macro).
	WSKEYS(AltGr,                               XK_1,            "10")
	WSKEYS(AltGr,                               XK_2,            "11")
	WSKEYS(AltGr,                               XK_3,            "12")
Note the "10", "11" and "12" here, these are the workspace names referred to earlier. We could have named them "E1", "E2", etc. but using plain numbers here to avoid confusion between the workspace names and icons.
How to set up additional modifiers would be a topic for another guide, but in short you can do this
using xmodmap.
Here is an example repurposing the right control key into a mod3.
$ cat ~/.Xmodmap
clear control
add control = Control_L
clear mod3
add mod3 = Control_R
By default both left and right control keys are bound to trigger control in the same way that it does not matter if you use the left or right shift key to type a capital letter. The above is first clearing the control modifier and adding the left control back in, then it clears mod3 and adds the right control as mod3.
$ xmodmap ~/.Xmodmap
$ xmodmap
xmodmap:  up to 4 keys per modifier, (keycodes in parentheses):

shift       Shift_L (0x32),  Shift_R (0x3e)
lock        Caps_Lock (0x42)
control     Control_L (0x25)
mod1        Alt_L (0x40),  Meta_L (0xcd)
mod2        Num_Lock (0x4d)
mod3        Control_R (0x69)
mod4        Super_L (0x85),  Super_R (0x86),  Super_L (0xce),  Hyper_L (0xcf)
mod5        ISO_Level3_Shift (0x5c),  Mode_switch (0xcb)
Moving on, let's see these in action.
There are many ways to get to the new workspaces. Obviously if you have added keyboard shortcuts you can just use those to navigate to them.
Now let us look at a few alternative ways to get to the hidden workspaces.
By default the keybinding of Super+0 will trigger the viewalloccwsonmon
function showing all workspaces that have clients on them. That is not good here.
The keybinding of Super+Ctrl+0, however, trigger the viewallwsonmon function
which shows all workspaces on the current monitor.
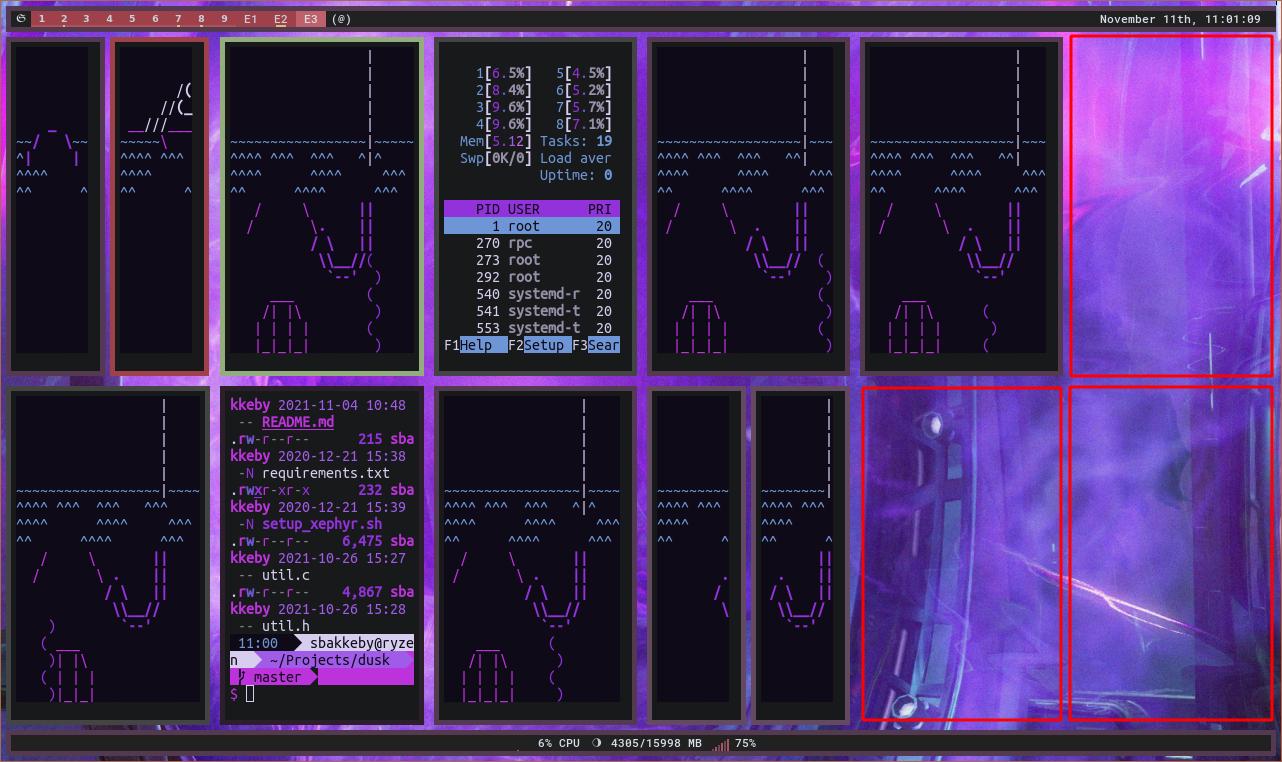
In the screenshot above I intentionally occupied all nine workspaces with clients and I highlighted using three red squares to show where the new workspaces of "E1", "E2", and "E3" reside. In this view you can also drag clients across if that is your thing, but there are better ways.
From here you can also click on the extra workspace icons to move to those workspaces.
The AltWorkspaceIcons functionality is intended as a way to temporarily show the workspace names rather than the icons.
There are no keybindings for this, but you can toggle this during runtime using the dusk client:
$ duskc run_command toggle AltWorkspaceIconsBy default with the AltWorkspaceIcons being off:

and with it being on:

From here you can also click on the extra workspace icons to move to those workspaces.
By default the keybindings Super+period / Super+comma (or Super+Tab / Super+Shift+Tab)
will trigger the viewwsdir function and move to the next workspace in the given
direction that has clients on them. That is not good here.
The default keybindings Super+Ctrl+period / Super+Ctrl+comma, however, strictly moves to the
next workspace in the given direction regardless of whether they have clients or not.

In the same way you could use the Super+Ctrl+Alt+period / Super+Ctrl+Alt+comma triggering the
movewsdir function to move the currently selected window in any direction.
You can also switch to a workspace using the dusk client, here is an example:
$ duskc run_command viewwsbyname "11"
{"result":"success"}
This is again referring to the workspace name and "11" will bring you to the "E2" workspace.
dusk supports changing the workspace using external tools. Here is an example using xdotool
to move to the "E2" workspace.
This is merely based on the number of "desktops" in the system.
$ xdotool get_num_desktops
12
Setting the desktop is merely done using the workspace index which means that workspace 1 will have the index of 0. To get to our workspace "E2" we therefore need to ask for the desktop with index 10.
$ xdotool set_desktop 10
How to move my windows to a hidden workspace
If you have set up keybindings for the extra workspaces then you can use the movetowsbyname, movealltowsbyname, moveallfromwsbyname or swapwsbyname using those.
If you did not set up keybindings then you can still use e.g. Super+Ctrl+7 to swap the clients
on the current workspace with the clients on workspace 7.
Alternatively you can trigger these using the dusk client, e.g. this will move all the client windows on the current workspace to our new "E2" workspace.
$ duskc run_command movealltowsbyname 11
{"result":"success"}
You can also use the moveallfromwsbyname function to move all the windows
from, e.g. workspace 7, to the current workspace. This can be done by moving to the "E2" workspace
as an example and then using the default keybinding of Super+Ctrl+Alt+7 to move the windows
across. This is also available via the dusk client.
NB: In principle adding workspaces dynamically during runtime is something that would be possible to implement, but that has some implications like not having keybindings for the new workspaces and they would all end up having generic icons and generic arrangements.
NB: It is also possible to designate workspaces to belong to a specific monitor as outlined in the How to set up workspaces per monitor guide.
Back to Guides.