Git and Github
In the first instance, all repositories should be created using the ACCESS-NRI General Repository Template which contains the correct software COPYRIGHT and LICENSE information.
Repositories should always have a README.md providing a description of the repo purpose, content and any useful links / references. The more detailed documentation that can be provided here the better.
Repository names should have unique, all lower-case names with words separated by hyphen/dashes. Ideally repo names should be as semantic as possible. Examples:
repomy-repomy-more-complex-repo
Permanent branches should contain two default branches:
-
main(ormasterfor legacy repositories)- Fully tested code ready for release
-
development- For release-candidate code ready to be tested
To add a new feature to an existing development branch, first create an issue to both describe the new feature and/or problem being solved, and generate a unique issue number for tracking. Feature branches should be as short-lived as possible and reference an issue directly (where possible). Issues should be closed when feature branches are merged or terminated.
All feature branches should be named using the naming convention described above prefixed with a unique issue number.
[issue number]-[short-name-separated-by-hyphens]
Examples:
9-some-issue12-some-other-issue
See here.
All direct Github actions (e.g. repo creation, naming etc) follow the Git style guide above.
- Use the anu.edu.au email address for your commits
- Enable two-factor authentication
- Enable commit signing
Two-factor authentication is an important security measure to protect your account and all ACCESS-NRI Staff must enable it. Outside contributors with write access to ACCESS-NRI Organisation repos are also required to enable 2FA.
There is extensive GitHub documentation covering how to enable 2FA.
Some notes:
- It is a good idea to configure more than one 2FA method in case you lose access
- Both BitWarden and Microsoft Authenticator are TOTP apps that are already in use by many in the organisation
- The GitHub Mobile app is also a convenient 2FA method
- Check that the Pull Request is actually "green-lit" for review before reviewing.
- Checkout the PR branch and inspect entire files as required. e.g. Search for variables that have been removed.
- The task of the reviewer is to review code, not to trigger the merge.
- The creator of the PR shall include details of the testing that was completed.
- The Assignee is responsible for triggering the merge.
- Be clear and concise: Explain the problem or issue in as few words as possible. Be specific and provide all relevant details.
- Short and descriptive title: The title is the most visible part of your issue, you want it short and to the point.
- Provide context: Explain why the problem is important and how it affects you or others. Provide any relevant background information that will help others understand the issue.
- Provide a way to reproduce the issue: Clearly outline the steps needed to reproduce the issue, and provide any relevant logs or error messages. Ideally include a Minimal Complete Verifiable Example (MCVE).
- Include relevant files or code: If the issue is related to a specific file or piece of code, include it in the issue description.
- Provide a desired outcome: Explain what you expect to happen when the issue is resolved.
- Use proper grammar and spelling: Poor grammar and spelling can make it difficult for others to understand your issue, so be sure to proofread your message before submitting it.
- Be respectful: Treat others as you would like to be treated. Be respectful and polite in your interactions with others, even if you are frustrated or upset.
- Use relevant labels: Use relevant labels to help others quickly identify the type of issue you are reporting.
- Provide updates: Keep the issue updated as you continue to work on it, and provide any additional information that may be helpful to others.
By following these guidelines, you can help ensure that your GitHub issue is clear, concise, and easy for others to understand and work on.
Empty issues are an anti-pattern. There should be some descriptive text in the body of the issue. Not only is it good practice, an empty issue sends a message, and it isn't a good one.
Pull requests should always be associated with an issue. The issue is for outlining the problem, discuss approaches and background. The pull request is where the codebase is updated to fix the related issue, including detailed code review.
Signed commits are very important.
Git by itself does not track and validate user action on commits. This means you can easily impersonate someone else and push commits under their name (for more information, refer to Why You Should Sign All Your Git Commits).
-
Generate a new SSH key
If you don't have one already, generate a new SSH key and add your ssh key to the ssh-agent. -
Add your public SSH key to GitHub
If you don't have an SSH already added to GitHub, add the SSH key to your GitHub account. -
Set up signed commits with SSH
To set up signed commits using SSH run the following commands (by substituting the path to your public SSH key):git config --global gpg.format ssh git config --global user.signingkey ~/.ssh/<path-to-your-ssh-key.pub> -
Set up signed commits globally
To set Git to sign all commits globally by default, run:git config --global commit.gpgsign true -
Create an allowed signers file
The allowed signers file is a list of trusted public SSH keys that tell Git who is allowed to sign commits.
To create the file run the following commands (by substituting your email and public SSH key content):Then, to inform Git about this file, use the following command:mkdir -p ~/.config/git cat > ~/.config/git/allowed_signers <<< "<your@email.address> <your-public-ssh-key-content>"git config --global gpg.ssh.allowedSignersFile ~/.config/git/allowed_signers -
Add your public SSH key as a signing key to GitHub
In GitHub's Settings, go to the SSH and GPG keys panel.
Click on "New SSH key" and change the "Key type" to Signing Key.
Copy your public SSH key content in the box and click on "Add SSH key".
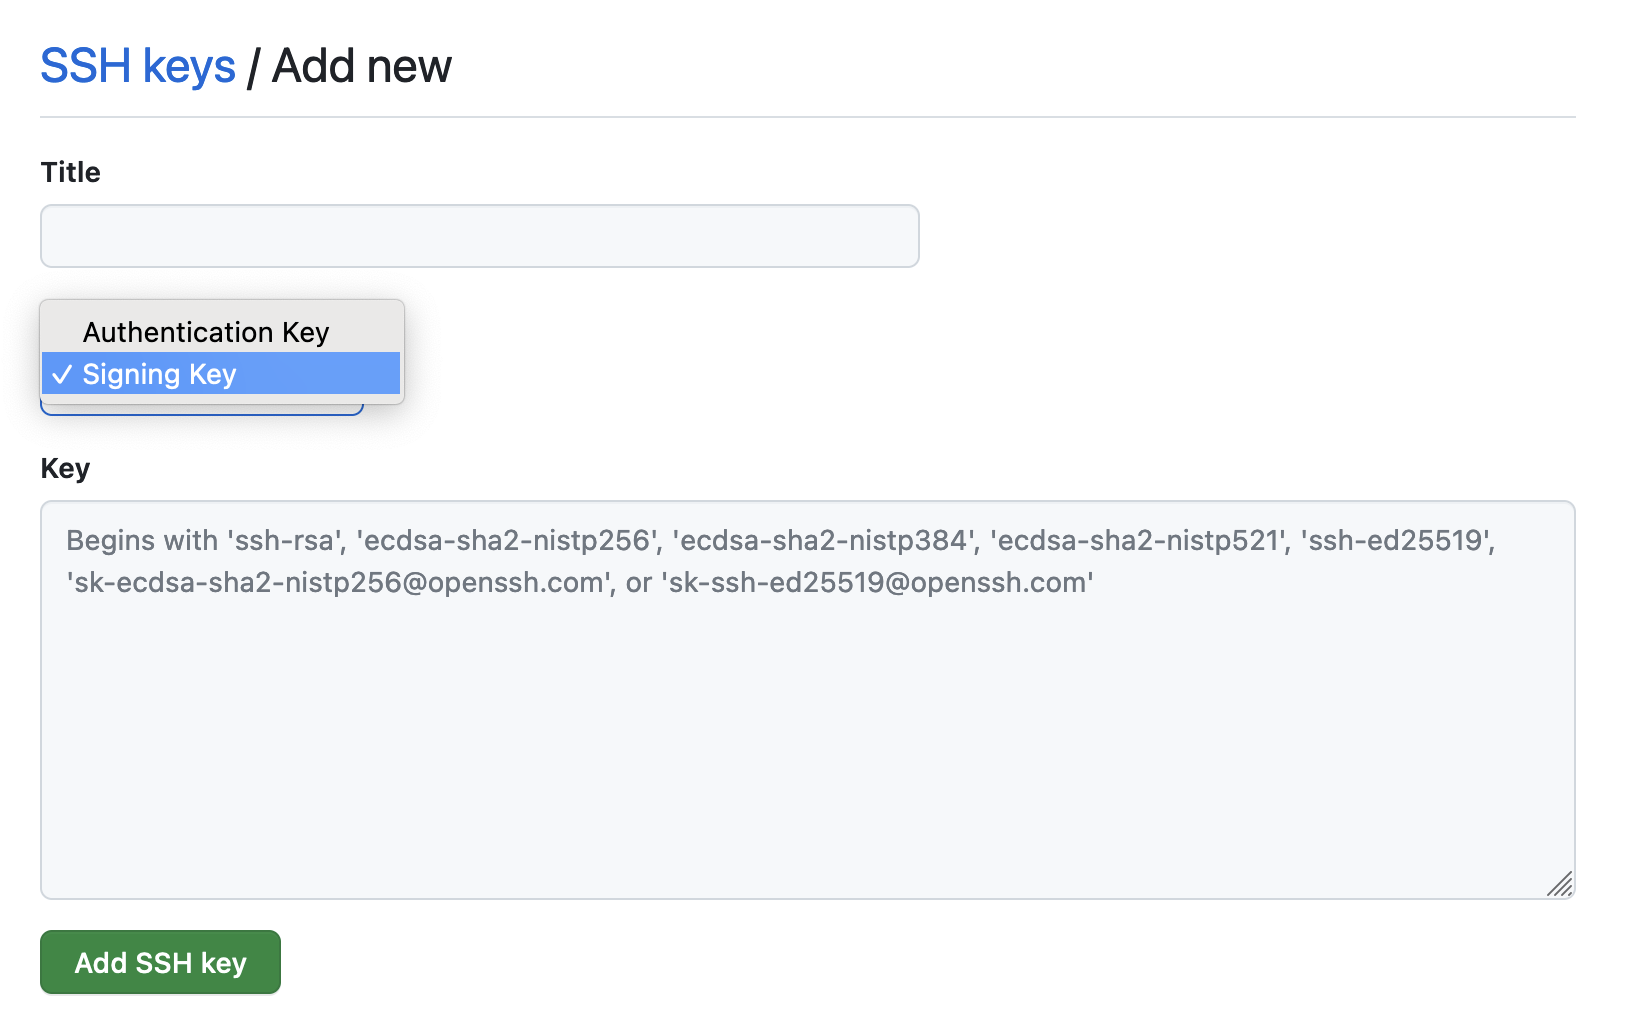
You are set! You should now see a Verified green tag next to your commit messages on GitHub.

Important
On Gadi, depending on which ssh-keygen distribution you are using, when trying to issue a signed commit you might get an error similar to the following:
error: ssh-keygen -Y sign is needed for ssh signing (available in openssh version 8.2p1+)
To solve this issue, the recommended option is to set the gpg.ssh.program Git configuration option to an ssh-keygen executable with version >= 8.2p1.
An ssh-keygen executable with version >= 8.2p1 is available, for example, in the hh5 conda/analysis3 or vk83 payu environments.
To set the gpg.ssh.program option to the ssh-keygen executable from the hh5 conda/analysis3 environment, for example, run:
git config --global gpg.ssh.program /g/data/hh5/public/apps/miniconda3/envs/analysis3/bin/ssh-keygen