Live - https://zoomxf.onrender.com/
- It is
Peer to Peer Collobartive application, where person can share their video , share screen, send messages, transfer files, watch youtube video - You can play
Youtube videosat same time in two tab, i mean with your friend - Peer to Peer Video call functionality with the Code Editor
(Best use for Interview) - Code Editor supports
multiple languageslike c, c++, java, python, javascript/typescript, golang and many more.


-
Frontend- ReactJS, TailwindCSS - For UI
- WebRTC - for setting up Peer to Peer Communication
- Monaco - Code Editor
- Yjs - It makes our Code Editor Collobrative
- Socket.io - Serve as Signaling Server
-
Backend- NodeJs, Express
- Socket.io - for setting up signaling server
So, webrtc is used for setting up peer to peer connection with the video, voice supports.
WebRTC - Web Real Time Communication
We can build powerful video and voice communication on webpages that works across the browser and devices.
Wheather you are building the peer to peer video, content sharing, messaging or chat tools , Webrtc makes coding easy and the end experience user friendly\
- WebRTC uses SRTP (Secure Real time Transport protocol) to encrypt authenticate and protect your data and conversation\
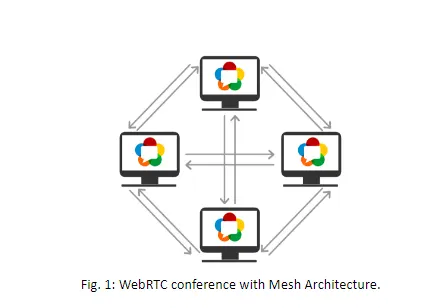
WebRTC Architecture

- P2P is for 2 person as it is clear from their name Peer-to-Peer Communication
- So if we want to go 1 to Many (1:Many) then we have choose to create
Mesh, SFU and MCU but in Mesh we can not create more connection suppose(1:10) it is really difficult to handle it and we need really good cpu power computer.\ - Forwarding WebRTC media is a complex operation that consumes a lot of bandwidth, especially video.\
- Encoding media multiple times can burn cycles on a device's CPU, which can cause the device to heat up and deplete its battery.
(WE CAN'T SCALE MESH TO GREAT EXTENT)
SFU - Selective Forwarding Unit- It only need to send and receive media from each party. This means that an SFU can support a much larger number of parties than a P2P connection

MCU - Multipoint Control Unit

Read More About WebRTC Architecture
-
STUN/TURN Server
-
UDP/TCP Protocol
-
ICE Candidate
-
SDP
-
Signaling Server
-
Create Offer / Answer Offer
-
RTCPeerConnection / RTCDataChannel / MediaRecorder / GUM - getUserMedia
-
setLocalDescription / setRemoteDescription
- Lets Discuss little bit about these keywords


Ice Candidate is a framework to allow your web browser to connect with peers\
- Why we can't directly connect with the other peers? It is due to firewall, NAT which restrict to connect directly with the other peers, it need to bypass the firewall that prevent opening connection, give you unique address in most situation your device does not have a public ip address and relay data through a server if your router does not allow you to directly connect with the peer.\
- How we get the ICE Candidate - It is due to the STUN / TURN Server
- Ice Candidate in computer networking to find way for two computer to talk to each other as directly as possible in peer to peer networking. Commonly used for interative media such as voice over Internet Protocol(VoIP), peer to peer communication, instant messanging. In such type of application comm. b/w client is really difficult on the internet due to firewall and other network barrier such as NAT(Network address translator) and communication through central server is slow and expensive

let peerConnection = new RTCPeerConnection({
    iceServers: [{
        urls: "stun:stun.l.google.com:19302",
    },],
});

So, see the previous image which i shared in the STUN - when the peer B requested to STUN server WHO I AM? the response came here is Symmetric NAT it means the router have some Restriction and it preventing it to connect with peer on internet. To overcome from such type of problem we can use TURN Server which is just the upgrade version of STUN Server.
- Some router using NAT employ a restriction -> Symmetric NAT which means the router will only accept connection from peers you've previously connected to, so use TURN.
const iceConfiguration = {
    iceServers: [
        {
            urls: 'turn:my-turn-server.mycompany.com:19403',
            username: 'optional-username',
            credential: 'auth-token'
        }
    ]
}
const peerConnection = new RTCPeerConnection(iceConfiguration);


Network Address Translation (NAT) is a service that enables private IP networks to use the internet and cloud. NAT translates private IP addresses in an internal network to a public IP address before packets are sent to an external network.(It is used to give your device a public IP Address)
A router will have a public IP address and every device connected to the router will have a private IP address.
Request will be translted from the device private IP to the router public IP with the unique port. That way you don't need a unique public IP address but can still be discovered on the Internet.
It is standard for describing the multimedia content of the connection such as resolution, format, codecs, encryption. So that both peer con understand each other data is transferring\
- Techincally SDP is not truly a protocol but a data format used to describe connection that shares media b/w devices.

- GUM - getUserMedia The getUserMedia() method of the MediaDevices interface prompts the user for permission to use a media input which produces a MediaStream with tracks containing the requested types of media.
 // get access for media input  - getUserMedia
   window.navigator.mediaDevices.getUserMedia({ video: true, audio: true }).then((stream) => {
          setLocalStream(stream);
   });
 // want to share screen - getDisplayMedia
  await window.navigator.mediaDevices.getDisplayMedia({ video: true });
  const screenTrack = screenStream.getVideoTracks()[0];

-
Create RTCPeerConnection and add the track (addTrack)
peerConnection.addTrack(localStream.getVideoTracks()[0]); -
RTCPeerConnection createOffer and set the local description(setLocalDescription)
   const offer = await peerConnection.createOffer();
   await peerConnection.setLocalDescription(offer);
 // offer will look like this
offer: {
type: offer,
sdp: "some string"
}
-
After setLocalDescription(), the caller asks STUN servers to generate the ice candidates
-
Signaling server to transmit the offer
-
Connect to socket.io
const URL = 'http://localhost:5006'
const socketIo = io(URL, {
       transports: ['websocket', 'polling', 'flashsocket'],
   });
-
Transmit Offer and set the RemoteDescription
socketIo.on('localDescription', async ({ description }) => {
       console.log({ description });
       peerConnection.setRemoteDescription(description);
       peerConnection.ontrack = (e) => {
           console.log({ 'ontrackEvent': e.track });
           setRemoteStream(new MediaStream([e.track]));
       }

       socketIo.on('iceCandidate', ({ candidate }) => {
           peerConnection.addIceCandidate(candidate);
       });

       peerConnection.onicecandidate = ({ candidate }) => {
           socketIo.emit('iceCandidateReply', {
               candidate
           });
       }

       // ANSWer
       const answer = await peerConnection.createAnswer();
       await peerConnection.setLocalDescription(answer);

       socketIo.emit('remoteDescription', { description: peerConnection.localDescription });
   });

-
-
Other End -> GUM -> addTrack() -> createAnswer
-
When you want to share the screen
-
What is Case in it? By default your front camera will be open(laptop) but you want to share your screen in p2p connection you can't send another mediaTrack to it (yeah you can do it - mesh) but here what we are doing is to just replace your video with the screen share content
-
Here is function how i am doing
- So just add the mediaDevices(getDisplayMedia) and take your videoTrack
- Find the sender using
peerConnection.getSenders();and look for thevideo track(there might be chances that the sender is connected with different kind of tracks too) - After finding the track -
videoneed to replace the video track with our screen share content(track) usingreplaceTrack(newTrack)function - Its not the end, when your work has been done and want to back to original state listen for
onendedevent on your track and revert the previous state (see the handleStopScreenShare function)
async function handleScreenShare() {
   if (!option.isScreenSharing) {
       try {
           const screenStream = await window.navigator.mediaDevices.getDisplayMedia({ video: true });
           const screenTrack = screenStream.getVideoTracks()[0];

           // Replace the video track in the peer connection
           const senders = peerConnection.getSenders();
           console.log({
               peerConnection,
               senders
           });
           const videoSender = senders.find(sender => sender.track.kind === 'video');
           console.log({ videoSender });
           videoSender.replaceTrack(screenTrack);

           // Update local stream to reflect the screen sharing
           setLocalStream(screenStream);
           setOption((s) => ({ ...s, isScreenSharing: true }));
           // Handle the event when the screen sharing stops
           screenTrack.onended = () => {
               handleStopScreenShare();
           };
       } catch (err) {
           console.error("Error sharing screen: ", err);
       }
   } else {
       // Stop screen sharing and revert to the camera
       handleStopScreenShare();
   }
}

async function handleStopScreenShare() {
    try {
        const cameraStream = await window.navigator.mediaDevices.getUserMedia({ video: true, audio: true });
        const cameraTrack = cameraStream.getVideoTracks()[0];

       // Replace the video track in the peer connection
       const senders = peerConnection.getSenders();
       const videoSender = senders.find(sender => sender.track.kind === 'video');
       videoSender.replaceTrack(cameraTrack);

       // Update local stream to reflect the camera feed
       setLocalStream(cameraStream);
       setOption((s) => ({ ...s, isScreenSharing: false }));
   } catch (err) {
       console.error("Error stopping screen share: ", err);
   }
 }
-
-
RTCDataChannel
- In the data channel we have to keep into our mind this things and its good to go
- createDataChannel(uniqueName) - if other datachannel with this name then their will some miss communication when you will listen for the event like
onmessageandondatachannel - The WebRTC message event is sent to the
onmessageevent handler on an RTCDataChannel object when a message has been received from the remote peer
const channel = peerConnection.createDataChannel('sendMessage');
channel.onopen = () => {
       console.log('Data channel is open');
       setOption((s) => ({ ...s, disabled: false }));
   };
   channel.onclose = () => {
       console.log('Data channel is close');
       setOption((s) => ({ ...s, disabled: true }));
   };
channel.onmessage = handleReceiveMessage;

peerConnection.ondatachannel = (e) => {
       const file_channel = e.channel;
       console.log(file_channel);
       if (file_channel.label === 'sendFiles') {

           file_channel.onmessage = (e) => {
               if (e.data === 'EOF') {
                   const receiveFile = new Blob(receiveBuffer, { type: fileRecOptions.type, });
                   console.log({ receiveFile });
                   console.log(fileRecOptions);
                   setReceivedFile(receiveFile);
                   setOption((s) => ({ ...s, isFileReady: true }));
                   receiveBuffer = [];
               } else {
                   receiveBuffer.push(e.data);
               }
           }
       } else if (file_channel.label === 'sendMessage') {
           receiveChannelCallback(e);
       }
   }

-
Record Your Video
- We have limited way to record the video
- Which section you can record here - your own stream, remote person stream here stream sense means
shared screen / video - We can do it using the MediaRecorder API -
MediaRecorder(stream, option); - When you wish to start recording -
mediaRecorder.start()and end by.end() - so to keep track of the stream we have the
ondataavailabelevent and we store the stream in chunks in some array - For assemble of the chunks(stream) we use
Bloband then created the link usingURL.createObjectURL(blob)for downloading our recorded stream. - I guess you can also do the same thing using
streambut it is little bit difficult from Blob (I am not confirm about it)
    async function RecordWindow() {
    const recordedChunks = [];
    const options = { mimeType: "video/webm; codecs=vp9" };
    let mediaRecorder;
    if (recordOption === 'localStream') {
        mediaRecorder = new MediaRecorder(localStream, options);
    } else {
        mediaRecorder = new MediaRecorder(remoteStream, options);
    }
    mediaRecorder.ondataavailable = handleDataAvailable;
    mediaRecorder.start();
    setRecordStream(mediaRecorder);
    setOption((s) => ({ ...s, isRecording: true }));
    function handleDataAvailable(e) {
        console.log("data-available");
        if (e.data.size > 0) {
            recordedChunks.push(e.data);
            console.log(recordedChunks);
            download();
        }
    }
    function download() {
        const blob = new Blob(recordedChunks, {
            type: "video/webm",
        });
        const url = URL.createObjectURL(blob);
        const a = document.createElement("a");
        document.body.appendChild(a);
        a.style = "display: none";
        a.href = url;
        a.download = "test.webm";
        a.click();
        window.URL.revokeObjectURL(url);
    }
}

function StopRecord() {
    recordStream.stop();
    setOption((s) => ({ ...s, isRecording: false }));
}