
In this workshop, you'll create an AI-powered chatbot that can access external data to provide accurate answers. This workshop is ideal for developers with basic web development knowledge who want to expand their skills in building modern, AI-enhanced applications.
The workshop combines two types of activities:
- Concept overviews: Explanations of key ideas you'll need to understand.
- Hands-on exercises: Guided activities where you'll apply what you've learned, with helpful code snippets provided.
- Exercise #0: Set up your project and development environment
- Concept Overview: What are Large Language Models (LLMs)
- Exercise #1: Add AI capabilities to your chatbot
- Concept Overview: Exploring Retrieval-Augmented Generation (RAG)
- Exercise #2: Use Postgres as a vector store
- Exercise #3: Implement RAG in your chatbot
To get the most out of this workshop, you should have:
- Basic knowledge of building APIs and server-side code with JavaScript/TypeScript
- Familiarity with command-line tools and installing Node.js packages
- Some understanding of SQL
This workshop focuses primarily on the backend and won't dive into the front-end part of the app you'll be building today.
Choose between using your local machine or Stackblitz, an online development environment.

Stackblitz will automatically set everything up for you. It will automatically install the project's dependencies for you and start the development server by running npm install && npx next dev for you.

Local setup instructions
You'll need:
- Git
- Node.js (version 18+). You can check the Node version installed on your machine by running
node -vin your terminal.
Steps:
- Clone the repo:
git clone https://github.com/neondatabase/build-smarter-chatbots-workshop
- Set up the project:
cd build-smarter-chatbots-workshop
npm i
npm run dev
This starts a local server at http://localhost:3000
Here's the basic structure of your project:
build-better-chatbots/
┣ public/
┣ src/
┃ ┗ app/
┃   ┣ api/
┃	  ┗ chat/
┃	    ┗ route.ts
┃   ┣ favicon.ico
┃   ┣ globals.css
┃   ┣ layout.tsx
┃   ┗ page.tsx
┣ .env.example
┣ .gitignore
┣ README.md
┣ next-env.d.ts
┣ next.config.mjs
┣ package-lock.json
┣ package.json
┣ postcss.config.mjs
┣ setup.ts
┣ tailwind.config.ts
┗ tsconfig.json
Next.js uses a file-system based router where folders located under the app directory are used to define routes. Each folder represents a route segment that maps to a URL segment. To create a nested route, you can nest folders inside each other.
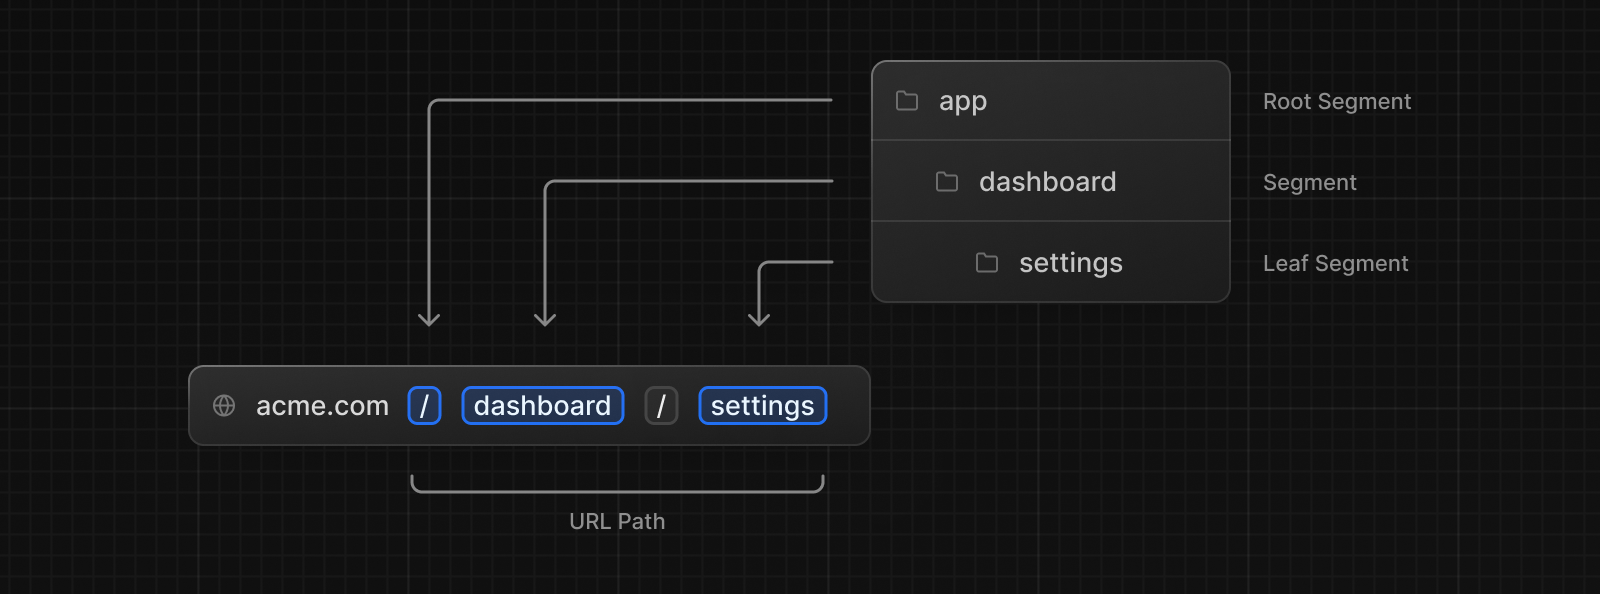
The app has a single route defined in the src/app/page.tsx file. This route will be rendered at the index route /. This is the page that will be displayed when you visit the app in the browser and where you'll see the chatbot UI.
When you add a special route.ts file inside a folder, it will make the full path of the folder an API endpoint. For example, in this project you have a app/api/chat with a route.ts file nested under it. This will create a route at /api/chat endpoint which will handle the chatbot's requests.
You're going to implement the logic to handle the chatbot's requests in this file.
Frontend code explanation
The `src/app/page.tsx` file contains the following code:"use client";
import { useChat } from "ai/react";
export default function Chat() {
const { messages, input, handleInputChange, handleSubmit } = useChat();
return (
<div className="flex flex-col w-full max-w-md py-24 mx-auto stretch">
{messages.map((m) => (
<div key={m.id} className="whitespace-pre-wrap">
{m.role === "user" ? "User: " : "AI: "}
{m.content}
</div>
))}
<form onSubmit={handleSubmit}>
<input
className="fixed bottom-0 w-full max-w-md p-2 mb-8 border border-gray-300 rounded shadow-xl"
value={input}
placeholder="Say something..."
onChange={handleInputChange}
/>
</form>
</div>
);
}This uses the Vercel AI SDK, a library that provides a set of tools that allows developers to integrate artificial intelligence (AI) capabilities into their applications. It also provides pre-built functions and APIs for popular AI services, which you'll use later.
- The
"use client"directive placed at the top of the file means the page will be rendered on the client.
The useChat hook is used to manage chat state and interactions. It returns multiple values which are used to build the UI:
messages- the current chat messages (an array of objects with id, role, and content properties).input- the current value of the user's input field.handleInputChangeandhandleSubmit- functions to handle user interactions (typing into the input field and submitting the form, respectively).isLoading- boolean that indicates whether the API request is in progress.
LLMs are AI models trained on vast amounts of text data to generate human-like text. They're used in chatbots, translation, content creation, and more.

We'll use the Mistral 7B model via Mistral's API for this workshop.
Let's make the chatbot functional by implementing the API endpoint.
Current app/api/chat/route.ts:
// app/api/chat/route.ts
export async function POST(req: Request) {
	const { messages } = await req.json();

	return new Response("Chat messages received!");
}
The code defines an asynchronous function named POST that handle POST requests made to this route. The function takes a single parameter req of type Request, which represents the incoming HTTP request.
We then use destructuring to extract a messages property from the JSON body of the request. This property will contain an array of messages sent by the user. Finally, we return a new Response object with a message indicating that the chat messages have been received.
We want to pass the messages array to an AI model and return the generated text as response.
To do that, we'll use Mistral's API along with the Vercel AI SDK, which simplifies working with LLMs by offering a standardized way of integrating them into your app. You get a unified interface that allows you to switch between AI model providers (e.g, OpenAI, Mistral, Google, etc.) with ease while using the same API for all providers.
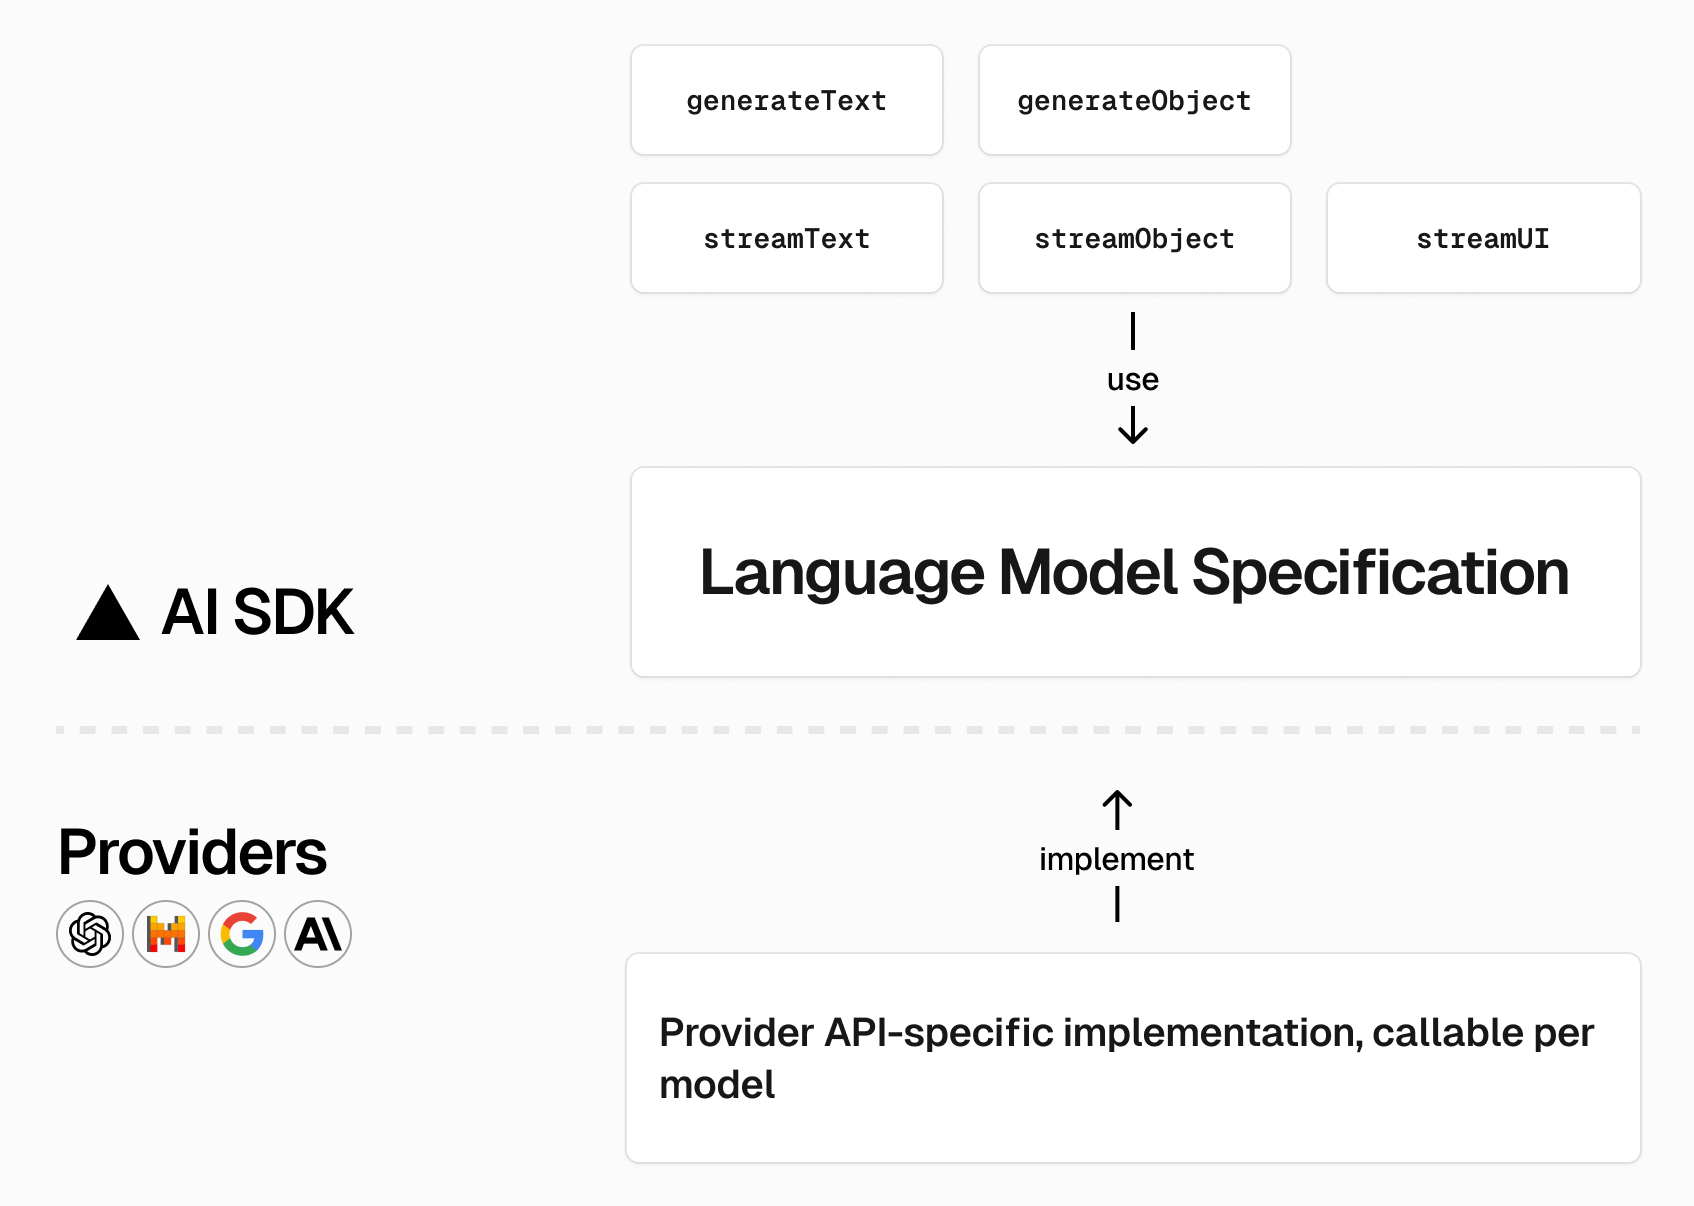
Here's a quick overview of the Vercel AI SDK:
Each AI company provider (such as OpenAI, Mistral, etc.) has its own dedicated npm package that lists the available models. For example, here's how you can install the Mistral AI provider package:
npm install @ai-sdk/mistralYou can then import the default provider instance mistral from @ai-sdk/mistral:
import { mistral } from '@ai-sdk/mistral';You can then specify which model you want to use by passing the model ID to the mistral instance:
const model = mistral('mistral-large-latest');The Vercel AI SDK will look for a MISTRAL_API_KEY environment variable. To generate an API key, you must do the following:
➡️ TODO:
- Install the Mistral AI provider package
- Generate an API key from the Mistral console.
- Create a Mistral account or sign in at console.mistral.ai.
- Then, navigate to "Workspace" and "Billing" to add your payment information and activate payments on your account.
- After that, go to the "API keys" page and make a new API key by clicking "Create new key". Make sure to copy the API key, save it safely, and do not share it with anyone.
- Copy the
.env.examplefile to a new file called.envand add your API key there. It should look like this:
MISTRAL_API_KEY=your-api-key
# Will be added later, you can leave it empty for now
DATABASE_URL=
Once you install the provider package and have set up an API key, you can then use functions from the Vercel AI SDK core package (it has been added to your project already and was installed by running npm install ai).
For example, here's how you can use the streamText() function for interactive use cases such as chat bots and other real-time applications:
import { openai } from '@ai-sdk/openai';
import { generateText } from 'ai';

const result = await streamText({
  model: openai('gpt-4-turbo'),
  prompt: 'Invent a new holiday and describe its traditions.',
});


return result.toAIStreamResponse();
➡️ TODO: Update the app/api/chat/route.ts file to use the Vercel AI SDK to generate text using the Mistral AI model. The generated text should be returned as the response to the user's messages.
Here are some resources you can use:
- API reference for the
streamText()function from the Vercel AI SDK core package - Mistral AI provider documentation
Tip
The streamText() function accepts a messages parameter that should contain an array of messages sent by the user.
You can test that the chatbot is working by starting the development server (npm run dev) and submitting a message. You should see a response from the chatbot if everything was set up correctly.
Solution you can also run `git checkout exercise-1-solution` if you're working locally
Here's the solution to the exercise:// app/api/chat/route.ts
import { mistral } from "@ai-sdk/mistral";
import { streamText } from "ai";
export async function POST(req: Request) {
const { messages } = await req.json();
const result = await streamText({
model: mistral("open-mistral-7b"),
messages,
});
return result.toAIStreamResponse();
}Large Language Models (LLMs) always provide an answer, but it may not always be the correct or needed one.
Here's an example prompt:
User: What's my favorite food?

AI: I don't know your favorite food yet. Could you tell me what it is?
To generate more accurate responses, we can supply the LLM with additional context.
However, this raises an important question: Given a set of factually correct data, how do we:
- Interpret the user's intent from their prompt
- Determine which specific information to provide the LLM

This is where vector embeddings come into play.
Vector embeddings are lists of floating-point numbers that can represent various types of unstructured data (text, images, audio, etc.).
Their power lies in their ability to capture the meaning behind the data and measure the relatedness between different text strings.
 source: https://qdrant.tech/articles/what-are-embeddings/
The closer two vectors are in this space, the more related they are and vice-versa.
For instance, the vectors for "banana" and "apple" would be closer together than the vectors for "banana" and "book".
You can create vector embeddings using an embeddings API. Here's an example using Mistral's API with the Vercel AI SDK:
import { mistral } from "@ai-sdk/mistral";
import { embed, embedMany } from "ai";

// Single embedding
const { embedding } = await embed({
  model: mistral.embedding("mistral-embed"),
  value: "sunny day at the beach",
});

// Batch embedding. This is useful when you have a large number of values to embed and want to do it in a single request. We'll use this function later in the workshop.
const { embeddings } = await embedMany({
  model: mistral.embedding('mistral-embed'),
  values: [
    'sunny day at the beach',
    'rainy afternoon in the city',
    'snowy night in the mountains',
  ],
});Vector search (or similarity search) has numerous applications, including information retrieval, natural language processing, recommendation systems, and anomaly detection.
Postgres can store and retrieve vector embeddings, eliminating the need for an external vector store in many AI and LLM applications. This possible through the pgvector extension, which provides efficient storage and querying mechanisms for vector data.
Here's how to get started:
1. Enable the pgvector extension:
CREATE EXTENSION vector;2. Create a table with a vector column:
CREATE TABLE documents (
  id BIGSERIAL PRIMARY KEY,
  content TEXT,
  embedding VECTOR(1024)
);
Here, the embedding column is capable of storing vectors with 3 dimensions. Depending on the embedding model you use, this number will be different.
Tip
The mistral-embed model generates embedding vectors of dimension 1024 for each text string, regardless of its length. So, this will be the value we use when we create the table.
3. Query for similar items:
SELECT * FROM documents
ORDER BY embedding <-> '[3,1,2,...]'
LIMIT 5;
This finds the top 5 most similar items using Euclidean distance.
By leveraging vector embeddings and efficient storage/querying mechanisms, we can significantly enhance the accuracy and relevance of LLM responses in various applications.
At a high-level, this is how the app will work:
- The user sends a message.
- We convert the message into a vector embedding using an AI model.
- We query the database for the most similar text content based on the user's message embedding.
- We return the most similar text content as the response to the user's message.
- We pass the response to the LLM as a system prompt to generate the final response.
- The LLM generates the final response based on the user's message and the most similar text content.
- We returns the final response to the user.

To create your vector store, you'll need a Neon account. Neon provides a fully managed PostgreSQL database service that supports storing and querying vector embeddings.
Follow these steps to get started:
- Sign up for a Neon account using the link above.
- Complete the onboarding process, which includes creating a new Project.
- Once your Project is set up, you'll be directed to the Project Quickstart page.
- On this page, you'll find your database connection string. You'll need this to connect to your new database.


➡️ TODO:
- Add the connection string to the
.envfile. It should look like this:
MISTRAL_API_KEY=your-api-key
DATABASE_URL=your-neon-connection-string- set up the database by running the following command in your terminal:
npm run db:setupThis will run the setup.ts script, which is responsible for setting up the database and inserting some sample data.
If you open the setup.ts file, you'll see the following code:
import { embedMany } from "ai";
import { mistral } from "@ai-sdk/mistral";
import { neon } from "@neondatabase/serverless";
import "dotenv/config";

const main = async () => {
	const sql = neon(process.env.DATABASE_URL!);

	const values = [
		"sunny day at the beach",
		"rainy afternoon in the city",
		"snowy night in the mountains",
	];

	const { embeddings } = await embedMany({
		model: mistral.embedding("mistral-embed"),
		values: values,
	});

	// Create extension and table if they don't exist
	await sql.transaction([
		sql`CREATE EXTENSION IF NOT EXISTS vector`,
		sql`CREATE TABLE IF NOT EXISTS documents(id UUID PRIMARY KEY DEFAULT gen_random_uuid(), content TEXT NOT NULL, embedding vector(1024));`,
	]);

	// Insert embeddings one by one
	for (let i = 0; i < values.length; i++) {
		await sql`
      INSERT INTO documents (content, embedding)
      VALUES (${values[i]}, ${JSON.stringify(embeddings[i])}::vector)
    `;
		console.log(`Embedding ${i + 1} inserted successfully`);
	}

	console.log("All embeddings inserted successfully");
};

main().catch(console.error);
The main() function connects to a database, defines a set of text samples, and generates embeddings for these samples using the Mistral AI model. The pgvector extension is then installed if it doesn't exist and then table designed to store text content alongside their vector embeddings is created. Each text sample and its corresponding embedding is then inserted into the database.
In this exercise, you will modify the src/app/api/chat/route.ts file to query the database for relevant information.
Here are the steps that you need to take:
- Connect to the Neon database using the
neonfunction from the@neondatabase/serverlesspackage. - Embed the user's message using the Mistral AI model.
- Query the database for the most similar text content based on the user's message embedding. You can use the
<->operator to calculate the Euclidean distance between the user's message embedding and the embeddings stored in the database. Sort the results by the calculated distance and return the most similar text content. - Return the most similar text content as the response to the user's message.
- Pass the response to the LLM as a system prompt to generate the final response.
Open the file app/api/chat/route.ts in your project and replace the existing code with the following code snippet:
// app/api/chat/route.ts
import { mistral } from "@ai-sdk/mistral";
import { streamText, embed } from "ai";
import { neon } from "@neondatabase/serverless";

export async function POST(req: Request) {
	const { messages } = await req.json();

	// Get the user's last message
	const prompt = messages[messages.length - 1].content;

	// Embed the user's last message

	// Connect to the Neon database

	// find the most similar document to the user's last message

	// Stream the user's messages and the most similar document to the model and include the document in the system message. Here's an example of how you can do this:

  const documents = await sql`...`;

  // The Vercel AI SDK, allows you to set a system message that provides additional context to the model. This message is not included in the final response to the user. You can use the following prompt to include the most similar document in the system message:
  // "You have access to information that might help answer the user's question. Use this information if it's relevant to the user's query, but don't mention it explicitly unless asked. If the information isn't relevant, rely on your general knowledge to answer. Here is the information: <most-relevant-document>"

  const result = ...

	return result.toAIStreamResponse();
}
If you prefer, you can switch to the exercise-3 branch, which already includes this code snippet. To do so: 1. Open your terminal. 2. Run the command: git checkout exercise-3
This branch contains the pre-configured code, allowing you to start working on the chat functionality immediately.
Tip
You can use the setup.ts file as a reference throughout this exercise.
Here are some additional resources you can use:
- API reference for the
embed()function from the Vercel AI SDK core package - Neon Serverless Driver documentation
- pgvector documentation on querying vectors
- API reference for the
streamText()function from the Vercel AI SDK core package - Mistral AI provider documentation
To make sure that the chatbot is working as expected, you can start the development server (npm run dev) and submit a message. You should see a response from the chatbot that is relevant to the user's message.
Here are some example prompts you can use to test the chatbot:
"What's the weather like today?" "Tell me about the best beaches in the world"
Solution - you can also run `git checkout exercise-3-solution` if you're working locally
Here's the solution to the exercise:
// app/api/chat/route.ts
import { mistral } from "@ai-sdk/mistral";
import { streamText, embed } from "ai";
import { neon } from "@neondatabase/serverless";

export async function POST(req: Request) {
  const { messages } = await req.json();

  // Get the user's last message
  const prompt = messages[messages.length - 1].content;

  // Embed the user's last message
  const { embedding } = await embed({
    model: mistral.embedding("mistral-embed"),
    value: prompt,
  });

  const sql = neon(process.env.DATABASE_URL!);

  // find the most similar document to the user's last message
  const documents = await sql`
    SELECT * FROM documents
    ORDER BY embedding <->  ${JSON.stringify(embedding)}::vector
    LIMIT 1
  `;

  // Stream the user's messages and the most similar document to the model and include the document in the system message
  const result = await streamText({
    model: mistral("open-mistral-7b"),
    messages,
    system: `You have access to relevant information that might help answer the user's question. Here it is: "${documents.map((d) => d.content).join(" ")}". Use this information if it's relevant to the user's query, but don't mention it explicitly unless asked. If the information isn't relevant, rely on your general knowledge to answer.`,
  });

  return result.toAIStreamResponse();
}
You can find the complete solution in the final branch of the repository.
You've built an AI chatbot that uses external data for more accurate responses.
You can extend this by:
- Handling more complex queries
- Integrating different AI models
- Working with various data types (images, audio, etc.) and potentially introducing a framework like Langchain that allows you to embed any type of data into a vector
- Building other AI-powered apps needing external data
Happy coding! 🚀