Please be aware that this application / sample is provided as-is for demonstration purposes without any guarantee of support
Sample of Zebra DataWedge's "Workflow Input" Plugin (OCR and Image Capture) as well as the "Barcode Highligting" feature.
These features are only available in DataWedge 11.2 to:
- Highlight barcodes in the field of view which match specified properties
- Capture multiple barcodes in the field of view
- Image capture
- Optical Character recognition of ID cards, tyres (TIN), vehicle IDs (VIN), License plates, meters (as in gas or electric meters).
- Support for all these features with both the camera and imager. Image capture via the imager has been a long standing requirement that has now been delivered.
OCR is a licensed feature, see the licensing process for more information.
Documentation for these features are spread over multiple sections on the techdocs portal:
- The Workflow Input Plugin
- The Barcode Highlighting Programmer's Guide
- The Workflow Programmer's Guide
- The Changes to the Notification API for Workflow
- A Code Walkthrough by Zebra engineering on YouTube
You can highlight barcodes in the current field of view which meet your specified criteria. Optionally, you can then choose to also decode these barcodes and return them to the application.

Example showing barcode highlighting configured to set PDF417 barcodes to orange and Code128 barcodes less than 13 characters to blue.
- Provide onscreen feedback to let the operator know which barcodes are being captured
- Help the operator find an item by highlighting the barcode
Barcode highlighting is part of the Barcode Input plugin, not the separate Workflow Input plugin.
To configure barcode highlighting, configure your DataWedge profile as follows:
- Enable Barcode Highlighting in the Barcode input plugin
- Press the ellipsis to bring up additional parameters
- Specify the highlighting rules:
- Create a different rule for each barcode type or colour you want to show
- You can have multiple rules with different colours
- Specify the conditions for the rule:
- The max / min length of the barcode
- Any string it might contain
- The barcode symbology.
- Rules are executed in priority order from top to bottom
- Specify the reporting rules. If you do not specify the reporting rule, your barcode(s) will not be sent to your app.
- Reporting rules and highlighting rules have different conditions, meaning you can choose to report different barcodes than what are being highlighted, though it is recommended to keep these rule the same.
- Specify the reporting action to have these barcodes returned to the application.

- The hardware or software trigger will initiate the scanning session
- When a barcode meeting the specified criteria is seen in the viewfinder, it will be highlighted.
- The next trigger will end the session and return decoded barcodes back to the app, if configured to do so.
The following video shows barcode highlighting via the Imager:
Notice how the different symbologies or barcode lengths were assigned different colours, as defined by the rules.
Also notice how data is returned in a JSON array output to the text field without modification in this app.
The following video shows barcode highlighting via the Camera:
The video also shows how the highlighting rules are configured with DataWedge. The rules are configured to highlight and report EAN13 barcodes of any length and with any contents.
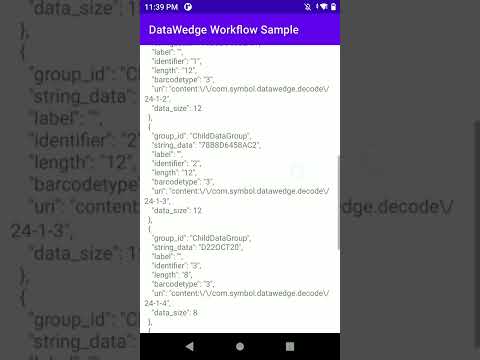
Although part of the Barcode input plugin, barcode highlighting borrows a lot of its logic from the Workflow plugin. What that means for you as a developer is you should follow the Workflow programmer's guide to extract data returned from the Intent output plugin, though there will be no image data.
//  Given the data returned via 'intent'
String data = intent.getStringExtra("com.symbol.datawedge.decode_data");
JSONArray dataArray = new JSONArray(data);
for (int i = 0; i < dataArray.length(); i++)
{
  JSONObject workflowObject = dataArray.getJSONObject(i);
  if (workflowObject.has("string_data"))
  {
    String label = workflowObject.getString("label");
    if (label.equalsIgnoreCase(""))
    {
      //  Each data decoded barcode is stored in workflowObject.getString("string_data")
      //  Symbology returned in workflowObject.getString("barcodetype")

    }
  }
}There are 2 ways to configure barcode highlighting in code
1. At Runtime:
A new API has been been introduced in DataWedge 11.2, Switch Data Capture to allow you to switch from 'regular' scanning, to barcode highlighting. A full code example is given in the help docs but as a high level summary:
Intent i = new Intent();
i.putExtra("com.symbol.datawedge.api.SWITCH_DATACAPTURE", "BARCODE");
//  Add highlighting rules
Bundle paramList = new Bundle();
  paramList.putString("scanner_selection_by_identifier", "INTERNAL_IMAGER");
  paramList.putString("barcode_highlighting_enabled", "true");
Bundle rule1 = new Bundle();
  rule1.putString("rule_name", "Rule1");
Bundle rule1Criteria = new Bundle();
Bundle bundleContains1 = new Bundle();
  bundleContains1.putString("criteria_key", "contains");
  bundleContains1.putString("criteria_value", "090986");
  ArrayList<Bundle> identifierParamList = new ArrayList<>();
    identifierParamList.add(bundleContains1);
    rule1Criteria.putParcelableArrayList("identifier", identifierParamList);
//  Similar logic for criteria
...
ArrayList<Bundle> ruleList = new ArrayList<>();
  ruleList.add(rule1);
Bundle ruleBundlebarcodeOverlay = new Bundle();
  ruleBundlebarcodeOverlay.putString("rule_param_id", "barcode_overlay");
  ruleBundlebarcodeOverlay.putParcelableArrayList("rule_list", ruleList);
  ArrayList<Bundle> ruleParamList = new ArrayList<>();
    ruleParamList.add(ruleBundlebarcodeOverlay);
    paramList.putParcelableArrayList("rules", ruleParamList);
i.putExtra("PARAM_LIST", paramList);
sendBroadcast(i);
I strongly recommend you copy / paste the example from techdocs and modify as needed
2. Persistently:
A new section has been added to the existing SetConfig API for Barcode Highlighting Parameters. The format passed to SetConfig is very similar to that passed to the new 'Switch Data Capture' API, i.e. create a nested bundle structure for rules, actions and criteria.
For a full example of barcode highlighting through SetConfig please see the Techdocs example
Again, I strongly recommend you copy / paste the example and modify as needed
The RegisterForNotification API has been updated to report the status of the workflow plugin and since barcode highlighting is implemented by the workflow plugin (though presented separately on the UI) it follows the same lifecycle.
Register to receive the Workflow notifications. See the RegisterForNotification docs or this app for more detailed code:
Bundle b = new Bundle();
b.putString("com.symbol.datawedge.api.APPLICATION_NAME", getPackageName());
b.putString("com.symbol.datawedge.api.NOTIFICATION_TYPE", "WORKFLOW_STATUS");
Process the received notification
case "WORKFLOW_STATUS":
  Log.d(LOG_TAG, "WORKFLOW_STATUS: status: " + b.getString("STATUS");
  break;
Be aware: Any Intent API sent to DataWedge before the 'PLUGIN_READY' status will lead to undefined behaviour.
- Reporting will only report barcodes meeting the specified criteria currently highlighted in the viewfinder. If you want to capture barcodes outside the viewfinder, for example, if you are waving the device across multiple barcodes, then you should use the 'Free-Form Image Capture' Workflow.
- Captured Barcodes are reported in the same way as "Workflow" data capture. I.e. the Intent plugin will report the result through
com.symbol.datawedge.data - The order the results are given will be the order in which the barcodes were recognized by the decoding algorithm, this is not something the user can influence. An
identifierfield is returned in the JSONObject for each barcode captured. - If multiple barcodes are captured, the value returned in
com.symbol.datawedge.data_stringwill be concatenated without any separators. It is strongly recommended to usecom.symbol.datawedge.datainstead. - If you switch scanners when configuring DataWedge, your highlighting rules will be lost (with this initial release)
- As stated in the documentation, the keystroke output will concatenate all the data without any separators. This means the Intent plugin is really the only viable way to receive data.
Even if your device does not have a camera, you can now capture an image using the barcode scanner. Any barcodes that have been seen during the capture session will be returned to your app along with the image (even if they are no longer in frame).
- Capture an image through the device imager (scanner), without a camera.
- Capture proof of delivery and the tracking barcode in a single step
Free-Form Image capture is delivered through a new DataWedge input plugin called 'Workflow'. This is separate from the standard 'Barcode' input plugin.
To configure freeform image capture, configure your DataWedge profile as follows:
- Enable the Workflow input plugin. If doing this through the DataWedge UI, you will be prompted that you cannot have both the Barcode and Workflow input plugins active.
- Scroll down to the 'Image Capture' section of the plugin and enable it.
- Press the ellipsis to bring up additional parameters
- Choose the input source, either camera or imager
- Set the session timeout, in ms. This is the length of time the scanning session will be held open, if the trigger was not pulled.
- Select 'Decode And Highlight Barcodes' to return data. Although set to 'Highlight' only by default, most use cases will also want to return data.
- Set the additional feedback parameters, such as haptic feedback, LED notification and decode audio feedback. This is the feedback that will be given whenever a new barcode is seen in the viewfinder, so as you pan across multiple barcodes your device will tell you whenever it sees a barcode.

- The hardware or software trigger will initiate the data acquisition session
- As the system sees barcodes, it will highlight them to let the user know it has been seen. Note: it is NOT possible to change the highlight colour with freeform image capture.
- The next trigger press will capture the image. The user can step back if need be, to ensure the entire object is within view.
- If the 'Decode / Highlight' option is turned on, barcodes that had been highlighted along with the image will be returned.
The following video shows free-form image capture via the Imager:
This is a brief scanning session with many barcodes in view.
The following video shows free-form image capture via the Camera:
The user pans across many barcodes during a long scanning session.
The Workflow programmer's guide gives a lot of detail how to parse workflow return types. The code applicable to freeform image capture is given below
//  Given the data returned via 'intent'
String data = intent.getStringExtra("com.symbol.datawedge.decode_data");
JSONArray dataArray = new JSONArray(data);
for (int i = 0; i < dataArray.length(); i++)
{
  JSONObject workflowObject = dataArray.getJSONObject(i);
  if (workflowObject.has("string_data"))
  {
    String label = workflowObject.getString("label");
    if (label.equalsIgnoreCase(""))
    {
      //  Each decoded barcode is stored in workflowObject.getString("string_data")
      //  Symbology returned in workflowObject.getString("barcodetype")
    }
  }
  else
  {
      //  string_data is absent, therefore this is an image
      if (workflowObject.has("uri")) {
        String uriAsString = workflowObject.get("uri").toString();
        byte[] imageAsBytes = null;
        imageAsBytes = processUri(uriAsString); //  Extract data from content provider
        int width = workflowObject.getInt("width");
        int height = workflowObject.getInt("height");
        int stride = workflowObject.getInt("stride");
        int orientation = workflowObject.getInt("orientation");
        String imageFormat = workflowObject.getString("imageformat");
        //  See the sample or programmer's guide for getBitmap(...)
        Bitmap bitmap =
          ImageProcessing.getInstance().getBitmap(imageAsBytes, imageFormat, orientation, stride, width, height);
        //  Show bitmap on UI
      }
   }
}There are two ways to configure freeform image capture in code. This section is similar to the earlier section talking about configuring DataWedge for barcode highlighting but some of the detail is different.
1. At Runtime:
As discussed in the "Coding and Barcode Highlighting: Configuring DataWedge" section, a new API has been introduced in DataWedge 11.2, Switch Data Capture to allow you to switch from 'regular' scanning to any of the workflow input options.
The full code example in the help docs for Switch Data Capture refers exclusively to OCR. For a freeform image capture example you can copy the format provided in the Set Config Example:
Intent i = new Intent();
i.putExtra("com.symbol.datawedge.api.SWITCH_DATACAPTURE", "WORKFLOW");
Bundle paramList = new Bundle();
  paramList.putString("workflow_name","free_form_capture");
  paramList.putString("workflow_input_source","2");
  Bundle paramSetContainerDecoderModule = new Bundle();
    paramSetContainerDecoderModule.putString("module","BarcodeTrackerModule");
    Bundle moduleContainerDecoderModule = new Bundle();
      moduleContainerDecoderModule.putString("session_timeout", "16000");
      moduleContainerDecoderModule.putString("illumination", "off");
      moduleContainerDecoderModule.putString("decode_and_highlight_barcodes", "1");
    paramSetContainerDecoderModule.putBundle("module_params",moduleAParams);
    //  Feedback params omitted from this code sample
  ArrayList<Bundle> paramSetList = new ArrayList<>();
  paramSetList.add(paramSetContainerDecoderModule);
  paramList.putParcelableArrayList("workflow_params", paramSetList);
i.putExtra("PARAM_LIST", paramList);
sendBroadcast(i);
2. Persistently:
A new section has been added to the existing SetConfig API for Workflow Input Parameters.
There is a dedicated SetConfig example for freeform image capture.
Registering for change in the workflow plugin status was covered earlier in the "Coding and Barcode Highlighting: Registering for change" section. The code will be identical
- The order the results are given will be the order in which the barcodes were seen by the decoding algorithm, this will correspond to the order the user passed over them.
- Captured Barcodes are reported via the Intent plugin as
com.symbol.datawedge.data - If multiple barcodes are captured, the data returned in
com.symbol.datawedge.data_stringwill return all data without any separators. It is recommended to usecom.symbol.datawedge.datainstead. - As stated in the documentation, the keystroke output will concatenate all the data without any separators. This means the Intent plugin is really the only viable way to receive data.
All DataWedge OCR features delivered via the Workflow plugin require a license. Each OCR feature is licensed individually and is term-based (at the time of writing, 1 or 2 years). Please contact your Zebra reseller to obtain licenses.

More information about licensing is available on TechDocs but in summary:
- You obtain a license file through a Zebra reseller or, in some cases, through Zebra directly. Evaluation licenses are also available to experiment with the feature prior to purchase.
- Access the license system to download the
.binfile associated with your license(s) - Apply the license to the device(s), either manually through the device UI or through mass-deployment using StageNow or your EMM.
Note: OCR licensing uses the same licensing mechanism used elsewhere for Zebra Android value-adds, known as Mobility DNA licensing, including entitlement for Zebra One Care customers.
You can experiment with all OCR features using DWDemo without obtaining any kind of license
DataWedge 11.2 introduces the first "Early Access" version of OCR for real world objects:
- License Plates
- Vehicle Identification Numbers (VIN)
- Tyre Identification Numbers (TIN)
- Meters (digital or analog dials e.g. gas or electric meters)
- Identification documents such as drivers licenses or National identity card card.
All these OCR features, with the exception of identity documents, are handled in a consistent way by DataWedge, so this section will group them together.
For more information on DataWedge OCR, please see the Techdocs help page
Unlike standard OCR, DataWedge OCR is designed with specific use cases in mind. With knowledge of what is being scanned, it can make the recognition process quicker and more reliable.
You can include DataWedge OCR into your existing workflow. For example:
- Returning a rental car could involve scanning the license plate and VIN rather than keying them in.
- On-site surveys requiring meter-reading could be made more efficient and less prone to keying errors
- Scanning the TIN will make changing tyres more efficient and less error-prone.
All OCR will follow some common configuration along with some special considerations depending on what is being recognized.
To configure OCR, configure your DataWedge profile as follows:
- Enable the Workflow input plugin. If doing this through the DataWedge UI, you will be prompted that you cannot have both the Barcode and Workflow input plugins active.
- Scroll down to the OCR type you want and enable it.
- Press the ellipsis to bring up additional parameters
- Under 'Input Source', only camera is supported at present
- Set the session timeout, in ms. This is the length of time that the scan engine will try to recognize the object in view. I recommend setting this to about 10 seconds.
- Set the Illumination (useful in low light conditions at the trade-off of increased battery use during recognition) and whether each scan will send an image along with the results ('Output Image').
- Set the Feedback Parameters, such as haptic feedback, LED notification and decode audio feedback. This is the feedback that will be given when recogition is complete.

OCR Configuration for VIN, though the options will be similar for all OCR types.
Only certain country's license plates are supported. At the time of writing the majority of US states plus the majority of EMEA countries are supported. For the most recent list of supported plates, please see TechDocs.
License plate configuration includes an additional option, Region selection, to aid recognition.

There are no additional settings for VIN. A VIN of 17 characters will be recognized, orientated horizontally or vertically. See TechDocs for more information.
Only certain tyre standards are supported. At the time of writing, this is just US DOT (department of transport) standards 1 and 2 but the international standard will be supported in a subsequent release. For the most recent list of supported tyre standards, please see TechDocs.
TIN configuration includes an additional option, the standard to use in recognition.

All standard meter types are supported: Analog, dial and digital meter readers. For more information, see TechDocs which also includes additional restrictions for each type of meter.
To aid recognition, it is necessary to tell DataWedge whether you are scanning a dial-based meter or not:

- The hardware or software trigger will initiate the data acquisition session
- As the system performs OCR, it will highlight the area it is recognizing
- Once recognized, the data will be returned to the calling app. Do NOT press the trigger to capture data. This differs from freeform image capture which does require you to press the trigger.
- If nothing was recognized before the timeout, no data is sent to the calling app.
The technical and marketing teams have already gone through the effort of posting short demos for each of the OCR types to YouTube, please find these below:

Video demonstrating OCR of a license plate through DWDemo

Video demonstrating OCR of a VIN through DWDemo

Video demonstrating OCR of a TIN through DWDemo
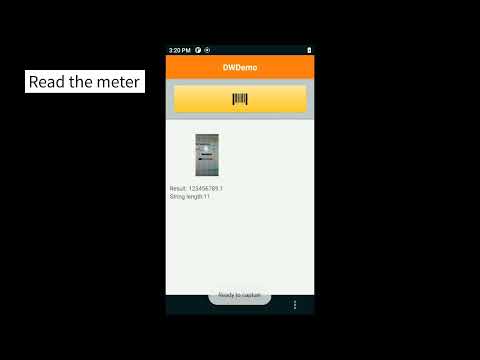
Video demonstrating OCR of a meter through DWDemo
Parsing OCR results is very similar to how Free-Form image capture results are parsed, as explained previously and the Workflow programmer's guide is the best place to start understanding either.
Most importantly for OCR, please refer to the 'OCR Result Output' section of the Workflow programmer's guide as that gives specific information about parsing the received OCR value.
License plates, VIN, TIN and meters will all return a single String data value representing the recognized value, contained within the string_data field. How you parse which value is returned can be done as follows:
//  Given the data is returned via 'intent
String data = intent.getStringExtra("com.symbol.datawedge.decode_data");
JSONArray dataArray = new JSONArray(data);
for (int i = 0; i < dataArray.length(); i++)
{
  JSONObject workflowObject = dataArray.getJSONObject(i);
  if (workflowObject.has("string_data"))
  {
    if (label.equalsIgnoreCase("License Plate Number"))
    {
      Log.d(LOG_TAG, "License Plate" + workflowObject.get("string_data"));
    }
    else if (label.equalsIgnoreCase("VIN Number"))
    {
      Log.d(LOG_TAG, "VIN (Vehicle Identification Number) " + workflowObject.get("string_data"));
    }
    else if (label.equalsIgnoreCase("TIN Number"))
    {
      Log.d(LOG_TAG, "TIN (Tyre Identification Number)" + workflowObject.get("string_data"));
    }
    else if (label.equalsIgnoreCase("Meter Reading"))
    {
      Log.d(LOG_TAG, "Meter (e.g. Gas meter)" + workflowObject.get("string_data"));
    }
    else
    {
      //  Free-Form Image capture.  Parse this as shown previously
    }
  }
  else
  {
      //  Image data.  Parse this in the same way as freeform image capture
  }
}There are two ways to configure OCR in code. This section is similar to the earlier sections talking about configuring DataWedge for barcode highlighting and freeform image capture, though some of the detail is different.
1. At Runtime:
As discussed previously, a new API has been introduced in DataWedge 11.2 Switch Data Capture to allow you to switch from 'regular' scanning to any of the workflow input options.
The full code example in the help docs for Switch Data Capture shows how to switch to OCR (meter reading) and should be treated as the authoritative source but is summarized below:
Intent i = new Intent();
i.setAction("com.symbol.datawedge.api.ACTION");
i.putExtra("APPLICATION_PACKAGE", getPackageName());
i.setPackage("com.symbol.datawedge");
i.putExtra("com.symbol.datawedge.api.SWITCH_DATACAPTURE", "WORKFLOW");

Bundle paramList = new Bundle();
  paramList.putString("workflow_name","meter_reading");
  paramList.putString("workflow_input_source","2");  //  2 is camera, 1 is imager
Bundle paramSet1 = new Bundle();
  paramSet1.putString("module","MeterReaderModule");
Bundle moduleAParams = new Bundle();
  moduleAParams.putString("session_timeout", "15000");
paramSet1.putBundle("module_params",moduleAParams);
ArrayList<Bundle> paramSetList = new ArrayList<>();
  paramSetList.add(paramSet1);
paramList.putParcelableArrayList("workflow_params", paramSetList);
i.putExtra("PARAM_LIST", paramList);

sendBroadcast(i);
2. Persistently:
A new section has been added to the existing SetConfig API for Workflow Input. The format passed to SetConfig is very similar to that passed to the new 'Switch Data Capture' API, i.e. create a nested bundle structure for rules, actions and criteria.
Important: Do not confuse the Workflow Input parameters for OCR with the OCR Parameters that apply only to the barcode input plugin and support freeform recognition of OCR_A and OCR_B typefaces.
There are dedicated examples available in TechDocs to configure OCR:
- Set License Plate Recognition Configuration
- Set VIN Recognition Configuration
- Set TIN Recognition Configuration
- Set Meter Recognition Configuration
Registering for change in the workflow plugin status was covered earlier in the "Coding and Barcode Highlighting: Registering for change" section. The code will be identical:
The RegisterForNotification API has been updated to report the status of the workflow plugin.
Register to receive the Workflow notifications. See the RegisterForNotification docs or this app for more detailed code:
Bundle b = new Bundle();
b.putString("com.symbol.datawedge.api.APPLICATION_NAME", getPackageName());
b.putString("com.symbol.datawedge.api.NOTIFICATION_TYPE", "WORKFLOW_STATUS");
Process the received notification
case "WORKFLOW_STATUS":
  Log.d(LOG_TAG, "WORKFLOW_STATUS: status: " + b.getString("STATUS");
  break;
Be aware: Any Intent API sent to DataWedge before the 'PLUGIN_READY' status will lead to undefined behaviour.
- Enhancements and additional features will be added to OCR in the future, so please check the official documentation for the latest feature set.
- Additional regions and standards will be added to the product in the near future, so again, please refer to the official docs to see if your region is supported.
- You can experiment with OCR without a license using DWDemo but evaluation licenses are also available when you need to integrate it with your app.
DataWedge 11.2 introduces OCR for identity documents which at launch are:
- National ID cards
- Driving licenses
There are many similarities between OCR for identity documents and other types of DataWedge Workflow OCR, so this section will concentrate on where ID cards differ from processing license plates, VIN, TIN and meters.
For more information on DataWedge OCR, please see the Techdocs help page
Quickly scan and recognize the text in a large number of supported ID cards.
At launch this will cover a selection of drivers licenses & identification cards across the following:
- United States
- Canada
- LATAM (Mexico)
- EMEA and EU (selected countries)
- Africa (selected countries)
- Australia (selected territories)
This list is ever increasing, please refer to the supported list on TechDocs for up to date information.
All OCR will follow some common configuration along with some special considerations depending on what is being recognized. Please refer to the previous section which described how to configure OCR with DataWedge
At the time of writing there are no special configuration options for recognizing ID cards. Any supported ID card placed in the field of view will be recognized.
- The hardware or software trigger will initiate the data acquisition session
- As the system performs OCR, it will highlight the area it is recognizing
- Once recognized, the data will be returned to the calling app. Do NOT press the trigger to capture data.
- If nothing was recognized before the timeout, no data is sent to the calling app.
The technical and marketing teams have already gone through the effort of posting a short demo for ID card OCR to YouTube, please find this below:
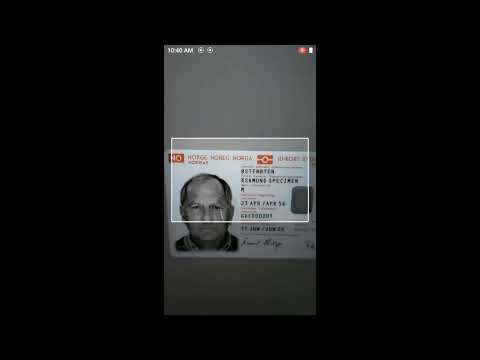
The primary difference between OCR for identity documents and OCR for other objects is how DataWedge will parse the data for you. Whereas other objects return a single, recognized string_data result, Identity cards will return upwards of 55 different attributes related to the card.
Obviously no single card will contain all of these attributes as the possible fields are designed to cover every card type but the full list of fields is given in the workflow programming guide.
To detect that an ID card has been scanned, use a label known to exist in that identity card , for example 'lastName'. Then parse the entire returned JSON object:
String data = intent.getStringExtra("com.symbol.datawedge.decode_data");
Log.d(LOG_TAG, "Decode Data: " + data);
if (data != null)
{
  JSONArray dataArray = new JSONArray(data);
  for (int i = 0; i < dataArray.length(); i++)
  {
    JSONObject workflowObject = dataArray.getJSONObject(i);
    if (workflowObject.has("string_data"))
    {
      String label = workflowObject.getString("label");
      if (label.equalsIgnoreCase("lastName"))
      {
        parseIdentityDocument(dataArray);
        break;
      }
      //  else if other type of OCR
    }
  }
}
Then to parse the identity document:
private void parseIdentityDocument(JSONArray dataArray) throws JSONException {
  String lastName = "?";
  String firstName = "?";
  for (int i = 0; i < dataArray.length(); i++)
  {
    JSONObject workflowObject = dataArray.getJSONObject(i);
    if (workflowObject.has("string_data"))
    {
      String label = workflowObject.getString("label");
        if (label.equalsIgnoreCase("lastName"))
          lastName = workflowObject.getString("string_data");
        else if (label.equalsIgnoreCase("firstName"))
          firstName = workflowObject.getString("string_data");
        //  else if / case ... for each of the other possible parameters
    }
  }
  Log.d(TAG, "First Name: " + firstName + ", Last Name: " + lastName);
}1. At Runtime:
As discussed previously, a new API has been introduced in DataWedge 11.2 Switch Data Capture to allow you to switch from 'regular' scanning to any of the workflow input options.
The full code example in the help docs for Switch Data Capture shows how to switch to OCR (ID cards) and should be treated as the authoritative source but is summarized below:
Intent i = new Intent();
i.setAction("com.symbol.datawedge.api.ACTION");
i.putExtra("APPLICATION_PACKAGE", getPackageName());
i.setPackage("com.symbol.datawedge");
i.putExtra("com.symbol.datawedge.api.SWITCH_DATACAPTURE", "WORKFLOW");

Bundle paramList = new Bundle();
  paramList.putString("workflow_name","id_scanning");
  paramList.putString("workflow_input_source","2");
Bundle paramSet1 = new Bundle();
  paramSet1.putString("module","IDDecoderModule");
Bundle moduleAParams = new Bundle();
  moduleAParams.putString("session_timeout", "25000");
paramSet1.putBundle("module_params",moduleAParams);
ArrayList<Bundle> paramSetList = new ArrayList<>();
  paramSetList.add(paramSet1);
paramList.putParcelableArrayList("workflow_params", paramSetList);
i.putExtra("PARAM_LIST", paramList);

sendBroadcast(i);
2. Persistently:
A new section has been added to the existing SetConfig API for Workflow Input. There are no special considerations for Identity cards when calling SetConfig, and an example is available on TechDocs which can be used as a template.
Registering for change in the workflow plugin status was covered earlier in the "Coding and Barcode Highlighting: Registering for change" section. The code will be identical:
The RegisterForNotification API has been updated to report the status of the workflow plugin.
Register to receive the Workflow notifications. See the RegisterForNotification docs or this app for more detailed code:
Bundle b = new Bundle();
b.putString("com.symbol.datawedge.api.APPLICATION_NAME", getPackageName());
b.putString("com.symbol.datawedge.api.NOTIFICATION_TYPE", "WORKFLOW_STATUS");
Process the received notification
case "WORKFLOW_STATUS":
  Log.d(LOG_TAG, "WORKFLOW_STATUS: status: " + b.getString("STATUS");
  break;
Be aware: Any Intent API sent to DataWedge before the 'PLUGIN_READY' status will lead to undefined behaviour.
- Passports, Visas are not supported through DataWedge OCR through the Workflow input plugin but you can still use the barcode input plugin OCR capabilities which recognizes the OCR_A and OCR_B typefaces.
- Performance may be impacted by reflections, lighting conditions, dirt, abrasion, poor background contrast
- Some accented characters are not yet supported, e.g. ñ or á but support is coming in the future.
Even users familiar with DataWedge may confuse some of these new features with existing ones. Below is a list of similar, though unrelated capabilities
- The Intent Output plugin setting for 'Use Content providers' is not used for Workflow or barcode highlighting
- Similarly, although the principle is similar do not use the content provider programming guide to extract images from the workflow data, instead use the workflow programmer's guide
- The "OCR params" under "Scanner Configuration" is something separate and not related to the OCR feature of workflow.