This project turns edge devices such as Raspberry Pi 3 into an intelligent gateway with deep learning running on it. No internet connection is required, everything is done locally on the edge device itself. Further, multiple edge devices can create a distributed AIoT network.
At DT42, we believe that bringing deep learning to edge devices is the trend towards the future. It not only saves costs of data transmission and storage but also makes devices able to respond according to the events shown in the images or videos without connecting to the cloud.
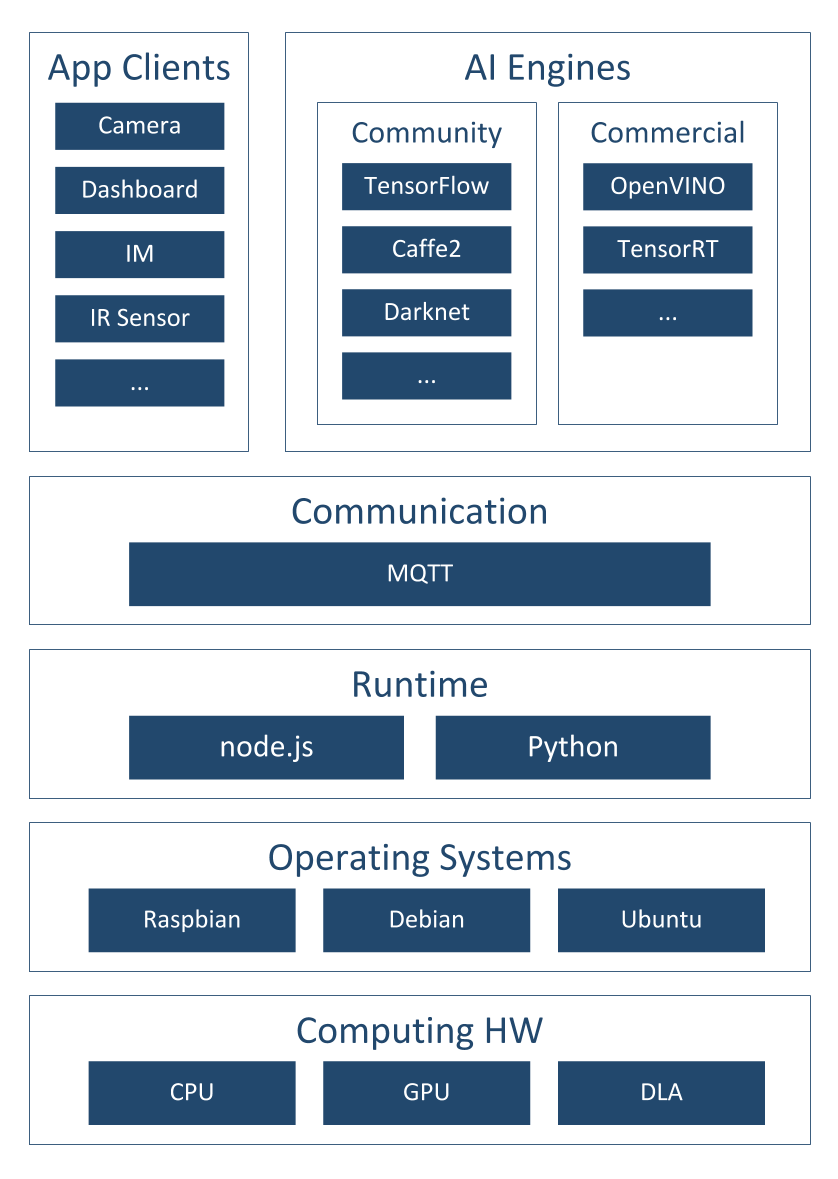
Figure 1: BerryNet architecture
Figure 1 shows the software architecture of the project, we use Node.js/Python, MQTT and an AI engine to analyze images or video frames with deep learning. So far, there are two default types of AI engines, the classification engine (with Inception v3 [1] model) and the object detection engine (with TinyYOLO [2] model or MobileNet SSD [3] model). Figure 2 shows the differences between classification and object detection.

Figure 2: Classification vs detection
One of the application of this intelligent gateway is to use the camera to monitor the place you care about. For example, Figure 3 shows the analyzed results from the camera hosted in the DT42 office. The frames were captured by the IP camera and they were submitted into the AI engine. The output from the AI engine will be shown in the dashboard. We are working on the Email and IM notification so you can get a notification when there is a dog coming into the meeting area with the next release.

Figure 3: Object detection result example
To bring easy and flexible edge AI experience to user, we keep expending support of the AI engines and the reference HWs.

Figure 4: Reference hardwares
You can install BerryNet by using pre-built image or from source. Please refer to the Wiki page for the details.
We are pushing BerryNet into Debian repository, so you will be able to install by only typing one command in the future.
Here is the quick steps to install from source:
$ git clone https://github.com/DT42/BerryNet.git
$ cd BerryNet
$ ./configure
BerryNet is managed by systemd. You can manage BerryNet via berrynet-manager:
$ berrynet-manager [start | stop | status | log]
All the configurations are in config.js.
-
Choose AI Engine.
- Two types of AI engines currently: object classifier and object detector.
-
Configure IP camera's snapshot access interface.
- Please refer to IP camera setup for more details.
-
MQTT topics.
Open browser and enter the URL:
http://localhost:8080/index.html#source=dashboard.json
The default dashboard configuration file will be loaded.
Open browser and enter the URL:
http://<gateway-ip>:8080/index.html#source=dashboard.json
Click the data sources, and change MQTT broker's IP address to the gateway's IP.
For more details about dashboard configuration (e.g. how to add widgets), please refer to freeboard project.
To capture an image via configured IP camera
$ mosquitto_pub -h localhost -t berrynet/event/camera -m snapshot_ipcam
To capture an image via board-connected camera (RPi camera or USB webcam)
$ mosquitto_pub -h localhost -t berrynet/event/camera -m snapshot_boardcam
To provide a local image
$ mosquitto_pub -h localhost -t berrynet/event/localImage -m <image_path>
To start and stop streaming from board-connected camera
$ mosquitto_pub -h localhost -t berrynet/event/camera -m stream_boardcam_start
$ mosquitto_pub -h localhost -t berrynet/event/camera -m stream_boardcam_stop
To start and stop streaming from Nest IP camera
$ mosquitto_pub -h localhost -t berrynet/event/camera -m stream_nest_ipcam_start
$ mosquitto_pub -h localhost -t berrynet/event/camera -m stream_nest_ipcam_stop
You might want to store the snapshot and inference results for data analysis.
To enable data collector, you can set the storage directory path in config.js:
config.storageDirPath = '<data-storage-dirpath>';
and restart BerryNet.
The original instruction of retraining YOLOv2 model see github repository of darknet
In the current of BerryNet, TinyYolo is used instead of YOLOv2. The major differences are:
- Create file yolo-obj.cfg with the same content as in
tiny-yolo.cfg - Download pre-trained weights of darknet reference model,
darknet.weights.12, for the convolutional layers (6.1MB) https://drive.google.com/drive/folders/0B-oZJEwmkAObMzAtc2QzZDhyVGM?usp=sharing
The rest parts are the same as retraining YOLO.
If you use LabelMe to annotate data, utils/xmlTotxt.py can help convert the xml format to the text format that darknet uses.
Please refer to the Google Group for questions, suggestions, or any idea discussion.