This repository outlines information about the AFi-R router required to customize it beyond what is possible out of the box.
⚠️ Remember that modifying your router can be dangerous and may well brick it and/or void your warranty.
To get access to the router's administrative serial console, we need to connect a reader to the main SoC's UART header.
There are five 4-pin UART headers available on the router's boards. Four of them sit on the board with the main SoC.
Do NOT connect VCC to your UART reader.
It's recommended to connect GND of your UART reader to the shield of your router's power connector rather than to the header's GND.
UART headers:
| Pinout | Baudrate | Purpose | |
|---|---|---|---|
| J8 | unk 0.0V, unk 0.0V, unk 3.3V, unconnected |
Not analyzed | |
| J9 | unk 3.3V, unk 0.0V, unk 3.3V, unk 0.0V |
Not analyzed | |
| J10 | unk 0.0V, unk 3.3V, unk 3.3V, unk 3.3V |
Not analyzed | |
| J11 | VCC 3.3v, RX, TX, GND |
115200 | Main SoC's serial console |
| J29 | unk 3.3V, unk 0.0V, unk 0.0V, unk 0.0V |
Not analyzed |
The UART header labeled J11 can be used for administrative communication with the main SoC.
Simply connect a UART reader to the RX, TX and GND pins and you should be able to communicate with the router.
The router uses a simple BusyBox /bin/ash shell without authentication which you can use to manage the router.

A dump from J11's boot procedure and a run of the mount command can be found here.
My pictures only show where the header is. You can find a teardown of the router here.
The J11 header can be found on the bottom right corner of the middle board.
From above, J11 is obstructed by a rubber piece stuck to the top board:

But the header is also exposed from the underside:

This is the pinout for J11 as seen from above:

You can find the firmware link for the latest version either by:
- Visiting Ubiquiti's forum, for example https://community.ui.com/releases/AmpliFi-Firmware-HD-and-Instant-4-0-0/b18104b6-554a-490b-8243-ad72ec066a49
- or visiting https://www.ubnt.com/update/amplifi/check/?c=stable&t=AFi-R&v=3.4.3
Flashing a firmware file on-demand can be done at http://{ROUTER_IP}/fwupdate.php.
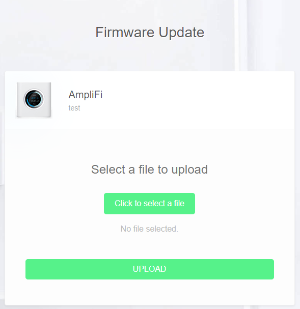
On firmware upload, the web server runs a firmware verification tool already existing in the current firmware called uh-fw-tool. This tool cancels the upgrade if the firmware is invalid, unsigned, has an invalid signature or wasn't signed by the manufacturer.
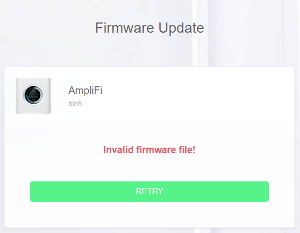
Because the web based flashing procedure doesn't allow flashing custom firmware, we need to access the router by other means. We must flash it by direct communication with the router. Luckily the router can be controlled through the J11 on-board UART header inside the router, as detailed in the UART and J11 sections.
uh-fw-tool is a tool in the firmware of the router (at /sbin/uh-fw-tool) that can verify a firmware file and also flash the router with the firmware file you give it.
Out of the box, this tool only flashes firmware that has been signed by the router manufacturer, but this can be easily circumvented.
Patching uh-fw-tool involves modifying the program to return 0 in a procedure instead of 0xa when the signature is "bad".
Open Ghidra or IDA and search for "Bad firmware signature". Patch the local variable assignment to assign a value of 0x0 instead of 0xa (decompiling the code helps here to know what's what). Alternatively, you can use a binary file editor (eg. HexEdit) and search for the pattern 9A A0 6A 0A 10 06 B2 0C*, replacing the 0A with 00.

*The pattern above has only been tested on 2.0.0, 2.1.1, 2.6.1, 3.1.2 and 3.3.0. It might work on other and future versions too, but I cannot guarantee that it does.
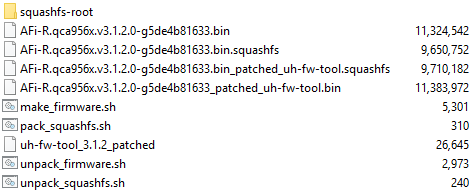
I have made some tools that you can use to make it easier to edit and build custom firmware, these can be found here.
After connecting to J11, we can run the patched version of uh-fw-tool to manually flash our firmware file. After flashing we use reboot to reboot the router.
-
Connect to the router's serial console through the J11 header.
-
Upload your patched uh-fw-tool to the router and mark it as executable:
- Upload
uh-fw-tool_patchedthroughhttp://{ROUTER_IP}/fwupdate.php. mv /tmp/uploaded-firmware.bin /tmp/uh-fw-tool_patchedchmod u+x /tmp/uh-fw-tool_patched
- Upload
-
Upload your custom firmware through
http://{ROUTER_IP}/fwupdate.php. -
Run your patched uh-fw-tool on the firmware:
./tmp/uh-fw-tool_patched -cf /tmp/uploaded-firmware.bin
-
If uh-fw-tool discovers an issue with your firmware, it will most likely spit out an error and stop the upgrading sequence. This usually means that your firmware is malformed. Read the error message and fix the issue.
- It is not a problem if the tool says that the signature is bad. The tool will continue.
-
If uh-fw-tool successfully verified your firmware, it will start flashing your router. This takes a few minutes.
-
When the flashing is done, reboot the router using
reboot. -
Enjoy!
If you flash a firmware that has its /sbin/uh-fw-tool exchanged with your patched one, the web interface will allow the flashing of custom firmware, making the flashing procedure a bit more straightforward.

When developer mode is enabled, the router's Dropbear SSH service starts up at boot, letting you interface with the router over the network. The mode also gives you access to other developer-only features such as custom QoS rules.
-
Connect to the router's serial console through the J11 header.
-
Run
echo 'SSH' | prst_tool -w miscand thenreboot.
Features that are enabled:
- SSH access
- After rebooting, the Dropbear SSH server will run on port 22. Login with username
ubntand your admin password.
- After rebooting, the Dropbear SSH server will run on port 22. Login with username
http://{ROUTER_IP}/info.php- Displays system information such as connected clients, connections and diagnostic information.
http://{ROUTER_IP}/qos.php- Lets you create Quality of Service (QoS) rules.
http://{ROUTER_IP}/speedtest.php- Runs download/upload speed tests against various services.
The LCD display sits on a board with an ARM processor. This board appears to have a micro-USB connector and a 6-pin UART header, of unknown purpose.
/lib/firmware/AFi-R_LCD.bin and /lib/firmware/AFi-R_LCD_BL.bin contain GIFs, strings and other unknown data.
/usr/sbin/uictld seems to control communication with the display module.
The images in /lib/firmware/AFi-R_LCD.bin can be edited for comedic effect:
