File Transfers
This document will describe various procedures for transferring files to and from Trixie.
Important Note: Before proceeding with this configuration, please ensure that you have performed the external access setup and advanced configuration procedures.
The following sections detail how to transfer files between your local computer and Trixie. They basically rely on advanced SSH configurations to bridge the network between your local computer and Trixie.
To copy a file to the Trixie server, please use the scp command. Please note that for external collaborators, the use of this method requires that your system be configured as detailed in the advanced configuration document in order to provide a direct link between your local machine and the Trixie server.
The following command will copy the file test.txt from John Doe’s local machine to his admin.john.doe account on Trixie. Please note that using trixie as the hostname will only work if you have configured SSH to use ProxyJump as detailed in the advanced configuration document.
scp test.txt trixie:/home/admin.john.doe
To copy a file from Trixie to your local machine, you basically reverse the arguments to the scp command.
scp trixie:/home/admin.john.doe/test.txt test.txt
To copy an entire directory instead of just a file, please use the –r option (for recursive) to the scp command.
scp –r myWorkFilesDir trixie:/home/admin.john.doe
To copy a file to the Trixie server, please use the pscp command.
For non-NRC users, please note that the use of this method requires that you have two Putty profiles defined.
- A profile for the bastion server
- A profile for the Trixie server
The bastion server profile was likely created during the setup configuration for your external access to Trixie. If not, then please see the initialize SSH connection section for detailed instructions on creating a profile for the bastion server.
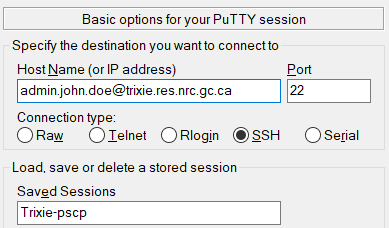
Follow the procedure below to create the Trixie server profile.
Under Session
-
Set Host Name (or IP address): <admin.firstname.lastname>@trixie.res.nrc.gc.ca
-
Set Port: 22
-
Add a name for Saved Sessions – perhaps Trixie-pscp
-
Click Save
Once you have the profiles created and saved, please follow the procedure below to run the pscp command.
-
Load the Bastion profile and click Open
-
Login to the bastion server and leave the window open
-
Open a Command Prompt window
-
Use the pscp command in the Command Prompt window to copy files to or from the trixie server using the Trixie-pscp putty profile
-
Copy the file
test.txtfrom John Doe’s local machine to his admin.john.doe account on trixiepscp test.txt Trixie-pscp:/home/admin.john.doe -
To copy a file from trixie to your local machine, you basically reverse the arguments to the pscp command
pscp Trixie-pscp:/home/admin.john.doe/test.txt test.txt -
To copy an entire directory instead of just a file, please use the –r option (for recursive) to the pscp command
pscp –r myWorkFilesDir Trixie-pscp:/home/admin.john.doe
-
Needs verification that this is accurate and works, as well as real parameters for the command lines please
The procedures in this section assume that the advanced SSH configurations discussed above have been implemented. There are three options for copying files between Trixie and another HPC cluster
- Copy files directly between Trixie and the HPC cluster
- Login to Trixie from the other HPC cluster
- Copy files through your local computer
This procedure requires that there is a network flow open between Trixie and the second HPC cluster. If this is the case, then files can be directly copied between Trixie and the second HPC cluster. This is the ideal situation and should be the fastest option in terms of overall network speed between the two systems.
To copy a file from the second HPC cluster to Trixie, use the following scp command on the Trixie server.
scp username@cluster.domain:/home/username/test.txt test.txt
To copy a file from Trixie to the second HPC cluster, you basically reverse the arguments to the scp command.
scp test.txt username@cluster.domain:/home/username/test.txt
To copy an entire directory instead of just a file, please use the –r option (for recursive) to the scp command.
scp –r myWorkFilesDir username@cluster.domain:/home/username/folder
This procedure requires that there is an open network flow from the second HPC cluster to Trixie. If this is the case, then files can be copied between Trixie and the second HPC cluster. As is suggested, you will need to login to the second HPC cluster first, and then from the cluster login, login to Trixie.
To copy a file from the second HPC cluster to Trixie, use the following scp command on the Trixie server.
scp username@cluster.domain:/home/username/test.txt test.txt
To copy a file from Trixie to the second HPC cluster, you basically reverse the arguments to the scp command.
scp test.txt username@cluster.domain:/home/username/test.txt
To copy an entire directory instead of just a file, please use the –r option (for recursive) to the scp command.
scp –r myWorkFilesDir username@cluster.domain:/home/username/folder
This procedure requires that you copy file between the two clusters using your local computer as a bridge. The commands below should be executed on your local computer and not either of the cluster servers.
To copy a file from the second HPC cluster to Trixie, use the following scp command on your local computer.
scp username@cluster.domain:/home/username/test.txt trixie:/home/admin.john.doe/test.txt
To copy a file from Trixie to the second HPC cluster, you basically reverse the arguments to the scp command.
scp trixie:/home/admion.john.doe/test.txt username@cluster.domain:/home/username/test.txt
To copy an entire directory instead of just a file, please use the –r option (for recursive) to the scp command.
scp –r trixie:/home/admin.john.doe/myWorkFilesDir username@cluster.domain:/home/username/folder
Shared project work and files should be placed in the shared project location under the following folder hierarchy
/gpfs/projects/<project-group>/
Where project-group is the name of your project group – for example, AI4D or COVID.
To copy files to a project folder you should create a folder under the project directory and then copy files from your home directory to the new folder. In the example below user John Doe will copy two dataset files to the AI4D/bio-01 project folder.
-
Change directory to the project folder
cd /gpfs/projects/AI4D/bio-01 -
Create the new folder using a unique name, perhaps your last name and first initial
mkdir doej -
Change back to your home directory
cd -
Copy the files to your new project directory
cp dataset1.dat dataset2.dat /gpfs/projects/AI4D/bio-01/doej