External Access Advanced Configuration
To ease usage of the bastion host to easily connect to Trixie, there are some steps which can be taken, especially making use of the SSH ProxyJump and ControlMaster parameters. Basically, you need to configure SSH to automatically connect with the Trixie server using the bastion host as a connector between your local computer and the Trixie server.
Important Note: Before proceeding with this configuration, please ensure that you have performed the external access setup procedure.
To configure SSH to automatically connect to the Trixie server, please open your .ssh/config file with your preferred text editor and add the following lines on your local machine – not the servers – while substituting your given usernames in the User directive. You will also need to create the folder .ssh/sockets to complete the configuration.
Host trixie-bastion
  HostName trixie.nrc-cnrc.gc.ca
  User <firstname>.<lastname>@pub.nrc-cnrc.gc.ca
  ControlMaster auto
  ControlPath ~/.ssh/sockets/%r@%h-%p

Host trixie
  HostName trixie.res.nrc.gc.ca
  User admin.<firstname>.<lastname>
  ProxyJump trixie-bastion
Once your settings are configured, you will be able to login to the Trixie server with the following command
ssh trixie
Please note that you will be prompted as follows
- LoginTC prompt – enter 1
- Prompt for your PUB password
- Prompt for your RES admin password
To configure SSH to automatically connect to the Trixie server, please set the following settings in your Putty application, substituting your username where applicable.
-
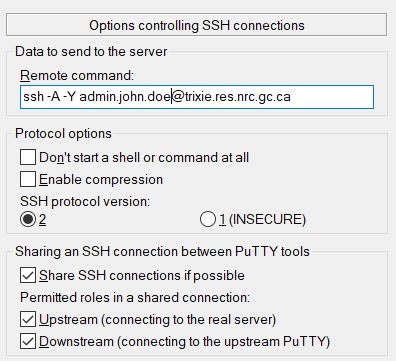
Under Connection -> SSH
-
Set Remote command:
ssh –A –Y admin.<firstname>.<lastname>@trixie.res.nrc.gc.ca -
Select the option Share SSH connections if possible – this will enable you to establish multiple connections to Trixie
-
-
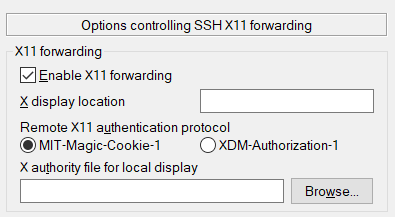
Under Connection -> SSH -> X11
-
Select the option Enable X11 forwarding
-
-
Under Session
-
Set Host Name (or IP address): <firstname.lastname>@pub.nrc-cnrc.gc.ca@trixie.nrc-cnrc.gc.ca
-
Set Port: 22
-
Add a name for Saved Sessions – perhaps Trixie

-
Click Save
-
Once the settings have been saved, you can double click on the name in the list of Saved Sessions to open a session to the Trixie server. Please note that you will be prompted as follows
- LoginTC prompt – enter 1
- Prompt for your PUB password
- Prompt for your RES admin password