File Transfers
This document will describe procedures for transferring files to and from Trixie.
To copy a file to the trixie server, please use the scp command. Please note that for external collaborators, the use of this method requires that your system be configured as detailed in the Advanced SSH Configuration section above in order to provide a direct link between your local machine and the trixie server.
The following command will copy the file test.txt from John Doe’s local machine to his admin.john.doe account
on trixie. Please note that using trixie as the hostname will only work if you have set up the advanced SSH
configuration using ProxyPass as detailed in the user's guide.
scp test.txt trixie:/home/admin.john.doe
To copy a file from trixie to your local machine, you basically reverse the arguments to the scp command.
scp trixie:/home/admin.john.doe/test.txt test.txt
To copy an entire directory instead of just a file, please use the –r option (for recursive) to the scp command.
scp –r myWorkFilesDir trixie:/home/admin.john.doe
To copy a file to the trixie server, please use the pscp command.
For non-NRC users, please note that the use of this method requires that you have two Putty profiles defined.
- A profile for the bastion server
- A profile for the trixie server
The bastion profile was likely created in the Accessing Trixie with LoginTC 2-Factor Authentication section under the Initialize SSH Connection with Windows sub-section. If you did not create one previously, please see that section to create the bastion profile.
Follow the procedure below to create the trixie profile.
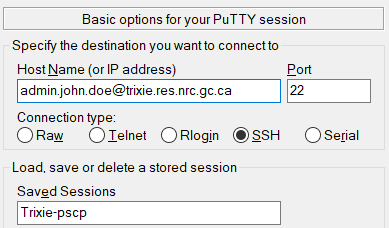
Under Session
-
Set Host Name (or IP address): <admin.firstname.lastname>@trixie.res.nrc.gc.ca
-
Set Port: 22
-
Add a name for Saved Sessions – perhaps Trixie-pscp
-
Click Save
Once you have the profiles created and saved, please follow the procedure below to run the pscp command.
-
Load the Bastion profile and click Open
-
Login to the bastion server and leave the window open
-
Open a Command Prompt window
-
Use the pscp command in the Command Prompt window to copy files to or from the trixie server using the Trixie-pscp putty profile
a. Copy the file
test.txtfrom John Doe’s local machine to his admin.john.doe account on trixiepscp test.txt Trixie-pscp:/home/admin.john.doeb. To copy a file from trixie to your local machine, you basically reverse the arguments to the pscp command
pscp Trixie-pscp:/home/admin.john.doe/test.txt test.txtc. To copy an entire directory instead of just a file, please use the –r option (for recursive) to the pscp command
pscp –r myWorkFilesDir Trixie-pscp:/home/admin.john.doe
Shared project work and files should be placed in the shared project location under the following folder hierarchy
/gpfs/projects/<project-group>/
Where project-group is the name of your project group – for example, AI4D or COVID.
To copy files to a project folder you should create a folder under the project directory and then copy files from your home directory to the new folder. In the example below user John Doe will copy two dataset files to the AI4D/bio-01 project folder.
-
Change directory to the project folder
cd /gpfs/projects/AI4D/bio-01 -
Create the new folder using a unique name, perhaps your last name and first initial
mkdir doej -
Change back to your home directory
cd -
Copy the files to your new project directory
cp dataset1.dat dataset2.dat /gpfs/projects/AI4D/bio-01/doej