- Introduction
- YOLO Versions Used
- Datasets
- Getting Started with Docker ( Training )
- Getting Started with Notebook ( Inference )
- YOLOvs8 Training and Inference Optimization Notebook
- Contributing
- License
This repository is designed to provide an overview and guidance on using two versions of the YOLO (You Only Look Once) object detection framework: YOLOv8 and YOLOv10. YOLO is a state-of-the-art deep learning model for object detection, offering real-time detection capabilities across a variety of tasks. YOLOv8 builds on the innovations introduced by YOLOv5, incorporating improved model architecture and optimized detection for smaller objects. YOLOv10 represents the latest advancement in the YOLO series, featuring cutting-edge performance with enhanced training methodologies and support for diverse datasets.
In this project, two key datasets were used: the HRSID dataset, consisting of high-resolution satellite images for ship detection, and the CAESAR Openship 2.0 SAR dataset, which provides a large-scale collection of SAR images. The HRSID dataset was used during the exploratory phase, offering insights into initial detection tasks, while the CAESAR Openship 2.0 SAR dataset was employed for the main training phase to further refine and improve the model's performance.
The repository also includes instructions for setting up the environment, using Docker for training, and utilizing notebooks for inference. Contributions and code modifications are encouraged, and the project is licensed under the MIT License.
YOLOv5 is a highly efficient and versatile object detection model, continuing the YOLO series' legacy with improvements in speed, accuracy, and ease of use. It is designed to deliver top-tier performance while being lightweight and adaptable to various applications and platforms.
Key Features:
- Fast and accurate object detection
- Optimized for deployment on edge devices and cloud environments
- User-friendly and easy to integrate into workflows
- Supports transfer learning and fine-tuning for custom datasets
The code for YOLOv5 can be found in the official repository YOLOv5 GitHub Repository.
YOLOv8 builds upon the advancements of YOLOv5 with further optimizations and new features aimed at improving performance in various object detection scenarios. It includes architectural changes and better handling of smaller objects.
Key Features:
- Enhanced model architecture
- Better performance on smaller objects
- Advanced augmentation techniques
- Further speed improvements
The code for YOLOv8 was taken from the reference repository Ultralytics YOLOv8 GitHub Repository.
YOLOv10 represents the latest iteration in the YOLO series, featuring cutting-edge improvements in both model architecture and training techniques. This version is designed to provide state-of-the-art performance across a wide range of object detection tasks.
Key Features:
- State-of-the-art detection performance
- Highly optimized for various hardware
- Advanced training methodologies
- Comprehensive support for diverse datasets
The code for YOLOv10 was taken from the reference repository YOLOv10 GitHub Repository.
The SAR-Ship-Dataset contains 43,819 ship chips, each with a resolution of 256 × 256 pixels, and includes 59,535 ship instances in total. This dataset is created using 102 Chinese Gaofen-3 images and 108 Sentinel-1 images.
- Gaofen-3 images have spatial resolutions of 3 m, 5 m, 8 m, 10 m, and 25 m per pixel.
- Sentinel-1 images have spatial resolutions ranging from 1.7 × 4.3 to 3.6 × 4.9 and 20 × 22 meters.
- Gaofen-3: Ultrafine Strip-Map (UFS), Fine Strip-Map 1 (FSI), Full Polarization 1 (QPSI), Full Polarization 2 (QPSII), and Fine Strip-Map 2 (FSII).
- Sentinel-1: S3 Strip-Map (SM), S6 SM, and IW-mode.
Each ship chip is associated with an Extensible Markup Language (XML) file, which includes details such as the ship's location, the ship chip name, and the image dimensions.
- Paper Link: SAR-Ship-Dataset Paper
- Dataset Link: SAR-Ship-Dataset GitHub Repository
The procedure described is for YOLOv8. The only difference for YOLOv10 or YOLOv5 is to start in the YOLOv10/YOLOv5 folder and change few file's name.
Before starting the process, you need to configure the .env file by adding the WANDB_API_KEY. This key is necessary for logging and tracking your machine learning experiments with Weights & Biases (WandB).
The .env file should look like this:
WANDB_API_KEY=<api_key>Start by building the Docker image and running the container for YOLOv8.
# Build Docker image for YOLOv8
docker build -t yolov8_image .

# Run the container with GPU support for YOLOv8
docker run -it --gpus '"device=2"' --name yolov8-container  --env-file .env -v $(pwd)/output:/app/ultralytics/output yolov8_image /bin/sh
This will create and start the container yolov8-container.
If the container is already running but you need to reconnect to it:
# Verify the container is running
docker ps

# Attach to the YOLOv8 container's shell
docker attach yolov8-container-IDTo start managing long-running processes inside the container, create a Tmux session:
# Create a new tmux session called 'training'
tmux new-session -s training
Inside the Tmux session, execute your training script:
# Run the YOLOv8 training process
python3.9 yolov8_train_val_test.py -e 200 -b 32 -o SGDAfter starting the training, detach from the Tmux session to leave it running in the background:
# Detach from the tmux session
Ctrl + B, then DTo exit the Docker container without stopping it, use the following command:
# Detach from the container
Ctrl + P, then Ctrl + Q
This will return you to your local terminal while keeping the container and processes running.
If you need to check on the training process or make modifications:
# Reattach to the YOLOv8 container
docker attach yolov8-container-ID

# Reattach to the tmux session
tmux attach-session -t trainingOnce your work is complete, exit the Tmux session and stop the Docker container:
# Exit the tmux session
Ctrl + B, then exit

# Stop the container from a separate terminal
docker stop yolov8-container-IDTo use the YOLO suite in a notebook environment, we utilized Google Colab for easy setup and access to resources. To begin, you'll need to upload the following files to your Colab environment:
- The notebook file (.ipynb).
- A zipped folder named
yolo_camcontaining the necessary scripts and models. - The images on which you want to perform inference.
Once the files are uploaded, you can unzip the folder and run the notebook to start using YOLO for object detection tasks.
Below, you will find a detailed description of how to perform inference and optimization with YOLOv8. The notebooks for these processes can be found in the inference and optimization folders.
This repository contains a Google Colab notebook demonstrating how to train a YOLOv8 model on a custom dataset, perform inference, and optimize the model using TensorRT for faster inference. The notebook follows these steps:
- Mount Google Drive
- Set up the YOLOv8 environment
- Train YOLOv8 models (original and modified)
- Perform inference with trained models
- Optimize the YOLOv8 model using TensorRT
- Perform inference with the TensorRT-optimized model
The dataset should be organized in the following structure:
dataset/
├── images/
│ ├── train/
│ ├── val/
│ └── test/
└── labels/
├── train/
├── val/
└── test/
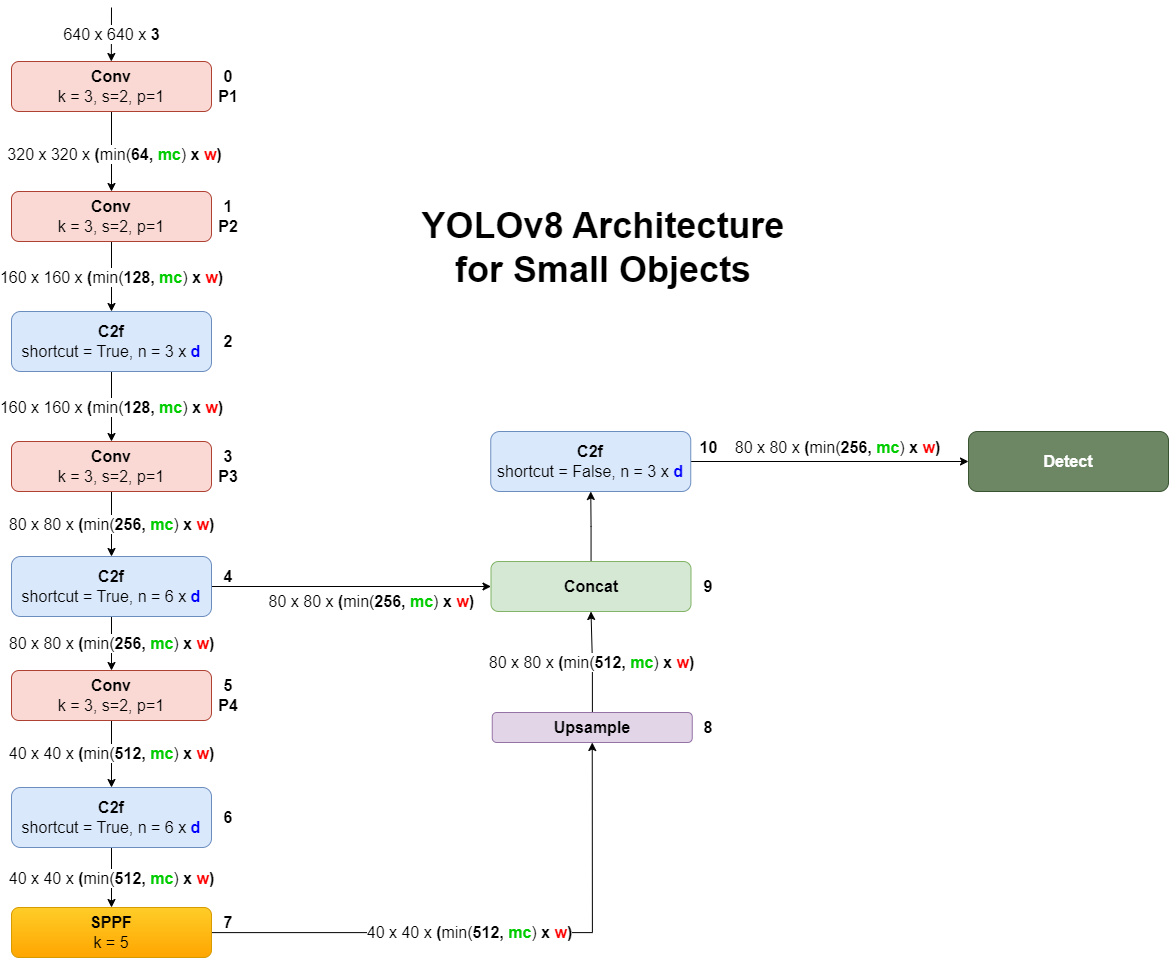
The original YOLOv8 model architecture is used to train the model on the dataset. This model is designed for general object detection tasks.
To optimize the YOLOv8 model for detecting small objects, certain layers in the architecture are removed. This modification helps in focusing the model's capacity on smaller scales of the input image, making it more efficient in detecting small objects.

The following diagram shows the modifications made to the YOLOv8 architecture to better handle small object detection:
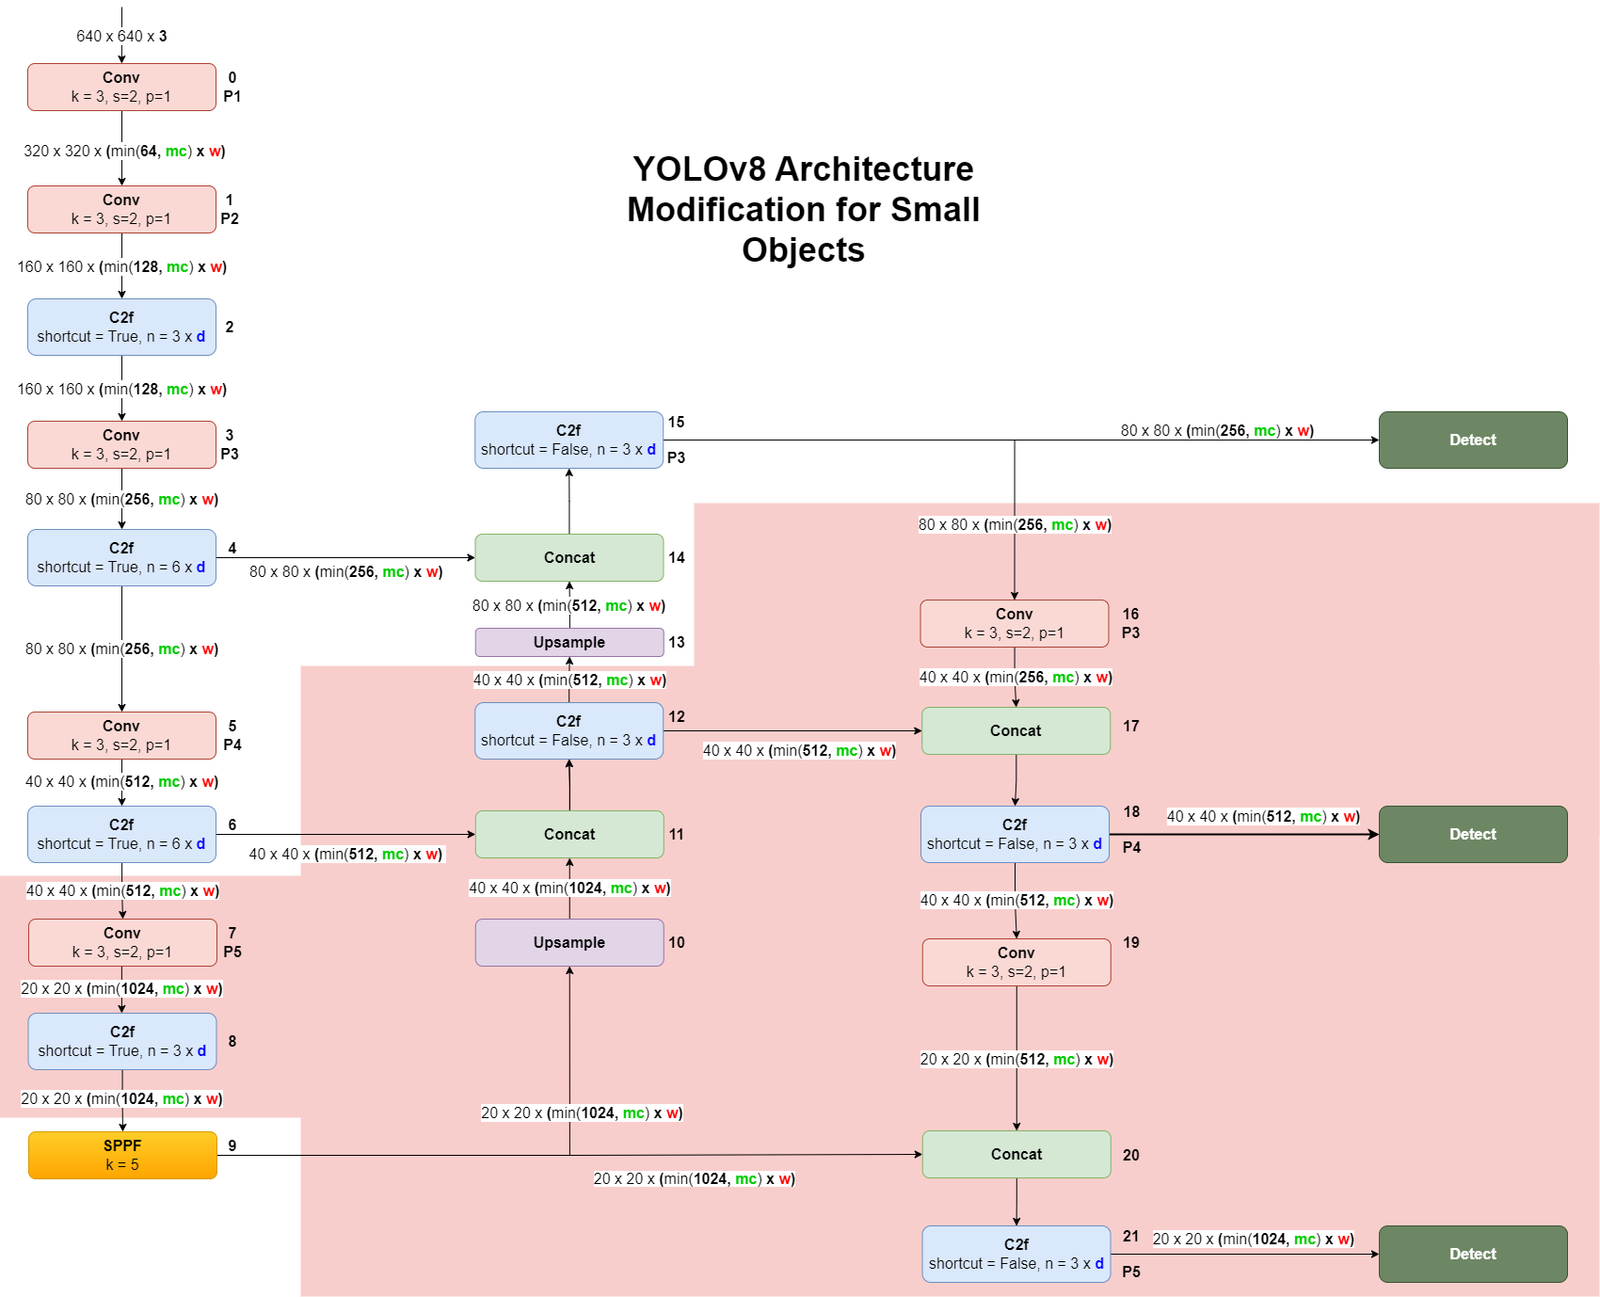
The following is the YOLOv8 architecture configuration file modified for detecting small objects, where unnecessary layers are commented out:
# Ultralytics YOLO 🚀, AGPL-3.0 license
# YOLOv8 object detection model with P3-P5 outputs. For Usage examples see https://docs.ultralytics.com/tasks/detect

# Parameters
nc: 80 # number of classes
#scales: # model compound scaling constants, i.e. 'model=yolov8n.yaml' will call yolov8.yaml with scale 'n'
#  # [depth, width, max_channels]
#  n: [0.33, 0.25, 1024] # YOLOv8n summary: 225 layers,  3157200 parameters,  3157184 gradients,   8.9 GFLOPs
#  s: [0.33, 0.50, 1024] # YOLOv8s summary: 225 layers, 11166560 parameters, 11166544 gradients,  28.8 GFLOPs
#  m: [0.67, 0.75, 768] # YOLOv8m summary: 295 layers, 25902640 parameters, 25902624 gradients,  79.3 GFLOPs
#  l: [1.00, 1.00, 512] # YOLOv8l summary: 365 layers, 43691520 parameters, 43691504 gradients, 165.7 GFLOPs
#  x: [1.00, 1.25, 512] # YOLOv8x summary: 365 layers, 68229648 parameters, 68229632 gradients, 258.5 GFLOPs

depth_multiple: 0.33
width_multiple: 0.50
max_channels: 1024

# YOLOv8.0n backbone
backbone:
  # [from, repeats, module, args]
  - [-1, 1, Conv, [64, 3, 2]] # 0-P1/2
  - [-1, 1, Conv, [128, 3, 2]] # 1-P2/4
  - [-1, 3, C2f, [128, True]]
  - [-1, 1, Conv, [256, 3, 2]] # 3-P3/8
  - [-1, 6, C2f, [256, True]]
  - [-1, 1, Conv, [512, 3, 2]] # 5-P4/16
  - [-1, 6, C2f, [512, True]]
#  - [-1, 1, Conv, [1024, 3, 2]] # 7-P5/32
#  - [-1, 3, C2f, [1024, True]]
  - [-1, 1, SPPF, [1024, 5]] # 9 -> 7

# YOLOv8.0n head
head:
#  - [-1, 1, nn.Upsample, [None, 2, "nearest"]]
#  - [[-1, 6], 1, Concat, [1]] # cat backbone P4
#  - [-1, 3, C2f, [512]] # 12

  - [-1, 1, nn.Upsample, [None, 2, "nearest"]]
  - [[-1, 4], 1, Concat, [1]] # cat backbone P3
  - [-1, 3, C2f, [256]] # 15 (P3/8-small) -> 10

#  - [-1, 1, Conv, [256, 3, 2]]
#  - [[-1, 12], 1, Concat, [1]] # cat head P4
#  - [-1, 3, C2f, [512]] # 18 (P4/16-medium)

#  - [-1, 1, Conv, [512, 3, 2]]
#  - [[-1, 9], 1, Concat, [1]] # cat head P5
#  - [-1, 3, C2f, [1024]] # 21 (P5/32-large)

  - [[10], 1, Detect, [nc]] # Detect(P3, P4, P5)
TensorRT is a deep learning inference optimizer and runtime library developed by NVIDIA. It is designed to deliver high-performance deep learning inference, leveraging NVIDIA GPUs. TensorRT takes a trained model and optimizes it for inference by performing layer fusion, precision calibration, kernel auto-tuning, and other optimizations to accelerate the inference process.
- Increased Throughput: By optimizing the model, TensorRT can significantly increase the number of inferences per second.
- Reduced Latency: Optimizations reduce the time taken for each inference, making real-time applications more responsive.
- Lower Power Consumption: Efficient use of GPU resources can lead to reduced power consumption, which is crucial for edge devices.
In the notebook, we demonstrate how to convert a trained YOLOv8 model to a TensorRT engine. The process involves:
- Installing necessary libraries:
tensorrt,onnx,onnxsim, andonnxruntime-gpu. - Exporting the YOLOv8 model to ONNX format.
- Converting the ONNX model to a TensorRT engine.
The following code snippets in the notebook perform these steps:
# Install required libraries
!pip install tensorrt tensorrt_lean tensorrt_dispatch
!pip install onnx onnxsim onnxruntime-gpu

# Static variable for TensorRT export
EXPORT_NAME = 'runs/detect/yolov8_ships_small/weights/best.pt'

# Export YOLOv8 Model to TensorRT
!yolo export model={EXPORT_NAME} format=engine half=True device=0- Clone this repository or download the notebook.
- Open the notebook in Google Colab.
- Follow the steps in the notebook to mount your Google Drive, set up the YOLOv8 environment, and train the models.
- Perform inference and visualize the results.
- Optimize the model using TensorRT and perform inference with the optimized model.
This work leverages the Ultralytics YOLOv8 repository and the related documentation. For additional insights and performance improvement techniques, you may also find the YOLO Performance Improvement Masterclass on Udemy useful.
This project is developed and maintained by the following authors:
- 👩💻 Zazzarini Micol
- 👨💻 Fiorani Andrea
This project is licensed under the MIT License - Refer to the LICENSE file for more details.