This the repository maintained for fortinet captive port auto login to university/organisation intranet made with fyne.io
Find out the OS agnostic installation binaries at latest release or Checkout at fyne app listing
login Script
Execution Policy Set
Set-ExecutionPolicy -ExecutionPolicy RemoteSigned -Scope CurrentUser
powershell -File auth.ps1
auth.ps1 Script
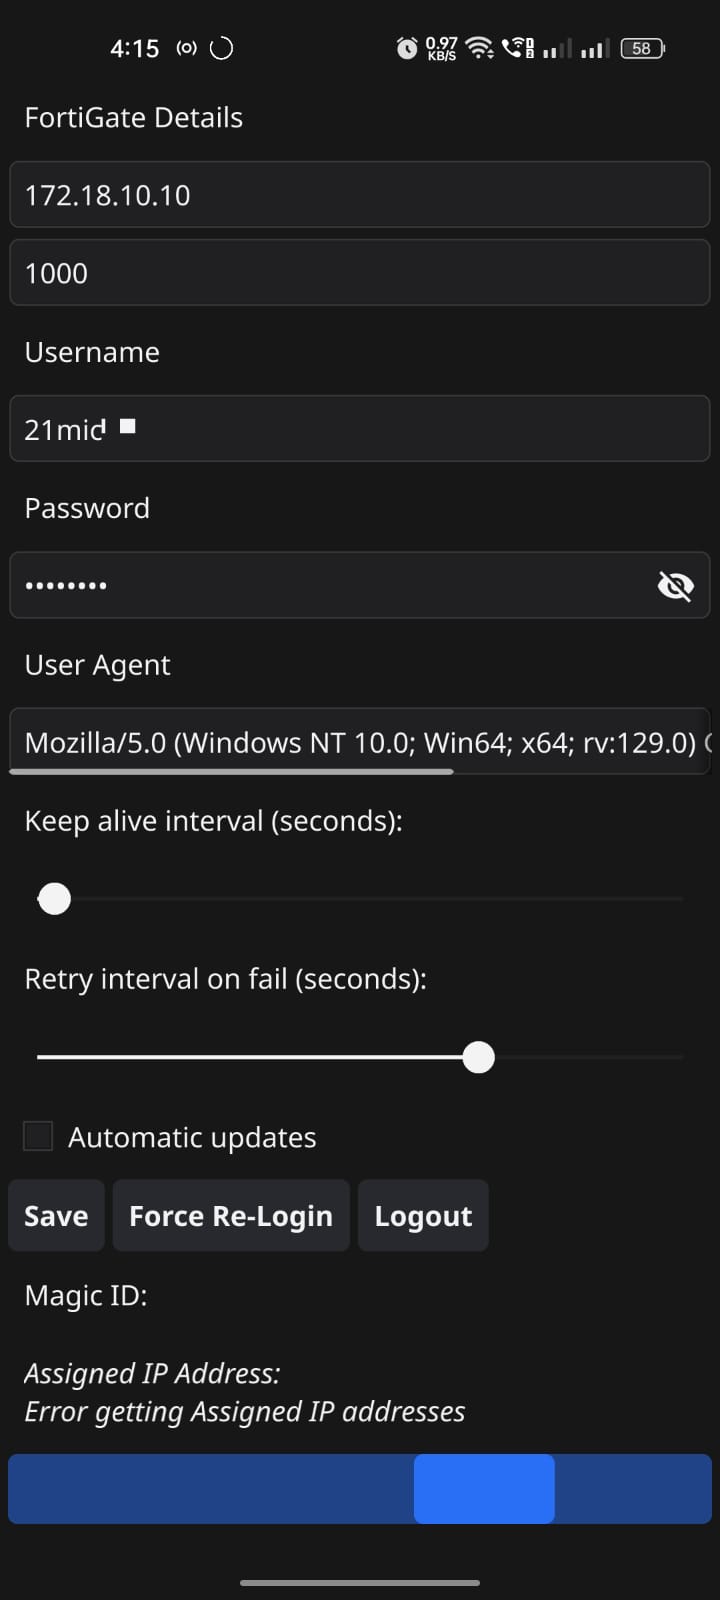
$FGT_IP = "172.18.10.10"
$USERNAME = "xxxxxx"
$PASSWORD = "xxxxxx"
$SESSION_ID = "3511041970b2f678"

$PostData = "magic=$SESSION_ID&username=$USERNAME&password=$PASSWORD"

$RequestParams = @{
    Uri = "http://$FGT_IP`:1000/fgtauth"
    Method = "Post"
    Body = $PostData
    ContentType = "application/x-www-form-urlencoded"
}

Invoke-RestMethod @RequestParams
logout script
curl 'http://172.18.10.10:1000/logout?' -H 'User-Agent: Mozilla/5.0 (Windows NT 10.0; Win64; x64; rv:129.0) Gecko/20100101 Firefox/129.0' -H 'Accept: text/html,application/xhtml+xml,application/xml;q=0.9,image/avif,image/webp,image/png,image/svg+xml,*/*;q=0.8' -H 'Accept-Language: en-US,en;q=0.5' -H 'Accept-Encoding: gzip, deflate' -H 'Connection: keep-alive' -H 'Upgrade-Insecure-Requests: 1' -H 'Priority: u=0, i'Invoke-WebRequest -UseBasicParsing -Uri "http://172.18.10.10:1000/logout?" `
-UserAgent "Mozilla/5.0 (Windows NT 10.0; Win64; x64; rv:129.0) Gecko/20100101 Firefox/129.0" `
-Headers @{
"Accept" = "text/html,application/xhtml+xml,application/xml;q=0.9,image/avif,image/webp,image/png,image/svg+xml,*/*;q=0.8"
"Accept-Language" = "en-US,en;q=0.5"
"Accept-Encoding" = "gzip, deflate"
"Upgrade-Insecure-Requests" = "1"
"Priority" = "u=0, i"
}Windows POSIX CurRL
curl 'http://172.18.10.10:1000/logout?' -H 'User-Agent: Mozilla/5.0 (Windows NT 10.0; Win64; x64; rv:129.0) Gecko/20100101 Firefox/129.0' -H 'Accept: text/html,application/xhtml+xml,application/xml;q=0.9,image/avif,image/webp,image/png,image/svg+xml,*/*;q=0.8' -H 'Accept-Language: en-US,en;q=0.5' -H 'Accept-Encoding: gzip, deflate' -H 'Connection: keep-alive' -H 'Upgrade-Insecure-Requests: 1' -H 'Priority: u=0, i'
-
magic (session id) generation from FortiAP captive portal

-
Upon Successful Auth with Fortinet FortiAP Endpoint got as
200status code response ie.. with certain magic generated from endpoint -
Observation : if we use the session again with the same magic you'll
444status code

-
if the user the user logged w.r.t to FortiAP server side session will session will get generated with prior MAC address from host
NICand you will get auth session failed as html response


References : https://docs.fortinet.com/document/fortiap/7.6.0/fortiwifi-and-fortiap-configuration-guide/292926/captive-portal-security https://fortinetweb.s3.amazonaws.com/docs.fortinet.com/v2/attachments/8391206d-966e-11eb-b70b-00505692583a/FortiWiFi_and_FortiAP-7.0.0-Configuration_Guide.pdf
Claude's Response :
#curl #linux
Here's a sample cURL script that you can use to configure an external captive portal:
#!/bin/bash

# Set the necessary variables
FGT_IP="your_fortigate_ip_address"
USERNAME="your_username"
PASSWORD="your_password"
SESSION_ID="your_session_id"

# Construct the POST data
POST_DATA="magic=$SESSION_ID&username=$USERNAME&password=$PASSWORD"

# Send the POST request to the FortiGate
curl -X POST \
     -H "Content-Type: application/x-www-form-urlencoded" \
     -d "$POST_DATA" \
     "https://$FGT_IP:1000/fgtauth"
Here's how the script works:
-
Set the necessary variables:
FGT_IP: The IP address of your FortiGate device.USERNAME: The username to be authenticated.PASSWORD: The password to be authenticated.SESSION_ID: The session ID provided by the FortiGate in the initial request to the web server.
-
Construct the POST data as per the format specified in your description:
magic=$SESSION_ID&username=$USERNAME&password=$PASSWORD. -
Use the
curlcommand to send the POST request to the FortiGate:-X POST: Specifies that this is a POST request.-H "Content-Type: application/x-www-form-urlencoded": Sets the content type of the request to URL-encoded form data.-d "$POST_DATA": Includes the POST data in the request body."https://$FGT_IP:1000/fgtauth": The URL to which the request is sent.
Make sure to replace the placeholder values (your_fortigate_ip_address, your_username, your_password, and your_session_id) with the appropriate values for your setup.
You can save this script as a file (e.g., captive_portal.sh) and make it executable with the chmod +x captive_portal.sh command. Then, you can run the script using ./captive_portal.sh.
#windows #powershell
Here's the PowerShell version of the cURL script to configure an external captive portal:
$FGT_IP = "your_fortigate_ip_address"
$USERNAME = "your_username"
$PASSWORD = "your_password"
$SESSION_ID = "your_session_id"

$PostData = "magic=$SESSION_ID&username=$USERNAME&password=$PASSWORD"

$RequestParams = @{
    Uri = "https://$FGT_IP`:1000/fgtauth"
    Method = "Post"
    Body = $PostData
    ContentType = "application/x-www-form-urlencoded"
}

Invoke-RestMethod @RequestParams
Here's how the PowerShell script works:
-
Set the necessary variables:
$FGT_IP: The IP address of your FortiGate device.$USERNAME: The username to be authenticated.$PASSWORD: The password to be authenticated.$SESSION_ID: The session ID provided by the FortiGate in the initial request to the web server.
-
Construct the POST data as per the format specified in your description:
magic=$SESSION_ID&username=$USERNAME&password=$PASSWORD. -
Create a hash table
$RequestParamswith the necessary parameters for theInvoke-RestMethodcmdlet:Uri: The URL to which the request is sent.Method: Specifies that this is a POST request.Body: Includes the POST data in the request body.ContentType: Sets the content type of the request to URL-encoded form data.
-
Use the
Invoke-RestMethodcmdlet to send the POST request to the FortiGate.
Make sure to replace the placeholder values (your_fortigate_ip_address, your_username, your_password, and your_session_id) with the appropriate values for your setup.
You can save this script as a PowerShell script file (e.g., captive_portal.ps1) and run it using the ./captive_portal.ps1 command.
It seems like you're trying to run the PowerShell script, but you're getting an error message saying that the script file is not recognized. Here are a few things you can try to resolve the issue:
-
Check the script file name: Ensure that the file name you're trying to run is correct. In the example, the script file is named
captive_portal.ps1, notauth.ps1. Make sure you're running the correct file name. -
Check the file path: Verify that the script file is located in the correct directory. In the example, the script is being run from the
C:\Users\VIT-AP\Desktopdirectory. Ensure that the script file is in this directory or update the file path accordingly. -
Run the script with the full file path: Instead of just running the script name, try running the script with the full file path. For example:
C:\Users\VIT-AP\Desktop>powershell -File C:\Users\VIT-AP\Desktop\captive_portal.ps1This should run the script regardless of your current working directory.
-
Check the script execution policy: PowerShell has a script execution policy that might be blocking the script from running. You can check the current policy by running the following command:
Get-ExecutionPolicyIf the policy is set to
Restricted, you'll need to change it to allow script execution. You can do this by running the following command:Set-ExecutionPolicy -ExecutionPolicy RemoteSigned -Scope CurrentUserAfter changing the execution policy, try running the script again.
If you're still facing issues, double-check the script content and make sure that the variable values are correctly set.