Installing VSenseBox is very easy and straightforward. You can install from PyPI directly or use the prebuilt .whl files on GitHub releases or install from GitHub directly or build it from source on your own machine. However, in order to get it work, you need to install all the necessary dependencies or requirements for the modules you need.
All requirements are not strictly limited. However, some specific modules might need some special dependencies; for example, YOLO_Classic (With .weights model) runs faster using OpenCV DNN with GPU. In this case, you might need to build OpenCV from source with GPU support or use our pyppbox-opencv instead of the official opencv-contrib-python.
-
Prerequisite:
- Python [3.9-3.12]
- Local
VSenseBoxrepo:git clone https://github.com/numediart/vsensebox.git
-
Before you install dependencies/requirements:
- For Linux, recommend changing
python3topython:sudo apt install python-is-python3 - If you prefer conda + Python [3.9-3.12]:
conda create --name vsensebox_env python=3.11 - Upgrade
pipandsetuptools:python -m pip install --upgrade pip pip install "setuptools>=67.2.0" - Recommend uninstalling the official
Ultralytics:pip uninstall -y ultralytics
- For Linux, recommend changing
-
Install dependencies/requirments under
vsensebox/requirements/:- On Windows:
- With GPU:
pip install torch torchvision torchaudio --index-url https://download.pytorch.org/whl/cu121 pip install -r requirements.txt - For CPU-only:
pip install torch torchvision torchaudio --index-url https://download.pytorch.org/whl/cpu
pip install -r requirements.txt
- With GPU:
- On Linux:
- With GPU:
python -m pip install tensorflow[and-cuda] # TensorFlow GPU pip install torch torchvision torchaudio pip install -r requirements.txt - For CPU-only:
python -m pip install tensorflow # TensorFlow CPU
pip install torch torchvision torchaudio --index-url https://download.pytorch.org/whl/cpu
pip install -r requirements.txt
- With GPU:
- On macOS:
- With GPU: Not available!
- For CPU:
pip install torch torchvision torchaudio
pip install -r requirements.txt
- On Windows:
-
ATTENTION
⚠️ ⚠️ ⚠️ - Default configurations of
VSenseBoxare set to use GPU, and to switch to CPU, you need to setcpuas string for the parameterdevicein the YAML config file; for example, line #8 inyolo_ultralytics_v8s.yaml.
- Default configurations of
vsensebox is the main package and if you use the classic YOLO detectors and DeepSORT tracker, etc., you need to also install vsensebox-data-xxx.
-
Install
vsensebox- Download and install the latest wheel in GitHub releases or install from PyPI:
pip install vsensebox - Or install directly from GitHub:
pip install git+https://github.com/numediart/vsensebox.git - Or build from source:
pip install setuptools wheel build PyYAML
python -m build --wheel --skip-dependency-check --no-isolation
- Download and install the latest wheel in GitHub releases or install from PyPI:
-
Install
vsensebox-data-xxx- Download the latest from GitHub releases and install
- Or install the ones you need directly from the links below:
pip install https://github.com/numediart/vsensebox-data/releases/download/v0.0.0/vsensebox_data_yolocls-0.0.0-py3-none-any.whl
pip install https://github.com/numediart/vsensebox-data/releases/download/v0.0.1/vsensebox_data_yoloult-0.0.1-py3-none-any.whl
pip install https://github.com/numediart/vsensebox-data/releases/download/v0.0.0/vsensebox_data_deepsort-0.0.0-py3-none-any.whl
-
Let's try some basic features of
VSenseBox- Configurator GUI can be called in Python terminal:
Now you should see the Configurator GUI like in this scheenshot:
import vsensebox
vsensebox.config()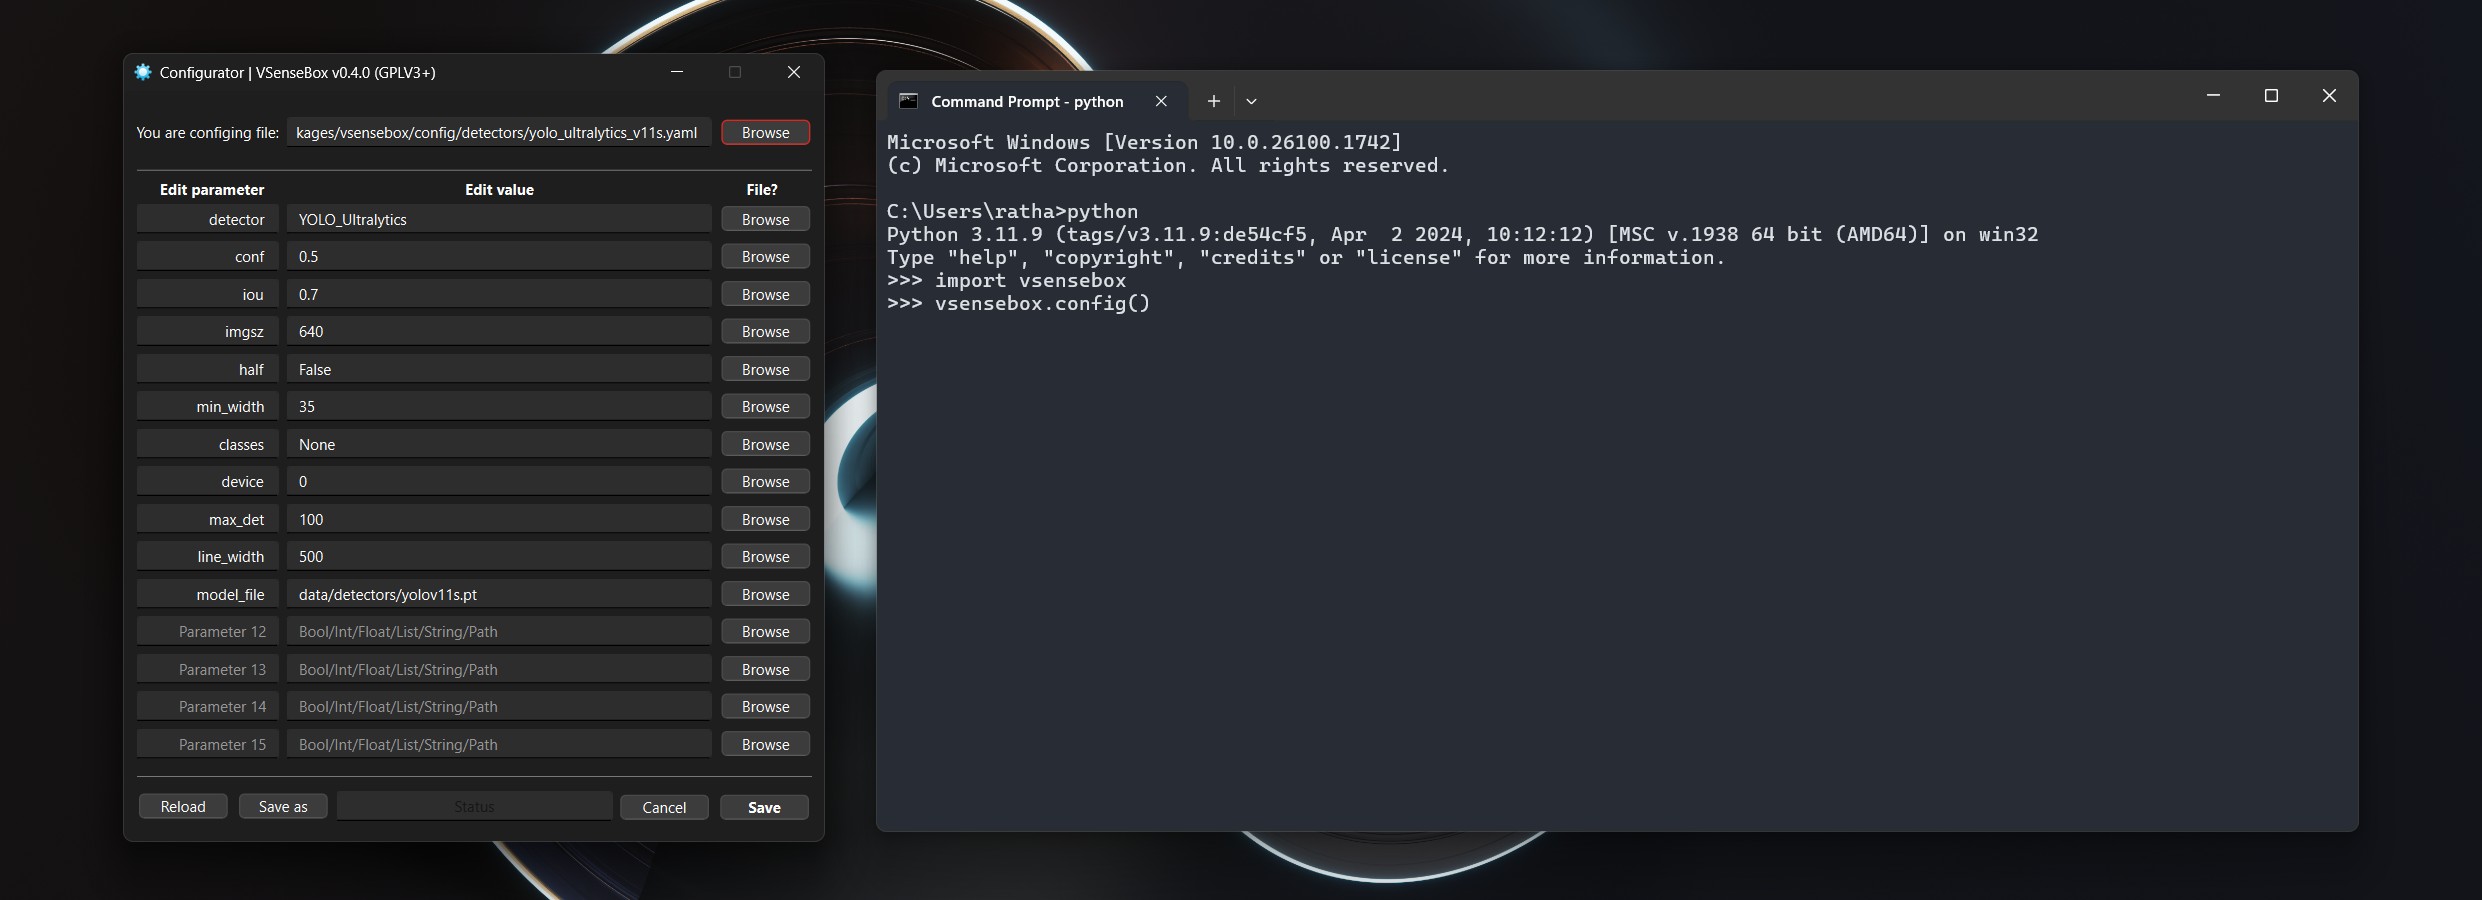
- You can also easily reset the internal configurations by calling the
reset(). THIS CAN'T BE REVERSED!⚠️ vsensebox.reset() - For the details of GUI functions and configurations, check Configurations page.
- Check the Examples page for some real coding!
- Configurator GUI can be called in Python terminal:
-
For Linux, if the GUI does not work, you might need to install these:
sudo apt-get install '^libxcb.*-dev' libx11-xcb-dev libglu1-mesa-dev libxrender-dev libxi-dev libxkbcommon-dev libxkbcommon-x11-dev -
For Ubuntu on WSL 2, if the GUI does not work, you need to install these:
sudo apt-get install libgl1-mesa-glx xdg-utils libegl1
OpenCV is widely used in many well-known packages, but the majority of the prebuilt WHLs on the Internet including the official one on PyPI do not include GPU support. Thus, we build our custom one which includes NVIDIA CUDA & cuDNN supports for the OpenCV DNN module. In order to well distinguish from the rest, we decided to build and change the package name from opencv-contrib-python to pyppbox-opencv -> [Repo] [WHL]
Also, similar to pyppbox-opencv, our custom ultralytics is changed to vsensebox-ultralytics, but this time, the module name is still the same ultralytics and it is the main reason why the official ultralytics must be removed. Find out more why VSenseBox needs the customized vsensebox-ultralytics -> [Repo] [PyPI]