i3Detroit is a hackerspace in Ferndale, MI. This is our Home Assistant (and ESPHome) configuration. We have 150+ esp8266 and such based devices running ESPHome, Tasmota, and custom programs automating a bunch of things.
- Home Assistant OS VirtualBox image as a VM on our server hardac with 2 CPUs and 3GB RAM
- Home Assistant Add-ons installed via Supervisor Add-on store:
- ESPHome - adds GUI for configuring and flashign devices from right in Home Assistant
- File editor - allows editing any config files in Home Assistant UI
- SSH & Web Terminal (Community Add-on) - Can be useful to have a terminal right in the UI
- Mosquitto broker - For any MQTT devices. We still have some devices running Tasmota or custom programs
- InfluxDB - DB for logging
- Grafana - Data visualization
- Google Drive Backup for HA snapshots (https://github.com/sabeechen/hassio-google-drive-backup)
- Home Assistant Community Store (HACS)
- Text Element - lets you add simple text objects to picture elements cards
- Kiosk Mode - for permanent displays of HA dashboards
- Integrations set up in the UI:
- Ubiquiti Unifi - Connects to our Unifi CloudKey and provides device trackers for relevant devices on the network. Most device trackers are disabled because the information is superfluous, but information like when a wifi AP is down is very useful to track. This theoretically can provide control of all ports on our PoE switch, but we haven't needed to use that for anything yet.
- ESPHome - Automatically detects and configures all the ESPHome devices.
Here are notable changes to add-on settings. For the rest, the default settings seem to generally suffice.
leave_front_door_open: true- for webserial flashing- Enable port 6052
- Enable SSL
- Set up a self-signed cert (Run this in the /ssl directory
openssl req -newkey rsa:2048 -nodes -keyout key.pem -x509 -days 365 -out cert.pem. Make sure to use the hostname or IP you use to connect to Home Assistant as the 'Common Name' when filling in the fields it asks for.) - With SSL enabled, bring up the ESPHome dashboard via
https://yourHassOShostnameOrIP:6052to flash devices over serial from your web browser (see https://esphome.io/guides/getting_started_hassio.html#webserial)
It's nice to have a specific bash/tmux environment you're comfortable with set up. Each time this add-on is started, most of the directory structure including the home directory is reset. /config and /data are persistent, so we can use /data to store things like .bashrc and .tmux.conf. Then a start-up script properly applies them.
- Put your ssh key in
/data/.ssh - Place your dotfiles on /data/.dotfiles
- Create a dotfiles setup script
/data/.dotfiles/setup.sh. For example:
# check for and download necessary files
[ ! -f ./.git-completion.bash ] && curl -o ./.git-completion.bash https://raw.githubusercontent.com/git/git/master/contrib/completion/git-completion.bash
[ ! -f ./.git-prompt.sh ] && curl -o ./.git-prompt.sh https://raw.githubusercontent.com/git/git/master/contrib/completion/git-prompt.sh
[ ! -d ./tmux-themepack ] && git clone https://github.com/jimeh/tmux-themepack

ln -s /data/.dotfiles/.bash_profile ~/.bash_profile
ln -s /data/.dotfiles/.bashrc ~/.bashrc
ln -s /data/.dotfiles/.bash_aliases ~/.bash_aliases
ln -s /data/.dotfiles/.bash_logout ~/.bash_logout
rm /root/.tmux.conf
ln -s /data/.dotfiles/.tmux.conf ~/.tmux.conf
tmux source-file /data/.dotfiles/.tmux.conf
source /data/.dotfiles/.bashrc
git config --global user.name yourusername
git config --global user.email your@email.foo
- Add-on config yaml:
ssh:
  username: hassio
  password: ''
  authorized_keys:
    - your pubkey here
  sftp: false
  compatibility_mode: false
  allow_agent_forwarding: false
  allow_remote_port_forwarding: false
  allow_tcp_forwarding: false
zsh: false
share_sessions: false
packages: []
init_commands:
  - /data/.dotfiles/setup.sh
We use this with custom and Tasmota devices, some of which are set up with the default Tasmota MQTT user/pass and some no user/pass. This presents some problems for the default configuration of this add-on which does not like unknown connections. So the important part of the add-on config yaml:
logins:
  - username: DVES_USER
    password: DVES_PASS
Then we must create two files:
/share/mosquitto/acl.confwith contentsacl_file /share/mosquitto/accesscontrollist/share/mosquitto/accesscontrollistwith contents:
topic readwrite #
user DVES_USER
topic readwrite #
In the latter file, line 1 enables read/write access to anonymous users. Lines 2 and 3 give read/write access to the default Tasmota MQTT username. In our experience, simply enabling anonymous users with the first line causes the broker to reject any named users.
The last person to leave the space needs to shut everything down, turn off lights, lock doors, etc. There are a lot of things to remember, but fortunately most of them are tracked in Home Assistant. With a picture elements card and a bunch of icons, text, and conditionals, we can display them:
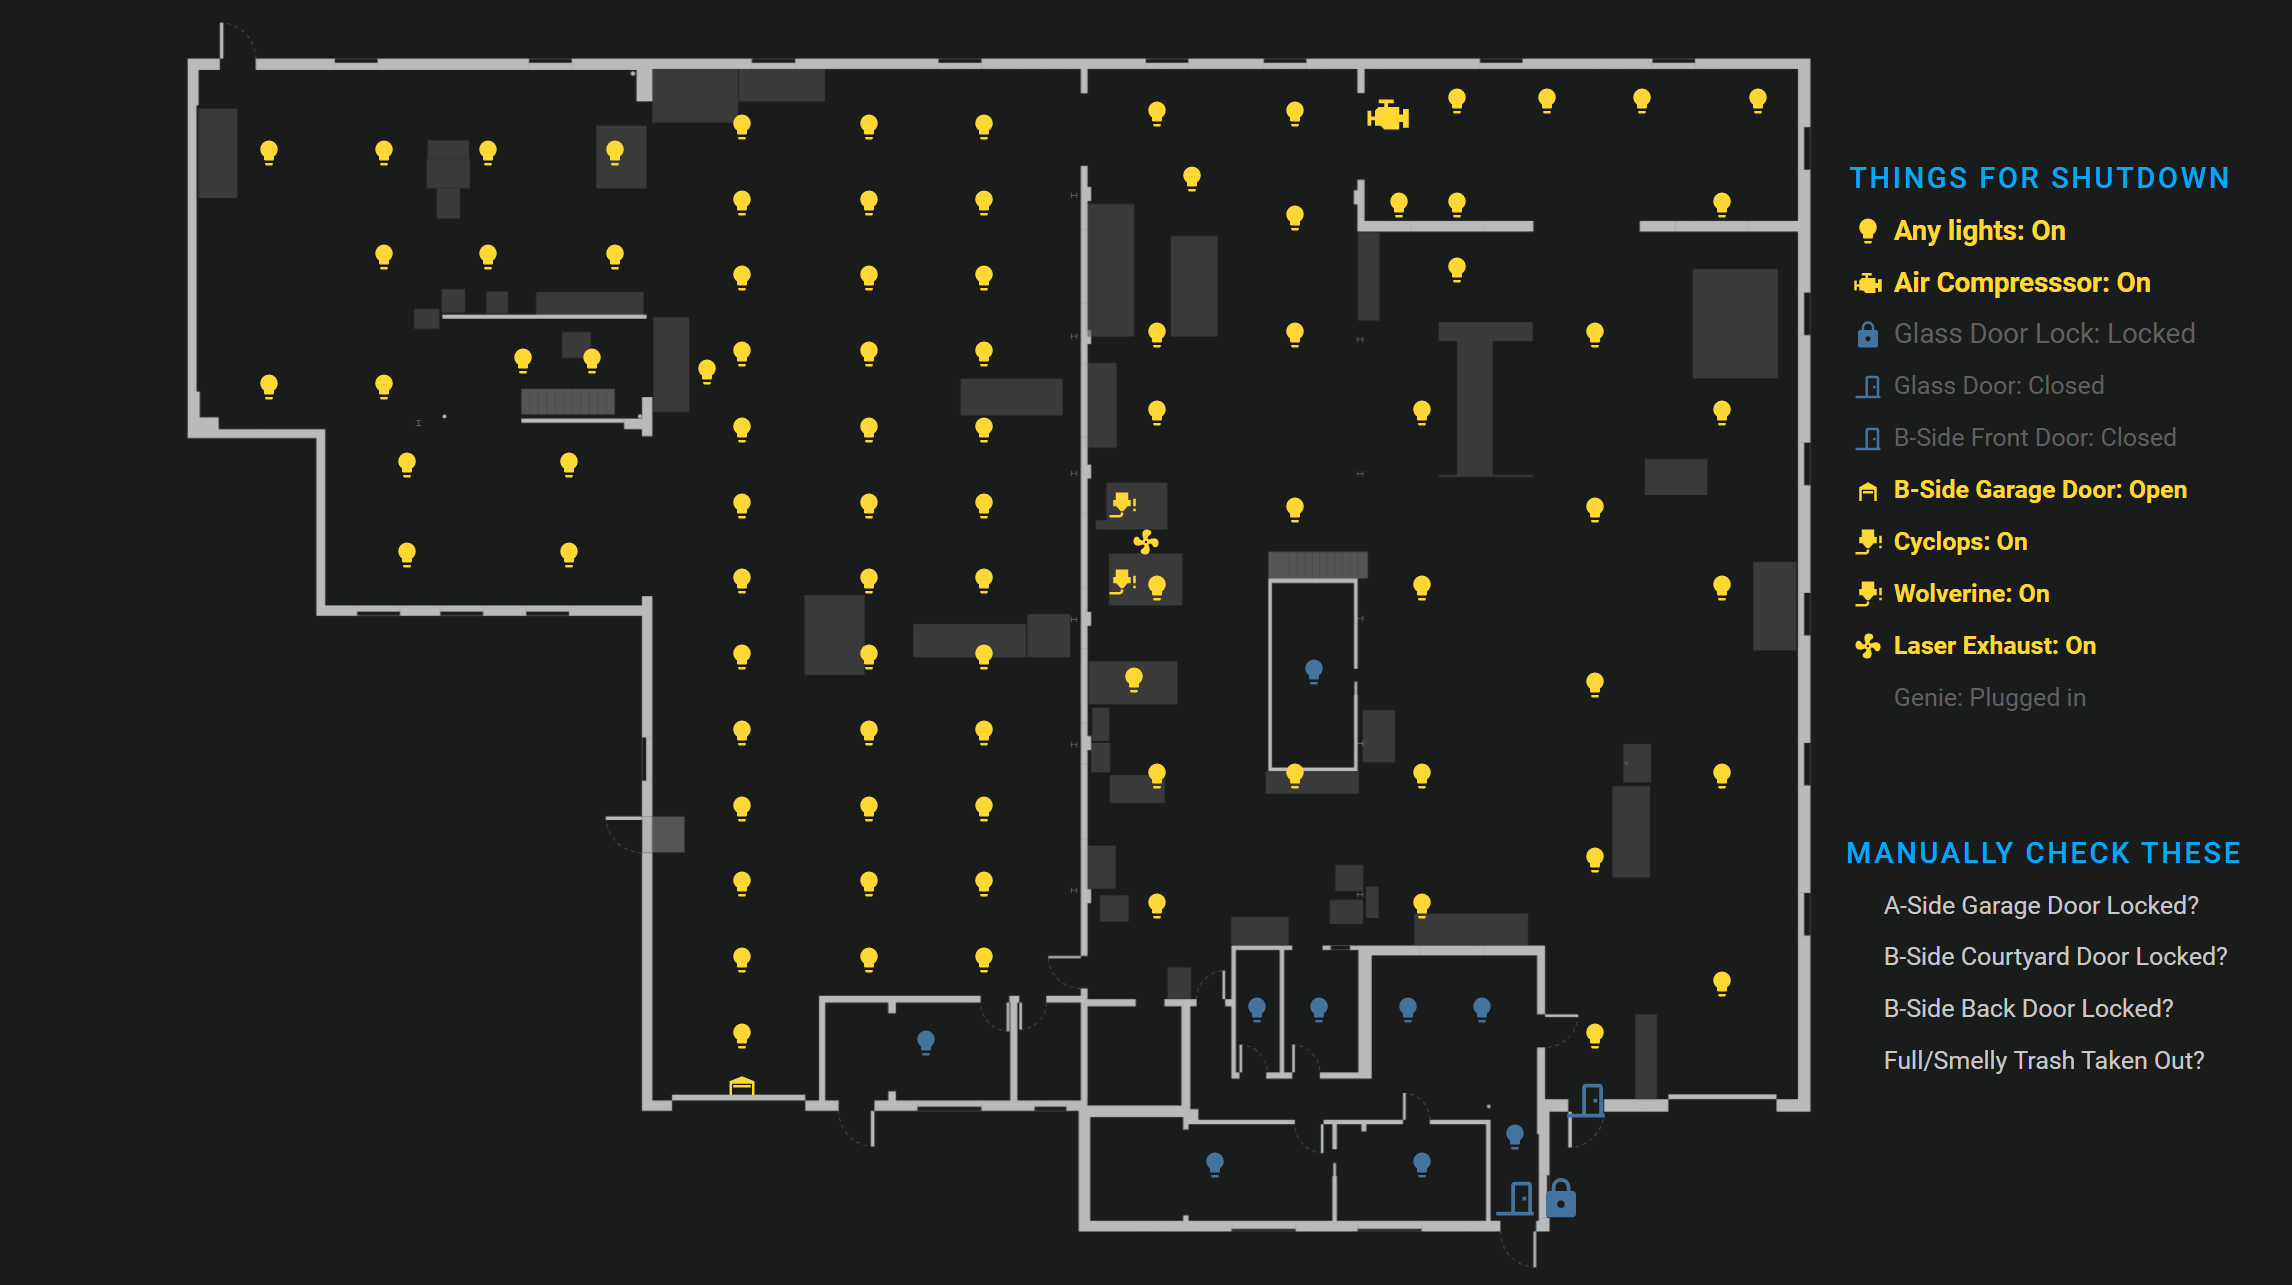
See our lovelace config for the code behind it. With Kiosk Mode from HACS, a raspberry pi, and a spare monitor, this is on permanent display next to the front door.
We have multiple laser cutters at i3, each of which require certain other things to be on to operate safely. In the Dark Ages, in order to use one of the laser cutters, you had to press like four different buttons to turn everything on. Now, each laser cutter has been modified to be powered by a Sonoff POW, and their chillers and exhaust fan are powered by Sonoff Basics/S31s. With some automations, everything necessary turns on magically when a laser cutter is powered on.
Wiring lights together and installing light switches is tedious, especially in a large shop. We've largely moved to custom LED light fixtures with built-in Sonoff Basics. To go along with this, most lights are controlled with 3d printed button boxes running ESPHome which target groups of lights in Home Assistant (for example https://github.com/i3detroit/homeassistant-config/blob/reboot/esphome/lightswitch_a-side_east_01.yaml).
With the SpaceAPI integration with HA, we're excited to share info about the current state of the space. But the HassOS VM is not accessible from outside our network. An automation runs every couple minutes, executing a bash script that uploads our SpaceAPI file to our actual webserver.