Censorship circumvention software like Snowflake, but faster thanks to not using Tor.
Acts as a TCP (and maybe UDP in the future) tunnel
between the user (client) and
the server,
much like ssh -L.
This, in turn, allows the client to access any blocked TCP service, such as a SOCKS proxy or your favorite (but blocked) VPN service provider.
Snowflake is developed by The Tor Project. As of 2024, it can only be used to access the Tor network.
A Snowflake client is embedded into Tor Browser and Orbot. Orbot provides VPN-like functionality by tunneling traffic through Tor, optionally accessing Tor through bridges, such as Snowflake.
But, as you might imagine,
making your traffic bounce off of 1 + 3 relays
(extra 1 is a Snowflake proxy) before it reaches the destination
could be quite slow.
If you're only looking to browse Instagram or YouTube
or whatever else is blocked for you, and you don't care about anonymity
that Tor provides, you'd want Snowflake to connect directly
(or at least more directly)
to where you want to go, and not through a huge chain of relays.
Luckily, as it turns out, Tor is not inherent in Snowflake. And this is where our project comes in!
Pretty much like Snowflake.
In fact you can argue that this project is just Snowflake,
but with adjusted arguments.
The source code is mostly boilerplate.
Not yet.
The real power of a Snowflake network comes from
the numerosity of its proxies.
Ideally we'd want one huge Snowflake network
(which the original one from The Tor Project is)
where proxies are happy to pass client's traffic
wherever the client wishes,
without making the proxy operator install
an extra browser extension or a Docker container per each
server that they want to let clients get unrestricted access to.
But, as was said, by default the proxies can only forward traffic to
just a few set-in-stone Tor relays.
In order to change that and
let proxies connect to arbitrary addresses,
we need to make a lot of hardening changes
to the proxy's code such that they cannot be abused,
e.g. for DDoS,
access to the proxy operator's private network,
or distribution of illegal content.
And I am trying to do just that with
my recent MRs.
My dream is: Snowflake clients can access any service they want with the help of Snowflake proxies, without having to route the traffic through the (not the fastest) Tor network, and the Snowflake proxies don't have to worry about being abused, and that all VPN providers have a Snowflake server running, ready to accept clients for whom their service is blocked.
Snowflake is a fascinating concept and I think it has a lot of potential.
Let's make a setup that will work in the same way as
ssh -L localhost:2080:example.com:80 my-server-1.my-domain.com -NThat is, if you connect with TCP to localhost:2080 on your local machine,
the connection will be performed to example.com:80 from
my-server-1.my-domain.com.
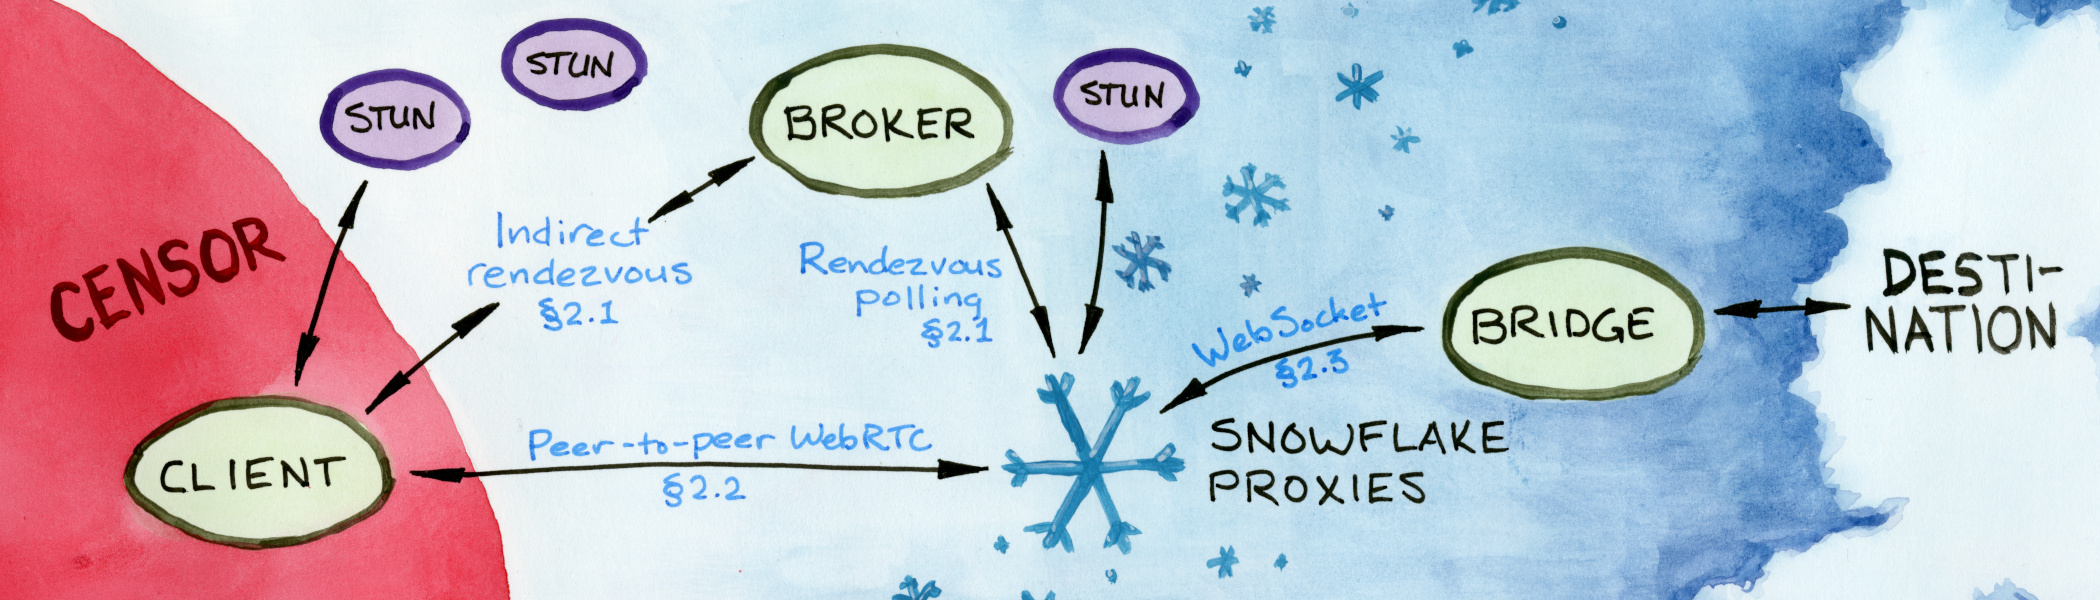
A Snowflake network consists of components of 4 types. In production, each component usually runs on a different machine, but for testing purposes you can run all of them locally.
It is not possible to use the already set up Snowflake broker maintained by The Tor Project because as of 2024 it refuses clients who ask to connect to servers other than the ones maintained by The Tor Project.
This might change in the future. Keep an eye on this issue.
-
Download the original Snowflake code.
git clone https://gitlab.torproject.org/tpo/anti-censorship/pluggable-transports/snowflake.git
-
_
cd snowflake/broker -
Create a list of available Snowflake servers. Replace
wss://my-server-1.my-domain.com:7901with the URL that your Snowflake server (not the broker!) is gonna listen on. We're gonna set up the said server in the next steps.echo '{"displayName":"my", "webSocketAddress":"wss://my-server-1.my-domain.com:7901", "fingerprint":"AAAAAAAAAAAAAAAAAAAAAAAAAAAAAAAAAAAAAAAA"}' > bridgeListMy.txt
This step might become unnecessary after this MR is merged.
-
Run the broker. Follow the original instructions to set up TLS ecnryption.
Or you can run it
⚠️ without encryption. Again, replacemy-server-1.my-domain.comwith the hostname of your Snowflake server, andlocalhost:4444with the address that you want the broker to listen on.go run . \ -disable-geoip \ -disable-tls \ -addr=localhost:4444 \ -allowed-relay-pattern='^my-server-1.my-domain.com$' \ -bridge-list-path=bridgeListMy.txt
-
Download the original Snowflake code.
git clone https://gitlab.torproject.org/tpo/anti-censorship/pluggable-transports/snowflake.git
-
_
cd snowflake/proxy -
Run the proxy.
Replace
http://localhost:4444with the URL of your broker, and^my-server-1.my-domain.com$with the same pattern that you set for the broker (i.e. your server's hostname).
Omitkeep-local-addressesin production.go run . \ -broker='http://localhost:4444' \ -verbose \ -allowed-relay-hostname-pattern='^my-server-1.my-domain.com$' \ -allow-non-tls-relay \ -keep-local-addresses
-
Download this project's code.
https://github.com/WofWca/snowflake-generalized.git
-
_
cd snowflake-generalized/server -
Run the server.
⚠️ As of 2024-09-02 the server doesn't support TLS natively. To add encryption, you ought to use Nginx or something like that.Replace
example.com:80with the desired destination. In practice you'd want it to be a SOCKS / VPN / Tor server running on the same machine as the server. Also replacelocalhost:7901with:7901if you want the server to be publicly reachable.go run . \ -destination-address='example.com:80' \ -listen-address='localhost:7901'
-
Download this project's code.
https://github.com/WofWca/snowflake-generalized.git
-
_
cd snowflake-generalized/client -
Run the client!
Again, replace
broker-urlwith the URL of the broker from a previous step and (optionally)server-idwith the one that you used inbridgeListMy.txt.
Omitkeep-local-addressesin production.go run . \ -listen-address='localhost:2080' \ -broker-url='http://localhost:4444' \ -server-id='AAAAAAAAAAAAAAAAAAAAAAAAAAAAAAAAAAAAAAAA' \ -keep-local-addresses
Now open up the browser and go to http://localhost:2080. If you see a dummy 404 page, then it worked!
Now feel free to replace example.com:80 with a real service of your choosing.
Thanks to The Tor Project for making the Snowflake library easy to use!