Quick Start Guide
This wiki assumes that ONLY Better Questing and Standard Expansion have been added. For more information, visit the expansion's pages.
Rule #1: Better Questing does not include pre-made quests, but gives modpack authors tools to make their own quests. If you have a problem with quests in a modpack not working correctly, please contact the modpack author.
First, its helpful to open a single-player creative world for purposes of editing and creating quests. Its also helpful to have JEI installed to load quest items into your inventory for use with quest rewards and item retrieval. Once you have created a world you will notice that Better Questing does not provide a quest book item. On default keybindings, you can hit the GRAVE key ` to open the book. You will also notice that its completely blank and you will be unable to edit it.
Rule #2: To create content in the questing book, run /bq_admin edit to put the book in editing mode.

Once you open the quest book in editing mode, you will see a gear in the top left corner. You can find out more details about those options in Advanced Editing. Let's get started writing a quest.
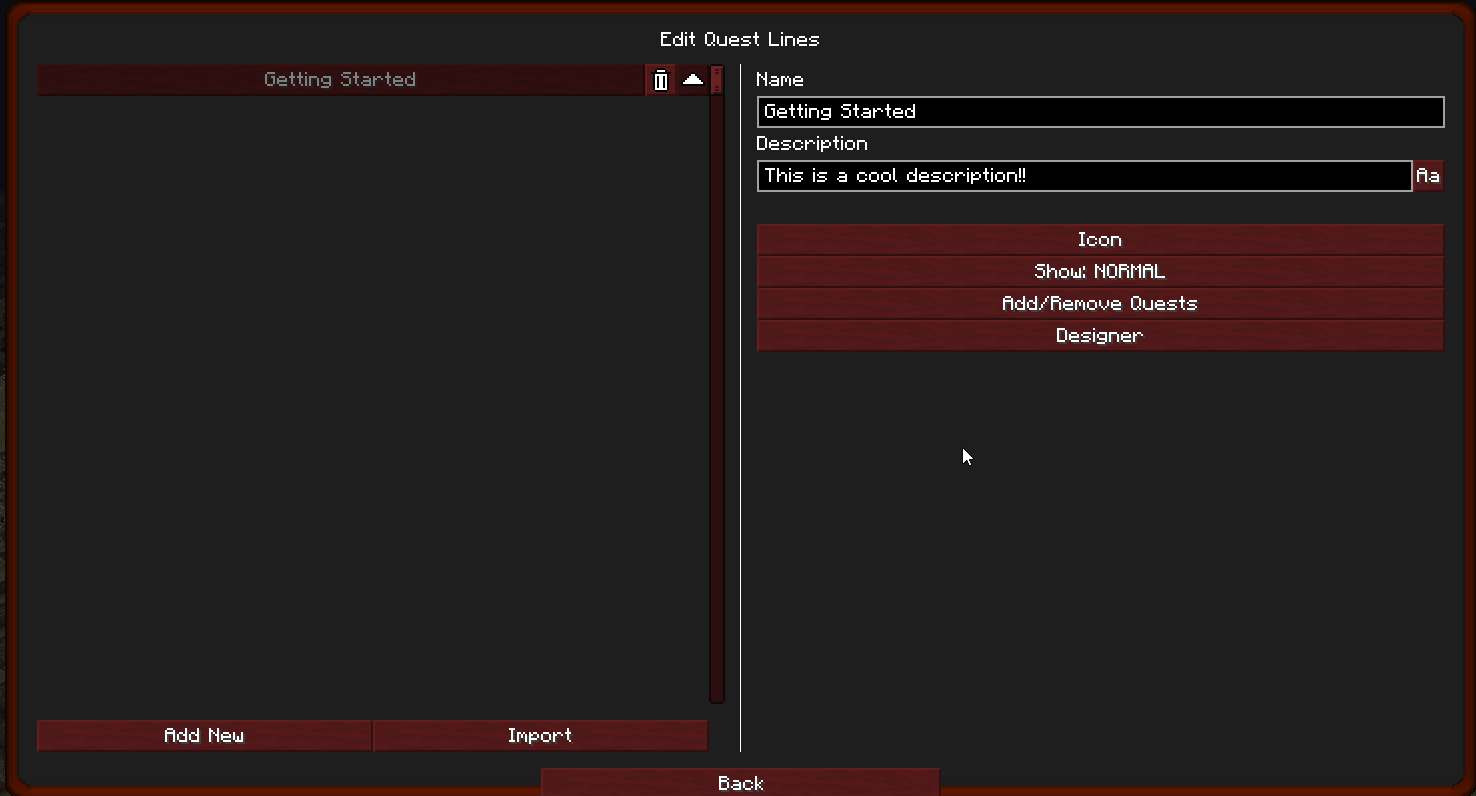
- Click on QUESTS - this will show you the list of current quest lines. You must create a quest line before you can add quests.
- Click on EDIT - this will allow you to edit the quest lines. You will see an empty list of quest lines on the left and some editing options on the right. You will notice that many of the options are grayed out except one. The beautiful thing about this mod is there are multiple ways to create content. This quick start will focus on the more visual approach.
- Click on ADD NEW - You will see a new quest line added to the list on the left. To the right of the questline's name, you will see a trash can, for deleting it, and an arrow for reorganizing your chapters.
- Click on NEW QUESTLINE - You will notice the editing options to the right are now available. Let's name this questline, "Getting Started" and give a brief description.
The rest of the options are covered in Quest Lines.
- CLICK ON DESIGNER - This will take you to a nice visual canvas to create your quests and organize your quest line. You will see a large workspace with 14 buttons on the right. Hovering over each option will give you a tool-tip of what each one does.
- CLICK ON NEW QUEST - Drop the quest anywhere on the quest line canvas. When the quest book is opened in non-edit mode, the canvas will center on the added quests.
Rule #3: Always be aware of which tool you are using. You could accidentally delete a quest or add a bunch of new quests.
- Using the OPEN tool, click on NEW QUEST - This opens the quest to see how it will look to the player.
- CLICK ON EDIT - This opens the editing options for each quest and where the REAL fun begins!! Please see the other pages to view more detailed guides on how to set-up and format your quests.
Rule #4: Always test your quests by turning off edit-mode. Many features are disabled in edit mode, like auto-complete and auto-consume.
When you have finished writing your quests, and you've turned edit mode off and tested to make sure all the triggers work, you will want to save your quests and test them in a new world. Before leaving the current world, here is a set of commands I always run:
- /bq_admin reset all - resets all the quests in the book. If any are completed, they will also be noted as completed in the default config.
- /bq_admin edit - removes edit mode
- /bq_admin default saves - saves the current quests to be loaded for every new world created.
Rule #5: To access your quest across world saves, be sure to run the command /bq_admin default save. Keep in mind, it also saves the editing state of the book, so be sure edit mode is off.