- Disk imaging with Guymager (Bitcurator)
- Disk imaging with FTK Imager
- Disk imaging with IsoBuster
- Disk imaging 5.25" floppy disks with FC5025
- Disk imaging with the Kryoflux
- Disk imaging with the Nimbie and ImgBurn
- Troubleshooting
At CCA, we capture the contents of original physical media as raw disk images. A disk image is a computer file that is an exact replica of the contents of a disk or other digital storage volume as that information exists on a particular physical storage medium. Because disk images can be stored redundantly, backed up, and audited in ways that physical carriers like DVDs or external hard drives cannot, they are a much better suited for preservation of digital information over time, while retaining all characteristics of the original physical media as a storage volume. If it is decided that the contents of a disk should be made available, disk images are ingested into the CCA's digital repository, Archivematica, to be stored until its contents are ready to be processed. Once processed, it will be accessible through our access tool, SCOPE.
Except when circumstances require different solutions, CCA prefers raw disk image formats (e.g. "dd" or "raw") or ISO images (for optical media).
Note: In order to ensure that the source media is unchanged by the process of data capture and transfer, hard drives and removable media drives should always be connected to the capture workstation through a hardware write-blocker.
We use the following tools to create disk images of media: Kryoflux (default), Guymager, FTK Imager, IsoBuster, or FC5025. Regardless of which tool you use, always complete the following step first:
Give each piece of media an ARCH number identifier if it doesn't have one already, and create a corresponding "Record for Management Need" object record in TMS. The identifier should be written on the media or its case with a felt tip pen or (very lightly) in pencil, or affixed to the case using a label maker if available.
Guymager is an open source disk imaging utility found in the Bitcurator environment, and one of the preferred tools for disk imaging at CCA. At CCA we use Guymager to create disk images in the raw (dd) format.
Before starting to create disk images from an accession, create a folder in the /mnt/1TB_RAID directory in which you will save your work. Name this folder something memorable and meaningful, such as an accession number or other identifier.
Steps for imaging physical media with Guymager:
-
Prior to creating a disk image, virus scan the media using the ClamAv command. If there are no viruses, proceed with the next step. If ClamAv finds viruses, stop, note the virus(es) encountered in the versement stabilization spreadsheet, set the media aside, and consult the Digital Archivist.
-
Open Guymager (from the 'Imaging Tools' folder on the Bitcurator desktop).

- Right-click on the drive you wish to image and select 'Acquire image'. If the drive/device you wish to image does not appear, refresh the screen by clicking "Rescan" in the upper left hand corner of the Guymager interface.

(These images were taken from here)
- Choose the 'Linux dd raw image' (file extension .dd or .xxx) file format.
- Make sure split size is unchecked.
- Enter the following metadata/settings:
- Image directory: Select the directory you created in /mnt/1TB_RAID.
- Image filename: Enter the disk's identifier with no spaces. Replace any colons (':') with underscores ('_').
- Info filename: This should be automatically created based on your image filename. Do not edit this field.
- Hash calculation/verification:
- Check "Calculate MD5", "Calculate SHA-1", and "Verify image after acquisition"
- Keep other options unchecked

- Once settings have been confirmed, press 'Start' to start the disk imaging process.
- Guymager will track its progress and give you color-coded indications when the process has been completed successfully or has failed. If it fails, make a note of this in the versement stabilization spreadsheet and set the disk aside for review by the Digital Archivist.
- If the image is successfully created, go to your project folder on the desktop and do a quick visual check that all looks good. You should see at two files: the disk image itself and a '.info' metadata file.
- If all looks good, repeat this process with the next disk until all media has been imaged. Once all media has been imaged, alert the Digital Archivist.
AccessData FTK Imager is a free but proprietary Windows-based disk imaging tool that forms part of the commercial larger Forensics Toolkit software suite. At CCA we use FTK Imager to create disk images for media which Guymager is unable to image.
Before moving on to the disk imaging process, make sure you are using the disk-imaging workstation (DSK-065-14) in the CCA Digital Lab. Create a project folder in which you will save your work. Name this folder something memorable and meaningful, such as an accession or an identification number.
Steps for imaging physical media with FTK Imager:
-
Prior to creating a disk image, virus scan the media using SentinelOne antivirus:
- Right click on the file or folder you wish to scan, and select "Scan for threats" in the dropdown menu.
- If there are no viruses, proceed with the next step. If SentinelOne finds viruses, stop, note the virus(es) encountered in the versement_stabilization spreadsheet, set the media aside and consult the Digital Archivist.
-
Open FTK Imager.
-
From the File menu, select Create a Disk Image.

- Choose the appropriate source: For full hard drives, the appropriate source will be 'Physical drive'. For most other media types (including CDs, DVDs, and floppy disks), the source will be 'Logical drive'.
 .
.
- Choose the appropriate drive from the dropdown list.

- Select 'Add' to add the image destination. Check 'Verify images after they are created', but leave 'Create directory listings...' unchecked.

-
Select Image type 'raw (dd)'.
-
FTK Imager will prompt you to add metadata for your disk image. Enter the following metadata:
- Case number: Versement
- Evidence number: Identifier of the media being imaged
- Unique description: Enter a brief description of the media and/or its annotations (e.g., '3.5" floppy disk labelled "FOA Photos 2002"')
- Examiner: Your name
- Notes: Leave this blank
-
FTK Imager will now ask you for information about where to save the resulting disk image and metadata files. Enter the following and then select 'Finish':
- Image destination folder: Enter the network location of your current work folder in the Catalogers drive.
- Image filename: Enter the disk's identifier with no spaces. Replace any colons (':') with underscores ('_').

- Double-check to make sure that the Image Destination and settings appear correct and then select 'Start' to begin the disk imaging process.

-
A progress window will now appear and keep you informed of how the disk imaging is progressing. If disk imaging fails or seems to get hung up on a large number of bad sectors, make note of this in the versement stabilization spreadsheet and set the disk aside for review by the Digital Archivist.
-
If the image is successfully created, go to your project folder in the Depot numérique folder and do a quick visual check that all looks good. You should see at least two files: the disk image(s) themselves (potentially split into several files with the same file name but extensions of .001, .002, etc.) and a '.txt' metadata file.
-
If all looks good, repeat this process with the next disk until all media has been imaged. Once all media has been imaged, alert the Digital Archivist.
-
Note The FTK Imager disk imaging process is very persistent. If the disk that you want to image is taking a long time to process, it may not necessarily be faulty. The imager will continue to try to image the disks sectors until it is done. It is still possible to extract a usable image from a disk after 30 or more hours of attempts, so keep this in mind.
IsoBuster is a Windows-based proprietary disk imaging tool produced by Smart Projects (managed by Peter Van Hove). At CCA, we use IsoBuster to create disk images for particular types of optical media - mostly DVDs, Audio-CDs, and optical media containing more than 1024MB of data - and as a tool for documenting the current condition of damaged media.
Before moving on to the disk imaging process, make sure you are using the disk-imaging workstation (DSK-065-14) in the CCA Digital Lab. Create a project folder in which you will save your work. Name this folder something memorable and meaningful, such as an accession or an identification number.
Steps for imaging physical media with IsoBuster:
-
Step 1: Prior to creating the disk image, virus scan the media using SentinelOne Antivirus.
- Right click on the file or folder you wish to scan, and select "Scan for threats" in the dropdown menu.
- If there are no viruses, proceed with the next step. If SentinelOne finds viruses, stop, note the virus(es) encountered in the versement stabilization spreadsheet, set the media aside and consult the Digital Archivist.
-
Step 2: Start IsoBuster from the Start Menu and go through the following settings. You may need to change some settings, depending on your needs for your digital preservation project.
- Image File Size - Under the Options menu, go to Image files. Under Image File Creation, uncheck the Split large Image Files to specified size option.
- Cuesheet file - Still under Image files. Under Select when a cuesheet file will be created, select Always after a CD, DVD or BD image is created.
- MD5 Checksum file - Still under Image files, go to Select when an MD5 checksum file will be created and select Always after an image is created.
IsoBuster automatically reads the entire content of the disk and displays a tree view of the repositories and files on the left side column. If not, select the right option drive in the drop-down box below the menu. The message “No media present” shows up if there is no disk mounted to the drive.

The detected media (CD/DVD, floppy disk) shows up at the top of the tree view. Click on the arrow left to the File System Icon (e.g. the green UDF icon named 'board2' in the image below) in order to show the internal structure of the repositories. When you select a repository, its content shows up in the right pane.

- In the left pane, right-click on the Media icon. Under the option , select “RAW (.bin, .iso)”.

- A new window opens up, asking you where you want to save your image file. Select the project folder you have previously created. Title the disk image by entering the disk's identifier without spaces and by replacing any colons with underscores (e.g.: DR2008:0016:346 becomes DR2008_0016_346).
- In the “Save as type” menu, select the .iso extension.

-
Click on “Save”. A new window pops up, showing the progress of the disk image extraction.
-
Once the extraction is done, IsoBuster will create a MD5 Checksum file.
-
Verify disk image's contents
- Once you've created a disk image, open your project folder and make sure you have all the right components. You should have at least three files: the disk image file (.iso), a cuesheet file (.cue) and a checksum file (.md5)
- In order to verify the integrity of the disk image file, go back to IsoBuster and select Open Image File in the “File” toolbar menu. Then double-click on the cuesheet file (.cue) associated with your image file (.iso).
- NOTE: The cue-sheet files (.cue) are commonly used and combined with optical disk image files to have a feel for the track layout of the CD, DVD, BD. Cue-sheet files are in fact text files, for which the actual CD data is always contained in a different file (.bin, .iso,…) So if you open a .cue file with IsoBuster, it will know the track layout of the image but will get the actual data from another file. This file’s name is also contained in the .cue file.
- Verify that the repositories and files are all there, to ensure the integrity of the image file. If there is a red X sign beside some of the files, those files have read errors and might not have been imaged correctly.
- Right-click on the media icon (CD), then in the select “Verify this image file with existing MD5 Checksum file”. The message “The checksum matches with the image file” confirms that the disk image corresponds to the data from the original media.
Audio-CDs don’t contain any data and thus, they have no file system. There’s neither data files nor folders on an Audio-CD, but audio tracks listed on a Table of Content (TOC).
- Follow Steps 1 and 2
- Extract the content of each audio track in an uncompressed WAVE file.
- Right-click on the media icon (CD), then under Extract CD , select “Extract Audio to Wave File (*.wav).
- Once the extraction is completed, make sure the Wave files are in the current working folder and rename it/them using the media’s accession number (e.g. DR2008_0016_264.wav). If you have multiple tracks, add track number at the end of the title (e.g.: DR2008_0016_264_01; DR2008_0016_264_02).
- Flag the Audio-CDs in the versement stabilization spreadsheet.
- Go through Steps 1 and 2.
- Using the File Size adjustment setting, IsoBuster avoids fractioning large image files – like the contents of a DVD – into multiple smaller image files. If you have a DVD or any piece of media containing more than 1024MB of data, you might want to use IsoBuster instead of FTK Imager. The later will fraction any large image file into smaller 1024MB image files.
- In the left side pannel, right-click on the media icon (DVD+R). Under “Extract DVD+R
, select “User Data (.tao, .bin, .iso)”. DVDs only have one type of blocks, that contains user data only (there’s no such thing as a RAW DVD). Under “Extract DVD+R
, the RAW and RAW2User options have been greyed out. Select “User Data (.tao, .bin, .iso)” to start the disk imaging process.
- Enter the path of your current project folder.
- Use the media’s identifier as the image filename, replacing any colons(“:”) with underscores(“_”). (e.g.: DR2008:0016:346 becomes DR2008_0016_346)
- Select the extension .iso in the “Save as type” menu.
- Click on “Save”. A new window will pop-up, showing the progress of the disk image extraction.
- Once the extraction is completed successfully, will create an MD5 Checksum file
- Follow Step 3 to verify the integrity of the disk image file.
- Flag the DVDs in the versement stabilization spreadsheet.
The following guidelines may be useful if you encounter difficulties reading and/or disk imaging media. It will not get you out of trouble, but it can surely help you document the current condition of the digital material you are preserving. Make sure you consult the Digital Archivist prior to accessioning damaged digital media.
- Go through Steps 1 and 2. If the disk you are working with has many bad sectors, you might not be able to complete an antivirus scan
- In the left-side panel, right-click on the Media Icon (CD/DVD+R) and select “Perform a surface scan”.
- After the scan is done, IsoBuster gives you more information on the state of your disk. If everything’s good, the message “No physical errors encountered. Your disc is still in good shape” will show up. Otherwise, IsoBuster generates a report showing you the readability of the disk (in percentage).

- You can launch a more detailed report by right-clicking on the File System Icon > Folder tree and file information > List files with read errors (in Edit Window). Files with read errors are identified by a red X sign in the right-side panel. In the report, note “Files with read errors in [Identification number]:” and save the list in your working folder, using it’s identification number as a filename (e.g.: DR2008_0016_118_ErrorFileList).

- Depending on the results from the two previous analysis, you can either proceed to the extraction of the disk image or identify that the disk cannot be disk imaged in the versement stabilization spreadsheet. Follow Step 3 and 4 to extract disk image.
- Identify the damaged media in the versement stabilization spreadsheet, including as much details as you can about the actual condition of the media. Write the errors logs filenames in the “Note” column of the versement stabilization spreadsheet for further reference.
The FC5025 is a 5.25" floppy controller that plugs into any computer's USB port and enables you to attach a 5.25" floppy drive. It comes with a disk image and browse tool program that allows you to access and create image copies of digital material. There are two ways of using the FC5025 software for disk-imaging: from the GUI or from the command-line. Each of these options has its own pros and cons: the GUI offers an instinctive, easy to use interface, whereas the command-line will allow you to capture the disk-imaging process by sending the standard output and the standard errors to a log file.
Before starting processing, you first need to insert the floppy disk in the FC5025 drive located in the disk-imaging workstation (DSK-065-14) with the correct side up, the front – on which the labels are typically – pointing towards you. The write-protect notch should be on the left of the floppy disk when you place it with the label closer to you. Another way to make sure the disk is inserted correctly is to examine the disk sides and to identify the back side: you should be able to discern the folded portions on the back side of the plastic jacket. Once the disk is inserted, turn the knob clockwise to lock the floppy disk into the drive. The indicator light should turn on to green when the disk is being read in the drive. When the indicator light turns off, you can safely remove the disk from the drive by unlocking it first.
- Once the disk is inserted correctly, start the FC5025 software. A window shows up with four settings to configure: Source Drive, Disk Type, Output Image Directory, and Output Image Filename
- Source Drive: Should always indicate the FC5025 device. There shouldn’t be any other option available at this step.
- Disk Type: Selects the disk format of the disk you are currently reading from the device. If the disk type is not accurate, the disk simply won’t be read correctly or will not read at all. In order to set the disk type, you can select an option from the drop-down menu and test it first. Examine the label first in order to find any information that indicates the disk type. E.g. If you have a 360KB 5.25” floppy disk created in a DOS environment, select 'MS-DOS 360k'.
After selecting the disk type, click on 'Browse Disk Contents'. A new window shows up. If the disk type corresponds, the disk is read correctly and the file listing appears in the dialogue window.

If the disk type does not correspond, a message indicates: “Unable to get file listing!”. Note that this feature is not available for all Disk Types.

- Output Image Directory: Copy the path to the directory which will contain the disk image file.
- Output Image Filename: Select a location and a name that describes best the content you are disk imaging, such as the media's identifier.

- Capture Disk: Click the 'Capture Disk Image File' button to begin operating the drive. Each read error is indicated in the progress display window. If there are multiple errors, they are usually displayed quickly on after the other, with each successive error erasing the one before it. This is one of the main inconveniences of using the GUI for disk-imaging. On the other side, we can keep track of the multiple read errors and keep a record of the disk-imaging process by using the command-line for disk imaging with FC5025. The following guidelines will show us how.

- On the disk-imaging workstation (DSK-065-14), open the command prompt from the Start menu.
- Recording errors: If you need to record the standard output and the standard errors from your processing, you can use the fcimage command to direct both of them to a log file. First, set the command prompt to the path of your project folder. Make sure you are located on the proper server:
cd Users\username\Desktop\ARCH222229
If the software tools were properly installed, you can call the command directly from the command-line. The complete syntax for fcimage to disk image the media while exporting the log in a text file is as follows:
fcimage -f format outputfile 1> logfile 2>&1
Following with our example, the command is :
fcimage -f msdos360 ARCH222229.img 1> ARCH222229.log 2>&1
- Once the command is completed, open your project folder and make sure everything is there. You should have an .img file (your disk image file) and a .log file (the recorded errors).
Note: Elements from the guidelines below have been gathered from the Archivist’s Guide to KryoFlux, a comprehensive resource for practitioners working with born-digital materials in an archival context.
The Kryoflux is a floppy disk controller card developed by the Software Preservation Society for imaging a wide variety of legacy floppies. Its particularity lies in its capacity to capture raw track data by sampling the fluctuation in the bit cells on the platter, enabling the capture of any type of 5.25" or 3.5" floppy disk, despite its format.
- From the BitCurator03 work station, launch the KryoFlux GUI by double-clicking on the file called kryoflux-ui.jar located on the Desktop.
- At the beginning of each imaging session, calibrate the floppy drive by selecting the correct drive from the Drive menu then selecting Calibrate from the same menu. The 5.25" drive corresponds to Drive 0 and the 3.5" drive to Drive 1. You should only need to calibrate the drive once per imaging session and any time you switch between disk drives.

- Configure the KryoFlux GUI to select the output directory for your newly-created disk images and log files. To do so, select File → Settings and click on the Output tab. Browse to the appropriate path to storage. Ensure that the Logs button is checked, and then click OK.
- For each disk, enter a unique identifier. Click on Enter name… and type in a unique ID associated with the disk. The text entered here will become the filename for any disk images and log files created. Do not include the extension of the file name.
- Select the image format(s) for the disk image using the dropdown list below the filename field.

Use the tables below to select the right image format(s). In order to choose multiple outputs, hold down the Control (Ctrl) key while making your selections. In most cases, selecting an image format to obtain a sector image requires that you know something about the media in hand (physical format, system format, density, etc.)
Common Media Types and Image Formats
| Physical Format | System Format | Encoding | Capacity | Image Profile/Format |
|---|---|---|---|---|
| 3.5” double density | Macintosh | GCR | 400 KB; 800 KB | Apple DOS 400K/800K sector image |
| 3.5” double density | PC | MFM | 720 KB | MFM sector image |
| 3.5” high density | Any | MFM | 1440 KB | MFM sector image |
| 5.25” double density | PC | MFM | 320 KB; 360 KB | MFM sector image [40 tracks] |
| 5.25” high density | PC | MFM | 1200 KB | MFM sector image [1.2MB] |
Specifications for Commonly Used Image Profiles
| Profile Name | Start Track | End track | Side Mode | Sector Size | Sector Count | Track Distance | Target RPM |
|---|---|---|---|---|---|---|---|
| MFM sector image [1.2MB] | At least 0 | At most 83 | Both sides | 512 Bytes | Exactly 15 | 80 Tracks | 360 |
| MFM sector image | At least 0 | At most 83 | Both sides | 512 Bytes | Any | 80 Tracks | By image type |
| MFM sector image [40 tracks] | At least 0 | At most 83 | Both sides | 512 Bytes | Any | 40 Tracks | By image type |
| Apple DOS 400K/800K sector image | At least 0 | At most 83 | Both sides | 512 Bytes | Any | 80 Tracks | By image type |
- Once you have everything set up, insert the disk into the appropriate drive and click Start. In the Tracks section of the window, you should see the cells fill progressively with different colours. Here is each colors’ signification:
| Color | Meaning |
|---|---|
| Green | Good: The track was imaged successfully! |
| Orange | Good + modified: The track was imaged successfully but has one or more sectors that were modified after formatting or mastering. |
| Red | Bad: The track was not imaged successfully |
| Grey | Unknown: The Kryoflux software could not determine the status of this track. This may or may not mean that it was read successfully. It could indicate that this track was unformatted or that the wrong format was selected prior to capture. If you are creating only preservation stream files, all sectors will be grey. |
- Once you hear the read head returning to its starting point (0), the disk stops spinning and the drive’s indicator light goes off meaning that the capture is done. A log file will automatically be generated in the directory you selected at step 3.
- To image another disk, go back to step 4 and go on from there. If you switch drive and have not calibrated the other drive, continue from step 3.

The coloured cells show that the chosen Image Profile was not appropriate for the disk. Whenever you see a result pattern alternating between Unknown and Good (+ Modified), you probably have a 40 tracks disk. Retry imaging with the MFM sector image [40 tracks] profile and compare results.
IMPORTANT NOTE: Whenever you notice the presence of mould or fungus on a piece digital media, consult Conservation and the Digital Archivist before capturing the disk image. Mould could spread inside the drive and on the read head and would risk contaminating other disks subsequently. To reduce the risk of contamination, you could use a drive exclusively dedicated to imaging contaminated media. For stubborn disks that appear to have multiple bad sectors and physical damage, here is the procedure:
- In the output formats dropdown list, select the format you believe the disk to be and the Kryoflux stream files, preservation formats. This way you can verify if the disk was read correctly, and perform retries in case of errors. In addition, the raw stream files will act as preservation files if the selected encoding format doesn’t correspond to the format of the disk. They can also be used to output new disk image files in deviceless mode.
- WARNING: Running the drive's head multiple times on the same sector of a disk can create permanent physical damage to the media. Only use this option if data preservation prevails on the media's physical preservation. You can set the number of retries to a larger value if the disk is particularly difficult to read. Each time the head retries to read a sector, it “polishes” it by cutting through intrusive substances, such as dust, fungus and mould. We have set the number of retries to 20 – which is already more significant than the default number of 5 retries – but you could go up to 100. To set the number of retries, go to File > Settings > Output and enter the number of retries you wish to execute in the “Retries” field.
- Follow steps 6 to 8 from the previous section.
- Pay attention: Listen to the sound of the drive and notice any abnormalities. Look at the status in the Kryoflux GUI and note any bad sector or unknown format in your processing spreadsheet.
Instructions in this section were inspired by Dr. Gough's Tech Zone article on Dealing with difficult disks and drives. Please refer to the full article for more details about hardware care and data recovery using the Kryoflux.
Once captured, Kryoflux stream files can be used directly from the GUI to produce encoded image files and avoid running any piece of external hardware. This technique can be useful to process fragile disks that shouldn't be read multiple times to avoid permanent physical damage. It can also be used for processing preservation files at a later time in your workflow. On the down side, Kryoflux streamfiles are proprietary and are much larger in size than the disk image files: their long term rentention is thus not encouraged at the CCA.
Here are the steps to output new encoded image files out of Kryoflux stream files:
- Go to Drive and select Stream Files
- Select the output destination.
- For each disk, enter a unique identifier. Click on Enter name… and type in a unique ID associated with the disk. The text entered here will become the filename for any disk images and log files created. Do not include the extension of the file name.
- Select the image format(s) for the disk image using the dropdown list below the filename field.
- Click on Start and select the folder containing the stream files you want to process. Click on Open and the disk image file creation will start right away. The results will show up in the cells of the GUI, as usual.
The Nimbie is an autoloader device that is used to read, write, and disk image many CDs or DVDs at a time with minimal user input. Please read the Nimbie operation manual to learn how to set up the Nimbie unit. The software that can be used in conjunction with the Nimbie is ImgBurn. To create disk images using the Nimbie and ImgBurn, you will need the following:
- Windows XP/Vista/ 7 or Apple OS X 10.6 / 10.7 (for QQGetTray only)
- 1 GB RAM or higher
- USB port 3.0 (backward compatible with USB 2.0)
- ImgBurn version 2.5.8.0 (including BSRobots Upgrade pack) or later
- Nimbie USB Plus unit with proper drivers installed
How To Set Up The Nimbie For Disk Imaging
- Make sure that the Nimbie unit is plugged into a wall outlet and the USB cord is connected to the computer.
- Secure the finished disk bin in front of the unit. When the Nimbie finishes processing a disc, it will eject it out of the front slot into the disk bin. If the Nimbie cannot process a disk (due to dirt or a scratched disk, among other possibilities), the disk will be ejected out of the bottom of the unit. Make sure that there is nothing underneath the unit for ample space for rejected discs.
- Open the lid of the unit. There are 4 LED lights at the front of the machine that tell you its status. There is a pictorial guide on the inside of the lid that tells you what the light configurations mean.
- Insert discs into the machine, label side facing up. The Nimbie can handle 20 discs at a time, unless you attach the 3 included extender rods, in which case the Nimbie can process up to 100 discs.
The rods screw in in three places in the lip under the lid, and are meant to hold the lid open and keep the stack of discs from toppling. If you do wish to process many discs at a time, it is necessary to prop the Nimbie up at least 96 mm high to account for the disks once the Nimbie is finished processing them. Once the discs are in the Nimbie, the unit is then set up for disk imaging.
Warning: While the manual mentions that the Nimbie can process up to 100 disks per batch, it makes no mention that the user needs to also ensure that their setup can safely handle the high volume of disks being ejected from the Nimbie unit in the process. Failure to do so can lead to the ejected, processed disks piling up and falling over, possibly damaging the disks.
How to Set Up ImgBurn to work with Nimbie USB Plus
- Connect the Nimbie USB to the PC and switch it on.
- Make sure the autoloader drivers are installed properly.
- Download and install ImgBurn.
- Download the BSRobots Upgrade Pack and extract the files to where you installed ImgBurn (i.e. C:\Program Files\ImgBurn).
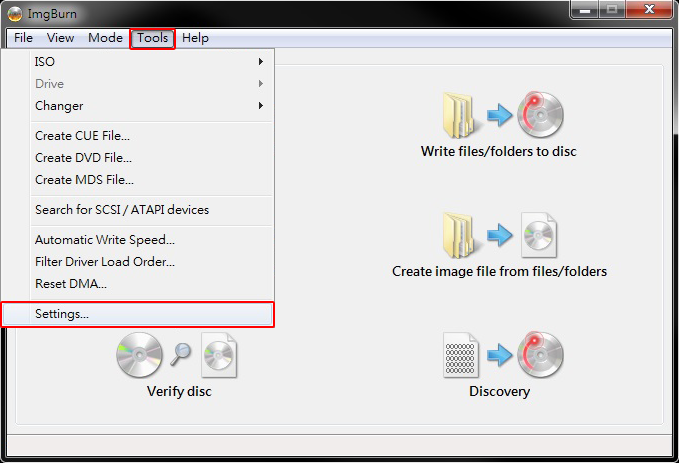
- Run ImgBurn, go to Tools > Settings
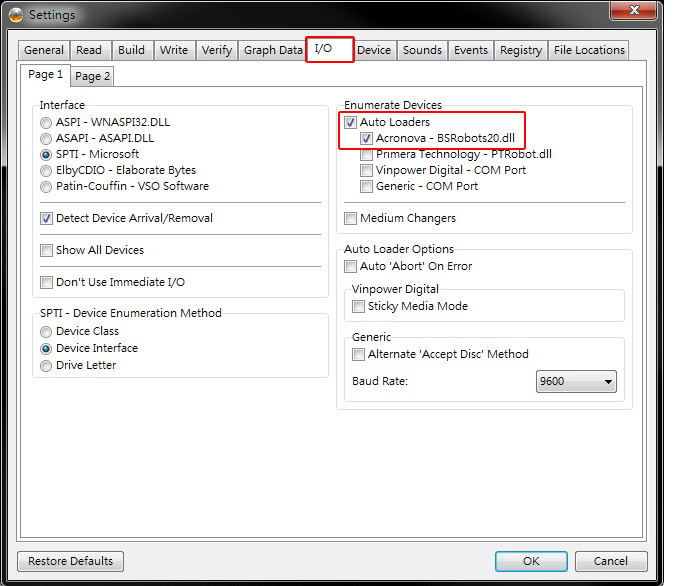
- Go to I/O. Under Enumerate Devices, check Auto Loaders and Acronova - BSRobots20.dll.
- Click OK to close the Settings window, and close ImgBurn to finish the installation.
(These instructions were taken from here)
To create disk images from CDs and DVDs
- Make sure that the Nimbie is connected and turned on
- Start ImgBurn and wait until the autoloader finished its robotic initiation.
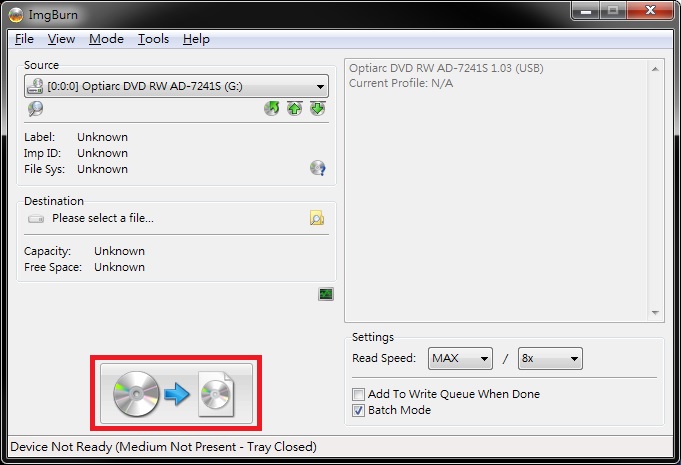
- Select the Create image file from disc
- Check Batch Mode
- Click on the icon to begin disc loading.
- Once the first disc is loaded, ImgBurn would ask user to set the destination folder for storing ISOs. (The prompt would only appear for the first disc.)
- All discs will be processed one by one until the loader is empty.


If you want ImgBurn to create checksum files for each disk image made
- Go to Tools>settings
- Within tools, go to the “Read” tab
- Select “Create MD5 File”
If you want to see the log file of what you have been disk imaging
ImgBurn automatically generates a log file that lists all of the actions that it has recently performed. To view this file, you can go to View and click Log. This will bring up the log file in a separate window. To save this file, go to File and click Save As.
You can find a full rundown of ImgBurn’s settings here
(These instructions were taken from here)
-
Issue: An issue that I found when using the Nimbie is that not all CDs that were disk imaged yielded .iso files like I wanted. Instead, ImgBurn sometimes gave .bin files. Apparently, this is caused by the type of sector mode that the CD uses to store data. CD’s using Mode 1 will yield .iso image files, while CDs using Mode 2/type 1 will yield .bin files.
- Solution: The best solution that I could find, found here was to simply change the file extension in file explorer from “filename.bin” to “filename.iso”. This seemed to have no effect on the image file, as I was still able to extract files from the image file without issue.
-
Issue: The Nimbie autoloader device does not show up as a usable drive in ImgBurn
- Solution:
There are a few possible causes for this, as this has happened in the lab several times. Here are the solutions that I used:
- Change the cable connecting the Nimbie to the computer. The required cable is USB 2.0 type-B to USB 2.0 or 3.0 Type-A
- Re-install the device drivers (requires admin priviledges)
- Double check that the driver is installed in the proper location, which is the location where ImgBurn is installed (i.e. C:\Program Files\ImgBurn)
- Solution:
There are a few possible causes for this, as this has happened in the lab several times. Here are the solutions that I used:
-
Issue: The CD doesn't show up on the Bitcurators
- Solution: Try ejecting and re-inserting the CD. The CD sometimes doesn't show up if the virus program (Clam TK) is open already.
-
Issue: After using Disk Image Processor or Folder Processor, the logical folder name seems off (e.g. characters or syntax not like other material, abbreviations)
- Solution: Try mounting the disk image and compare the folder titles. If there is a discrepancy copy the folder from the mounted disk image into your SIP.